
User Manual
Page 7
Air Inlet 6. Upper Drain 9. Remote Control Cradle 5. Air Outlet 2. RESET: AFTER SOLVING THE PROBLEM, PRESS THE RESET BUTTON TO RESUME OPERATION. 6 Power Supply Cord 10. Lower Drain (Note : Please ensure if the water outlet drain is well installed before use.) POWER SUPPLY CORD 2 • 0 6 7 8 9 10 3 5 TEST: WHEN THIS BUTTON IS PRESSED OR WHEN THERE IS A CURRENT LEAK, THE UNIT WILL NOT OPERATE. Control Panel 3. Air Filter 8. Casters 7. Handle 4. Parts and Features English MI 1.
Air Inlet 6. Upper Drain 9. Remote Control Cradle 5. Air Outlet 2. RESET: AFTER SOLVING THE PROBLEM, PRESS THE RESET BUTTON TO RESUME OPERATION. 6 Power Supply Cord 10. Lower Drain (Note : Please ensure if the water outlet drain is well installed before use.) POWER SUPPLY CORD 2 • 0 6 7 8 9 10 3 5 TEST: WHEN THIS BUTTON IS PRESSED OR WHEN THERE IS A CURRENT LEAK, THE UNIT WILL NOT OPERATE. Control Panel 3. Air Filter 8. Casters 7. Handle 4. Parts and Features English MI 1.
User Manual
Page 10
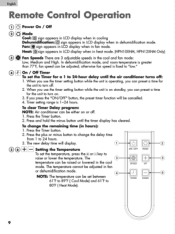
...: Low, Medium and High. The temperature cannot be adjusted in the cool mode. Heat: sign appears in LCD display when in heat mode. (HPN10XHM, HPN12XHM Only) D el, Fan Speeds There are 3 adjustable speeds in fan mode. If you use the timer setting button while the unit is 1-24 hours.... To change the delay time from 1 to raise or lower the temperature. English Remote Control Operation 0 0 Power On / Off O Lc) Mode Cool: sign appears in LCD display when in cooling Dehumidification: cd sign appears in LCD display...
...: Low, Medium and High. The temperature cannot be adjusted in the cool mode. Heat: sign appears in LCD display when in heat mode. (HPN10XHM, HPN12XHM Only) D el, Fan Speeds There are 3 adjustable speeds in fan mode. If you use the timer setting button while the unit is 1-24 hours.... To change the delay time from 1 to raise or lower the temperature. English Remote Control Operation 0 0 Power On / Off O Lc) Mode Cool: sign appears in LCD display when in cooling Dehumidification: cd sign appears in LCD display...


