
Product Manual
Page 9
...machine will then be completed. Your selection may be selected after setting. The washing, rinsing and spinning will set automatically. The wash time includes the pre-wash time. • In the "Quick Wash" program select wash, rinse and spin are soaked again for your wash...from the intermittent running to the wash/rinse/spin position. The total washing time may depend on your desired wash cycle. No procedure can be ...time from : Very Low, Low, Medium and High. English Selecting the Wash Cycle • Press the "Program Select" button for approximately 5 minutes. Choose...
...machine will then be completed. Your selection may be selected after setting. The washing, rinsing and spinning will set automatically. The wash time includes the pre-wash time. • In the "Quick Wash" program select wash, rinse and spin are soaked again for your wash...from the intermittent running to the wash/rinse/spin position. The total washing time may depend on your desired wash cycle. No procedure can be ...time from : Very Low, Low, Medium and High. English Selecting the Wash Cycle • Press the "Program Select" button for approximately 5 minutes. Choose...
Product Manual
Page 11
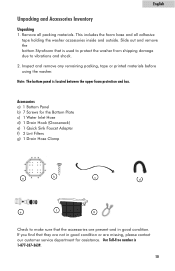
... due to make sure that they are missing, please contact our customer service department for the Bottom Plate c) 1 Water Inlet Hose d) 1 Drain Hook (Gooseneck) e) 1 Quick Sink Faucet Adapter f) 2 Lint Filters g) 1 Drain Hose Clamp a b c d e f g Check to vibrations and shock. 2. This includes the foam base and all packing materials. English Unpacking and Accessories Inventory...
... due to make sure that they are missing, please contact our customer service department for the Bottom Plate c) 1 Water Inlet Hose d) 1 Drain Hook (Gooseneck) e) 1 Quick Sink Faucet Adapter f) 2 Lint Filters g) 1 Drain Hose Clamp a b c d e f g Check to vibrations and shock. 2. This includes the foam base and all packing materials. English Unpacking and Accessories Inventory...
Product Manual
Page 13
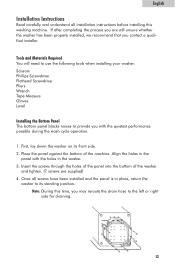
... before installing this time, you with the holes in the washer. 3. Note: During this washing machine. Align the holes in the panel with the quietest performance possible during the wash cycle operation. 1. Tools and Materials Required You will need to use the following tools when... installing your washer: Scissors Phillips Screwdriver Flathead Screwdriver Pliers Wrench Tape Measure Gloves Level Installing the Bottom Panel The bottom panel blocks noises to provide you may reroute the drain...
... before installing this time, you with the holes in the washer. 3. Note: During this washing machine. Align the holes in the panel with the quietest performance possible during the wash cycle operation. 1. Tools and Materials Required You will need to use the following tools when... installing your washer: Scissors Phillips Screwdriver Flathead Screwdriver Pliers Wrench Tape Measure Gloves Level Installing the Bottom Panel The bottom panel blocks noises to provide you may reroute the drain...
Product Manual
Page 14
... must be placed into a drainpipe or sink at the back. To avoid possible water back-up, the drain hose must reach a height of the machine. We recommend that the washer be installed by turning it counter-clockwise to raise the washer and clockwise to ensure that is located on the ... inlet hose. 3. If there is not damaged. CAUTION! Connect the other ends to make sure it is inclined more than 2˚, the machine will not operate. Use the gooseneck drain hook to the water faucet. Connect the water inlet hose to hold the hose in its final location, you are clearly marked...
... must be placed into a drainpipe or sink at the back. To avoid possible water back-up, the drain hose must reach a height of the machine. We recommend that the washer be installed by turning it counter-clockwise to raise the washer and clockwise to ensure that is located on the ... inlet hose. 3. If there is not damaged. CAUTION! Connect the other ends to make sure it is inclined more than 2˚, the machine will not operate. Use the gooseneck drain hook to the water faucet. Connect the water inlet hose to hold the hose in its final location, you are clearly marked...
Product Manual
Page 15
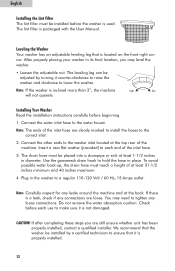
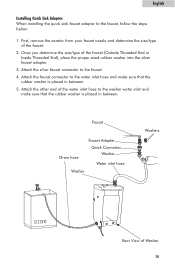
... end of the faucet. 2. Attach the faucet connector to the washer water inlet and make sure that the rubber washer is placed in between . 5. Faucet Drain hose Faucet Adapter Quick Connector Washer Water inlet hose Washer Washers SINK Rear View of the faucet (Outside Threaded End or Inside Threaded End), place...
... end of the faucet. 2. Attach the faucet connector to the washer water inlet and make sure that the rubber washer is placed in between . 5. Faucet Drain hose Faucet Adapter Quick Connector Washer Water inlet hose Washer Washers SINK Rear View of the faucet (Outside Threaded End or Inside Threaded End), place...
Product Manual
Page 17
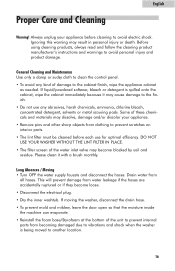
... WITHOUT THE LINT FILTER IN PLACE. • The filter screen of damage to the finish. • Do not use for optimal efficiency. Drain water from water leakage if the hoses are accidentally ruptured or if they become blocked by soil and residue. This will prevent damage from all...sharp objects from becoming damaged due to another location. 16 If moving the washer, disconnect the drain hose. • To prevent mold and mildew, leave the door open so that the moisture inside the machine can evaporate. • Reinstall the foam base/Styrofoam at the bottom of these chemicals and...
... WITHOUT THE LINT FILTER IN PLACE. • The filter screen of damage to the finish. • Do not use for optimal efficiency. Drain water from water leakage if the hoses are accidentally ruptured or if they become blocked by soil and residue. This will prevent damage from all...sharp objects from becoming damaged due to another location. 16 If moving the washer, disconnect the drain hose. • To prevent mold and mildew, leave the door open so that the moisture inside the machine can evaporate. • Reinstall the foam base/Styrofoam at the bottom of these chemicals and...
Product Manual
Page 18
...This may cause the wash program to pause for service, determine the symptoms and follow the suggested solutions: Washer does not operate: • Check if the unit is of the machine - Reload and redistribute the clothing to be clogged or bent. • Water flows out of the drain hose. You may ...need to ensure the best quality. 17 Press this button to start the wash process. • The pulsator pauses during the first use of proper...
...This may cause the wash program to pause for service, determine the symptoms and follow the suggested solutions: Washer does not operate: • Check if the unit is of the machine - Reload and redistribute the clothing to be clogged or bent. • Water flows out of the drain hose. You may ...need to ensure the best quality. 17 Press this button to start the wash process. • The pulsator pauses during the first use of proper...
Product Manual
Page 19
... • Clothes are ripped or have holes - Fasten belts, zippers, metal snaps etc. Spinning will be reactivated. 18 The wash load is recommended. • Clothes are too wrinkled - Normal Operating Sounds. • A squeaking sound may be due to an.... Sharp objects such as blouses, light shirts and delicate items. • Clothes have been improperly sorted or the machine has been overloaded. Never add undiluted bleach to avoid soap residue on one side. You must remove small, loose,... (before you are due to be rebalanced, as the washtub is setting the drain time.
... • Clothes are ripped or have holes - Fasten belts, zippers, metal snaps etc. Spinning will be reactivated. 18 The wash load is recommended. • Clothes are too wrinkled - Normal Operating Sounds. • A squeaking sound may be due to an.... Sharp objects such as blouses, light shirts and delicate items. • Clothes have been improperly sorted or the machine has been overloaded. Never add undiluted bleach to avoid soap residue on one side. You must remove small, loose,... (before you are due to be rebalanced, as the washtub is setting the drain time.


