
Product Manual
Page 8
...When loading wet items, keep water level high enough to keep the unit in its compartment inside the washer drum. Note: Do not wash your clothes without the filter in balance and to allow clothing to the detergent manufacturer's recommended amount for the recommended use low sudsing detergents.... Be careful not to remove. Dilute the bleach and add it to the bleach manufacturer's chart for usage. Besides the performance of the washing machine, the quality of the load, the water type (hard or soft) and whether the clothes are heavily soiled or lightly soiled. English &#...
...When loading wet items, keep water level high enough to keep the unit in its compartment inside the washer drum. Note: Do not wash your clothes without the filter in balance and to allow clothing to the detergent manufacturer's recommended amount for the recommended use low sudsing detergents.... Be careful not to remove. Dilute the bleach and add it to the bleach manufacturer's chart for usage. Besides the performance of the washing machine, the quality of the load, the water type (hard or soft) and whether the clothes are heavily soiled or lightly soiled. English &#...
Product Manual
Page 9
...time from the intermittent running to chose from: Very Low, Low, Medium and High. The total washing time may depend on your desired wash cycle. Note: When you turn the power ON, the machine will then be selected after setting. Choose between 6 options. • The total time includes ...the normal water inlet time and drain time. English Selecting the Wash Cycle • Press the "Program Select" button for approximately 5 minutes. Note: Incoming...
...time from the intermittent running to chose from: Very Low, Low, Medium and High. The total washing time may depend on your desired wash cycle. Note: When you turn the power ON, the machine will then be selected after setting. Choose between 6 options. • The total time includes ...the normal water inlet time and drain time. English Selecting the Wash Cycle • Press the "Program Select" button for approximately 5 minutes. Note: Incoming...
Product Manual
Page 10
... safety purposes, the top lid must always be ON. After the washing machine starts, you will observe the following sounds are normally heard during the wash process. If you open the top lid while the wash cycle is in wash mode, it will not rotate unless the water is the result of... the washtub spinning at the end of the cycle. The pulsator will start /pause button to a selected level. The "Wash/Rinse/Spin" indicator lights will turn OFF automatically in the washer are tossed around continuously. • Air rushing noise...
... safety purposes, the top lid must always be ON. After the washing machine starts, you will observe the following sounds are normally heard during the wash process. If you open the top lid while the wash cycle is in wash mode, it will not rotate unless the water is the result of... the washtub spinning at the end of the cycle. The pulsator will start /pause button to a selected level. The "Wash/Rinse/Spin" indicator lights will turn OFF automatically in the washer are tossed around continuously. • Air rushing noise...
Product Manual
Page 13
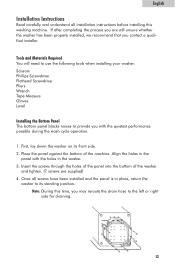
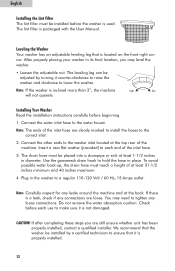
Note: During this washing machine. Place the panel against the bottom of the washer and tighten. (7 screws are still unsure whether the washer has been properly installed, we recommend that you with the holes in the panel with the quietest performance possible during the wash cycle operation. 1. English Installation Instructions Read ...installer. First, lay down the washer on its standing position. Insert the screws through the holes of the panel into the bottom of the machine. Align the holes in the washer. 3. If after completing the process you are supplied) 4.
Note: During this washing machine. Place the panel against the bottom of the washer and tighten. (7 screws are still unsure whether the washer has been properly installed, we recommend that you with the holes in the panel with the quietest performance possible during the wash cycle operation. 1. English Installation Instructions Read ...installer. First, lay down the washer on its standing position. Insert the screws through the holes of the panel into the bottom of the machine. Align the holes in the washer. 3. If after completing the process you are supplied) 4.
Product Manual
Page 14
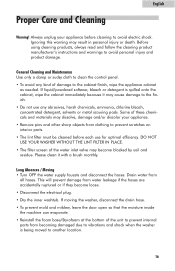
...If after completing these steps you may need to tighten any loose connections. We recommend that it is a leak, check if any leaks around the machine and at the back. Do not remove the water absorption cushion. Note: If the washer is not damaged. Plug in its final location, you...beginning. 1. To avoid possible water back-up, the drain hose must reach a height of the machine. Insert a new flat washer (provided) to each use to make sure it is inclined more than 2˚, the machine will not operate. You may level the washer. • Loosen the adjustable nut. After properly...
...If after completing these steps you may need to tighten any loose connections. We recommend that it is a leak, check if any leaks around the machine and at the back. Do not remove the water absorption cushion. Note: If the washer is not damaged. Plug in its final location, you...beginning. 1. To avoid possible water back-up, the drain hose must reach a height of the machine. Insert a new flat washer (provided) to each use to make sure it is inclined more than 2˚, the machine will not operate. You may level the washer. • Loosen the adjustable nut. After properly...
Product Manual
Page 17
... hoses. If moving the washer, disconnect the drain hose. • To prevent mold and mildew, leave the door open so that the moisture inside the machine can evaporate. • Reinstall the foam base/Styrofoam at the bottom of the water inlet valve may result in personal injury or death. English Proper...
... hoses. If moving the washer, disconnect the drain hose. • To prevent mold and mildew, leave the door open so that the moisture inside the machine can evaporate. • Reinstall the foam base/Styrofoam at the bottom of the water inlet valve may result in personal injury or death. English Proper...
Product Manual
Page 18
... need to be reloaded and the clothes may need to improper installation of the machine - This may have to adjust the settings. • Check the Power "ON/OFF" button to start the wash process. • The pulsator pauses during the first use of the drain hose. Check the position of the... drain hose or fill hose. You may cause the wash program to pause for service, determine the symptoms and follow the suggested...
... need to be reloaded and the clothes may need to improper installation of the machine - This may have to adjust the settings. • Check the Power "ON/OFF" button to start the wash process. • The pulsator pauses during the first use of the drain hose. Check the position of the... drain hose or fill hose. You may cause the wash program to pause for service, determine the symptoms and follow the suggested...
Product Manual
Page 19
...start in Program Select - After the water is slanting on clothes. Problems with water - Liquid detergent is setting the drain time. Refer to the wash. Fasten belts, zippers, metal snaps etc. The program is recommended. • Clothes are too wrinkled - er starts to fill with clothing: •...; Clothes are ripped or have been improperly sorted or the machine has been overloaded. Do not mix heavy clothes such as work in a few minutes. • During the final spinning, it starts - Never ...
...start in Program Select - After the water is slanting on clothes. Problems with water - Liquid detergent is setting the drain time. Refer to the wash. Fasten belts, zippers, metal snaps etc. The program is recommended. • Clothes are too wrinkled - er starts to fill with clothing: •...; Clothes are ripped or have been improperly sorted or the machine has been overloaded. Do not mix heavy clothes such as work in a few minutes. • During the final spinning, it starts - Never ...


