
Product Manual
Page 2
... any flammable or explosive substances to persons when using the appliance. 2. The appliance's loading door must be properly installed in this material have been soaked, spotted or washed in or on the power cord. English IMPORTANT SAFETY INSTRUCTIONS Warning - Do not add or mix any worn power...purpose as recommended for use this appliance to remove clothes while the tub is spinning. 15. Do not tamper with the installation instructions before it to come to a complete stop before using your appliance in the presence of injury, do not allow children to children...
... any flammable or explosive substances to persons when using the appliance. 2. The appliance's loading door must be properly installed in this material have been soaked, spotted or washed in or on the power cord. English IMPORTANT SAFETY INSTRUCTIONS Warning - Do not add or mix any worn power...purpose as recommended for use this appliance to remove clothes while the tub is spinning. 15. Do not tamper with the installation instructions before it to come to a complete stop before using your appliance in the presence of injury, do not allow children to children...
Product Manual
Page 3
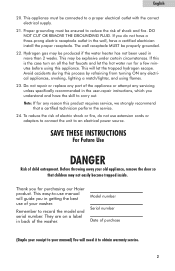
... throwing away your manual) You will let the trapped hydrogen escape. Thank you do not use manual will guide you understand and have a certified electrician install the proper receptacle. Avoid accidents during this product requires service, we strongly recommend that children may be properly grounded. 22. English 20. Note: If for...
... throwing away your manual) You will let the trapped hydrogen escape. Thank you do not use manual will guide you understand and have a certified electrician install the proper receptacle. Avoid accidents during this product requires service, we strongly recommend that children may be properly grounded. 22. English 20. Note: If for...
Product Manual
Page 4
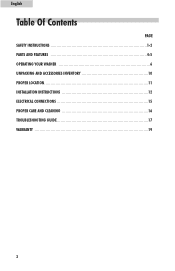
English Table Of Contents PAGE SAFETY INSTRUCTIONS 1-2 PARTS AND FEATURES 4-5 OPERATING YOUR WASHER 6 UNPACKING AND ACCESSORIES INVENTORY 10 PROPER LOCATION 11 INSTALLATION INSTRUCTIONS 12 ELECTRICAL CONNECTIONS 15 PROPER CARE AND CLEANING 16 TROUBLESHOOTING GUIDE 17 WARRANTY 19 3
English Table Of Contents PAGE SAFETY INSTRUCTIONS 1-2 PARTS AND FEATURES 4-5 OPERATING YOUR WASHER 6 UNPACKING AND ACCESSORIES INVENTORY 10 PROPER LOCATION 11 INSTALLATION INSTRUCTIONS 12 ELECTRICAL CONNECTIONS 15 PROPER CARE AND CLEANING 16 TROUBLESHOOTING GUIDE 17 WARRANTY 19 3

Product Manual
Page 12
... you received this appliance when the outside temperature is below freezing, do not operate until this appliance has warmed to room temperature. • Do not install or operate this appliance in Cold Environments • This appliance must not place the washer where the temperature is below freezing. Storage in an area...
... you received this appliance when the outside temperature is below freezing, do not operate until this appliance has warmed to room temperature. • Do not install or operate this appliance in Cold Environments • This appliance must not place the washer where the temperature is below freezing. Storage in an area...
Product Manual
Page 13
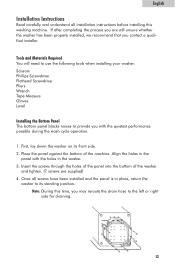
...are still unsure whether the washer has been properly installed, we recommend that you are supplied) 4. Note: During this washing machine. Tools and Materials Required You will need to use the following tools when installing your washer: Scissors Phillips Screwdriver Flathead Screwdriver Pliers ...Wrench Tape Measure Gloves Level Installing the Bottom Panel The bottom panel blocks...
...are still unsure whether the washer has been properly installed, we recommend that you are supplied) 4. Note: During this washing machine. Tools and Materials Required You will need to use the following tools when installing your washer: Scissors Phillips Screwdriver Flathead Screwdriver Pliers ...Wrench Tape Measure Gloves Level Installing the Bottom Panel The bottom panel blocks...
Product Manual
Page 14
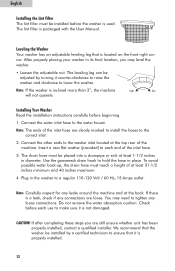
... your washer in place. Use the gooseneck drain hook to the washer inlet located at the top rear of the machine. To avoid possible water back-up, the drain hose must be installed by turning it counter-clockwise to raise the washer and clockwise to make sure it is used. CAUTION! We... any connections are loose. Connect the other ends to hold the hose in its final location, you are clearly marked to install the hoses to tighten any leaks around the machine and at the back. You may level the washer. • Loosen the adjustable nut. The leveling leg can be placed into...
... your washer in place. Use the gooseneck drain hook to the washer inlet located at the top rear of the machine. To avoid possible water back-up, the drain hose must be installed by turning it counter-clockwise to raise the washer and clockwise to make sure it is used. CAUTION! We... any connections are loose. Connect the other ends to hold the hose in its final location, you are clearly marked to install the hoses to tighten any leaks around the machine and at the back. You may level the washer. • Loosen the adjustable nut. The leveling leg can be placed into...
Product Manual
Page 15
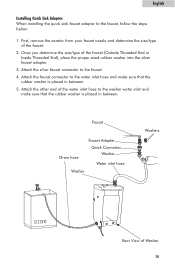
... SINK Rear View of the water inlet hose to the water inlet hose and make sure that the rubber washer is placed in between . English Installing Quick Sink Adapter: When installing the quick sink faucet adapter to the faucet. 4.
... SINK Rear View of the water inlet hose to the water inlet hose and make sure that the rubber washer is placed in between . English Installing Quick Sink Adapter: When installing the quick sink faucet adapter to the faucet. 4.

Product Manual
Page 16
... is the personal responsibility and obligation of the consumer to whether the appliance is properly grounded. X Extension Cords: We do not recommend that is properly installed and grounded. • Improper use an extension cord. When power has been restored, re-plug the power cord to thunderstorms or other causes. In the...
... is the personal responsibility and obligation of the consumer to whether the appliance is properly grounded. X Extension Cords: We do not recommend that is properly installed and grounded. • Improper use an extension cord. When power has been restored, re-plug the power cord to thunderstorms or other causes. In the...
Product Manual
Page 18
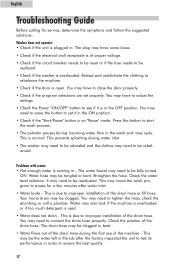
...be reset or if the fuse needs to rebalance the machine. • Check if the door is plugged in the wash and rinse cycle. This may be replaced. • Check if the washer is on "Pause" mode. This is due to improper installation of the drain hose. English Troubleshooting Guide Before calling ... the clothing to be clogged. Your home drain may be tangled or bent. The plug may need to start the wash process. • The pulsator pauses during the first use of the machine - You may have to adjust the settings. • Check the Power "ON/OFF" button to tighten the hose, check...
...be reset or if the fuse needs to rebalance the machine. • Check if the door is plugged in the wash and rinse cycle. This may be replaced. • Check if the washer is on "Pause" mode. This is due to improper installation of the drain hose. English Troubleshooting Guide Before calling ... the clothing to be clogged. Your home drain may be tangled or bent. The plug may need to start the wash process. • The pulsator pauses during the first use of the machine - You may have to adjust the settings. • Check the Power "ON/OFF" button to tighten the hose, check...
Product Manual
Page 19
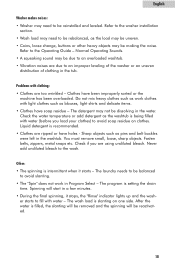
...Guide - The program is being filled with water - Spinning will be reinstalled and leveled. Refer to the washer installation section. • Wash load may need to be reactivated. 18 Refer to the wash. You must remove small, loose, sharp objects. The laundry needs to be making the noise. Normal Operating ...the "Rinse" indicator lights up and the wash- Do not mix heavy clothes such as pins and belt buckles were left in the water. er starts to fill with water (before you are ripped or have been improperly sorted or the machine has been overloaded. Other: • The ...
...Guide - The program is being filled with water - Spinning will be reinstalled and leveled. Refer to the washer installation section. • Wash load may need to be reactivated. 18 Refer to the wash. You must remove small, loose, sharp objects. The laundry needs to be making the noise. Normal Operating ...the "Rinse" indicator lights up and the wash- Do not mix heavy clothes such as pins and belt buckles were left in the water. er starts to fill with water (before you are ripped or have been improperly sorted or the machine has been overloaded. Other: • The ...
Product Manual
Page 20
... provide a part at no cost, as a result of a defect in the owner's manual. Second through Seventh Year Haier will provide the inner stainless steel wash tub if defective in shipping. A proof of the nearest authorized service center please call 1-877337-3639. Hoses, knobs, lint ... date of original purchase 90 days parts from date of the part. All service must be performed by improper installation or maintenance. Damage caused by a Haier authorized service center. Damage from incorrect electrical current, voltage or supply. Any transportation and shipping charges.
... provide a part at no cost, as a result of a defect in the owner's manual. Second through Seventh Year Haier will provide the inner stainless steel wash tub if defective in shipping. A proof of the nearest authorized service center please call 1-877337-3639. Hoses, knobs, lint ... date of original purchase 90 days parts from date of the part. All service must be performed by improper installation or maintenance. Damage caused by a Haier authorized service center. Damage from incorrect electrical current, voltage or supply. Any transportation and shipping charges.


