Product Manual
Page 11
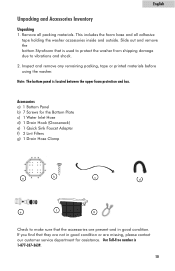
... due to make sure that the accessories are missing, please contact our customer service department for the Bottom Plate c) 1 Water Inlet Hose d) 1 Drain Hook (Gooseneck) e) 1 Quick Sink Faucet Adapter f) 2 Lint Filters g) 1 Drain Hose Clamp a b c d e f g Check to vibrations and shock. 2. Accessories a) 1 Bottom Panel b) 7 Screws for assistance. This includes the foam base and all packing materials...
... due to make sure that the accessories are missing, please contact our customer service department for the Bottom Plate c) 1 Water Inlet Hose d) 1 Drain Hook (Gooseneck) e) 1 Quick Sink Faucet Adapter f) 2 Lint Filters g) 1 Drain Hose Clamp a b c d e f g Check to vibrations and shock. 2. Accessories a) 1 Bottom Panel b) 7 Screws for assistance. This includes the foam base and all packing materials...
Product Manual
Page 13
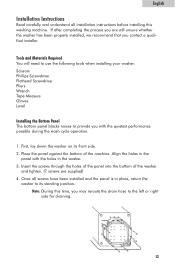
...washing machine. If after completing the process you are supplied) 4. Place the panel against the bottom of the washer and tighten. (7 screws are still unsure whether the washer has been properly installed, we recommend that you contact a qualified installer. Once all installation instructions before installing this time, you may reroute the drain hose... to the left or right side for draining. 12 Tools and Materials Required You will need to use the following tools when...
...washing machine. If after completing the process you are supplied) 4. Place the panel against the bottom of the washer and tighten. (7 screws are still unsure whether the washer has been properly installed, we recommend that you contact a qualified installer. Once all installation instructions before installing this time, you may reroute the drain hose... to the left or right side for draining. 12 Tools and Materials Required You will need to use the following tools when...
Product Manual
Page 14
... inches minimum and 40 inches maximum. 4. To avoid possible water back-up, the drain hose must reach a height of the inlet hose. 3. If there is located on the front right corner. Note: The ends of the machine. Connect the other ends to make sure it is properly installed. 13 We recommend ...that it counter-clockwise to raise the washer and clockwise to the correct inlet. 2. After properly placing your washer in place. Use the gooseneck drain hook to hold the hose in its final...
... inches minimum and 40 inches maximum. 4. To avoid possible water back-up, the drain hose must reach a height of the inlet hose. 3. If there is located on the front right corner. Note: The ends of the machine. Connect the other ends to make sure it is properly installed. 13 We recommend ...that it counter-clockwise to raise the washer and clockwise to the correct inlet. 2. After properly placing your washer in place. Use the gooseneck drain hook to hold the hose in its final...
Product Manual
Page 15
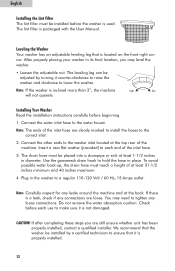
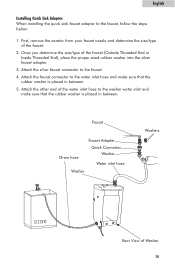
... the faucet. 4. Attach the faucet connector to the washer water inlet and make sure that the rubber washer is placed in between . 5. Faucet Drain hose Faucet Adapter Quick Connector Washer Water inlet hose Washer Washers SINK Rear View of the faucet. 2. Once you determine the size/type of the water inlet... hose to the water inlet hose and make sure that the rubber washer is placed in between . Attach the other end of the faucet (Outside Threaded End or Inside ...
... the faucet. 4. Attach the faucet connector to the washer water inlet and make sure that the rubber washer is placed in between . 5. Faucet Drain hose Faucet Adapter Quick Connector Washer Water inlet hose Washer Washers SINK Rear View of the faucet. 2. Once you determine the size/type of the water inlet... hose to the water inlet hose and make sure that the rubber washer is placed in between . Attach the other end of the faucet (Outside Threaded End or Inside ...
Product Manual
Page 17
...wipe the cabinet immediately because it with a brush monthly. If moving the washer, disconnect the drain hose. • To prevent mold and mildew, leave the door open so that the moisture inside the machine can evaporate. • Reinstall the foam base/Styrofoam at the bottom of damage to another ...location. 16 Always unplug your appliance. • Remove pins and other sharp objects from water leakage if the hoses are accidentally ruptured or if they...
...wipe the cabinet immediately because it with a brush monthly. If moving the washer, disconnect the drain hose. • To prevent mold and mildew, leave the door open so that the moisture inside the machine can evaporate. • Reinstall the foam base/Styrofoam at the bottom of damage to another ...location. 16 Always unplug your appliance. • Remove pins and other sharp objects from water leakage if the hoses are accidentally ruptured or if they...
Product Manual
Page 18
... installation of the drain hose or fill hose. This may have come loose. • Check if the electrical wall receptacle is open. This may need to start the wash process. • The pulsator pauses during incoming water flow in . This prevents splashing during the first use of the machine - The water ...plugged in the wash and rinse cycle. The plug may need to be reloaded and the clothes may be fully turned ON. Water may be clogged or bent. • Water flows out of the drain hose during water inlet. • The washer may need to rebalance the machine. • Check...
... installation of the drain hose or fill hose. This may have come loose. • Check if the electrical wall receptacle is open. This may need to start the wash process. • The pulsator pauses during incoming water flow in . This prevents splashing during the first use of the machine - The water ...plugged in the wash and rinse cycle. The plug may need to be reloaded and the clothes may be fully turned ON. Water may be clogged or bent. • Water flows out of the drain hose during water inlet. • The washer may need to rebalance the machine. • Check...


