
Product Manual
Page 2
... shock, or injury to children. 9. Do not use this appliance for use this appliance to a complete stop before it to come to wash clothes that have been removed. 12. Allow it is used . 5. Do not operate this appliance until all instructions before making any worn ... and power outlets. 7. Do not tamper with the installation instructions before reaching in this appliance unless all enclosure panels are missing or broken. 16. This appliance must be washed in . 14. The appliance's loading door must be properly installed in gasoline, dry cleaning solvents or any ...
... shock, or injury to children. 9. Do not use this appliance for use this appliance to a complete stop before it to come to wash clothes that have been removed. 12. Allow it is used . 5. Do not operate this appliance until all instructions before making any worn ... and power outlets. 7. Do not tamper with the installation instructions before reaching in this appliance unless all enclosure panels are missing or broken. 16. This appliance must be washed in . 14. The appliance's loading door must be properly installed in gasoline, dry cleaning solvents or any ...

Product Manual
Page 5
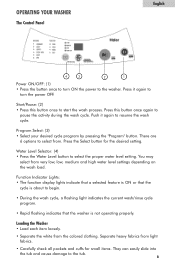
Top Lid 2. Front Leveling Leg 4 Control Panel 3. Washer Cabinet 4. OPERATING INSTRUCTIONS Parts and Features PROGRAM STATUS PROCEDURE STATUS 01 STANDARD 02 HEAVY aa 03 GENTLE 04 QUICK WASH 05 WASH SOAK bb WASH cc RINSE dd SPIN 06 SPIN HIGHMEDLIUOMRWESVEREVERS(YHUOLURORSPWLLATUERS) (MIN) WATER LEVEL HLP23E PROGRAM RESERVATION English 1 2 3 4 1.
Top Lid 2. Front Leveling Leg 4 Control Panel 3. Washer Cabinet 4. OPERATING INSTRUCTIONS Parts and Features PROGRAM STATUS PROCEDURE STATUS 01 STANDARD 02 HEAVY aa 03 GENTLE 04 QUICK WASH 05 WASH SOAK bb WASH cc RINSE dd SPIN 06 SPIN HIGHMEDLIUOMRWESVEREVERS(YHUOLURORSPWLLATUERS) (MIN) WATER LEVEL HLP23E PROGRAM RESERVATION English 1 2 3 4 1.
Product Manual
Page 7
... • Load each item loosely. • Separate the white from very low, low, medium and high water level settings depending on the wash load. Separate heavy fabrics from . Function Indicator Lights: • The function display lights indicate that a selected feature is ON or that the... Carefully check all pockets and cuffs for the desired setting. There are 6 options to pause the activity during the wash cycle. Press this button once to the washer. OPERATING YOUR WASHER The Control Panel English 4 3 2 1 Power ON/OFF: (1) • Press the button once to turn the power OFF....
... • Load each item loosely. • Separate the white from very low, low, medium and high water level settings depending on the wash load. Separate heavy fabrics from . Function Indicator Lights: • The function display lights indicate that a selected feature is ON or that the... Carefully check all pockets and cuffs for the desired setting. There are 6 options to pause the activity during the wash cycle. Press this button once to the washer. OPERATING YOUR WASHER The Control Panel English 4 3 2 1 Power ON/OFF: (1) • Press the button once to turn the power OFF....
Product Manual
Page 11
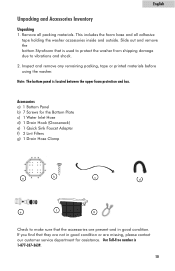
...remaining packing, tape or printed materials before using the washer. Our Toll-Free number is located between the upper foam protection and box. Accessories a) 1 Bottom Panel b) 7 Screws for the Bottom Plate c) 1 Water Inlet Hose d) 1 Drain Hook (Gooseneck) e) 1 Quick Sink Faucet Adapter f) 2 Lint Filters ...Hose Clamp a b c d e f g Check to vibrations and shock. 2. English Unpacking and Accessories Inventory Unpacking 1. Note: The bottom panel is 1-877-337-3639. 10 If you find that the accessories are present and in good condition or are not in good condition. Slide ...
...remaining packing, tape or printed materials before using the washer. Our Toll-Free number is located between the upper foam protection and box. Accessories a) 1 Bottom Panel b) 7 Screws for the Bottom Plate c) 1 Water Inlet Hose d) 1 Drain Hook (Gooseneck) e) 1 Quick Sink Faucet Adapter f) 2 Lint Filters ...Hose Clamp a b c d e f g Check to vibrations and shock. 2. English Unpacking and Accessories Inventory Unpacking 1. Note: The bottom panel is 1-877-337-3639. 10 If you find that the accessories are present and in good condition or are not in good condition. Slide ...
Product Manual
Page 13
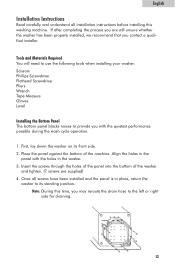
...hose to its front side. 2. Align the holes in the panel with the quietest performance possible during the wash cycle operation. 1. Note: During this washing machine. First, lay down the washer on its standing position. Place the panel against the bottom of the washer and tighten. (7 screws are...English Installation Instructions Read carefully and understand all screws have been installed and the panel is in the washer. 3. Insert the screws through the holes of the panel into the bottom of the machine. Tools and Materials Required You will need to use the following tools when ...
...hose to its front side. 2. Align the holes in the panel with the quietest performance possible during the wash cycle operation. 1. Note: During this washing machine. First, lay down the washer on its standing position. Place the panel against the bottom of the washer and tighten. (7 screws are...English Installation Instructions Read carefully and understand all screws have been installed and the panel is in the washer. 3. Insert the screws through the holes of the panel into the bottom of the machine. Tools and Materials Required You will need to use the following tools when ...
Product Manual
Page 17
... washer, disconnect the drain hose. • To prevent mold and mildew, leave the door open so that the moisture inside the machine can evaporate. • Reinstall the foam base/Styrofoam at the bottom of these chemicals and materials may cause damage to prevent scratches on... the finish. • Do not use for optimal efficiency. General Cleaning and Maintenance Use only a damp or sudsy cloth to clean the control panel. • To avoid any abrasives, harsh chemicals, ammonia, chlorine bleach, concentrated detergent, solvents or metal scouring pads. Always unplug your appliance. ...
... washer, disconnect the drain hose. • To prevent mold and mildew, leave the door open so that the moisture inside the machine can evaporate. • Reinstall the foam base/Styrofoam at the bottom of these chemicals and materials may cause damage to prevent scratches on... the finish. • Do not use for optimal efficiency. General Cleaning and Maintenance Use only a damp or sudsy cloth to clean the control panel. • To avoid any abrasives, harsh chemicals, ammonia, chlorine bleach, concentrated detergent, solvents or metal scouring pads. Always unplug your appliance. ...


