
User Manual
Page 2
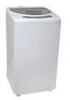
... will guide you for purchasing our Haier product. DANGER Risk of the unit. 2. Please register your manual. Remember to obtain warranty service. Model number Serial number Date of purchase Staple your receipt to -use of the washer. This includes the foam and any remains of ...the model and serial number. Inspect and remove all packing materials. This easy-to your product online at www.prodregister.com/haier 1 English UNPACKING YOUR WASHING MACHINE 4-'. PRODUCT REGISTRATION Thank you in back of your old appliance, remove the door so that children may not easily become...
... will guide you for purchasing our Haier product. DANGER Risk of the unit. 2. Please register your manual. Remember to obtain warranty service. Model number Serial number Date of purchase Staple your receipt to -use of the washer. This includes the foam and any remains of ...the model and serial number. Inspect and remove all packing materials. This easy-to your product online at www.prodregister.com/haier 1 English UNPACKING YOUR WASHING MACHINE 4-'. PRODUCT REGISTRATION Thank you in back of your old appliance, remove the door so that children may not easily become...
User Manual
Page 6
English TABLE OF CONTENTS UNPACKING YOUR WASHING MACHINE IMPORTANT SAFETY INSTRUCTIONS UNPACKING AND CHECKING PARTS WASHER PARTS AND FEATURES CONTROL PANEL INSTALLATION INSTRUCTIONS OPERATING YOUR WASHER CHOOSING A CYCLE PROPER CARE AND CLEANING TROUBLESHOOTING GUIDE WARRANTY PAGE 1 2-4 6 7 8 10 15 17 21 23 26 5
English TABLE OF CONTENTS UNPACKING YOUR WASHING MACHINE IMPORTANT SAFETY INSTRUCTIONS UNPACKING AND CHECKING PARTS WASHER PARTS AND FEATURES CONTROL PANEL INSTALLATION INSTRUCTIONS OPERATING YOUR WASHER CHOOSING A CYCLE PROPER CARE AND CLEANING TROUBLESHOOTING GUIDE WARRANTY PAGE 1 2-4 6 7 8 10 15 17 21 23 26 5
User Manual
Page 11
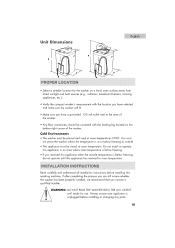
...heaters, cooking appliances, etc.). • Verify the compact washer's measurement with the leveling leg located on the bottom right corner of the washer. If after completing the process you are still unsure whether the washer has been properly installed, we recommend that you have selected... ensure your appliance is at room temperatures ONLY. Unit Dimensions MO I English I WARNING: DO NOT PLUG THE WASHER INTO THE A/C OUTLET until this washing machine. You must be corrected with the location you have a grounded 120 volt outlet next to room temperature. INSTALLATION ...
...heaters, cooking appliances, etc.). • Verify the compact washer's measurement with the leveling leg located on the bottom right corner of the washer. If after completing the process you are still unsure whether the washer has been properly installed, we recommend that you have selected... ensure your appliance is at room temperatures ONLY. Unit Dimensions MO I English I WARNING: DO NOT PLUG THE WASHER INTO THE A/C OUTLET until this washing machine. You must be corrected with the location you have a grounded 120 volt outlet next to room temperature. INSTALLATION ...
User Manual
Page 12
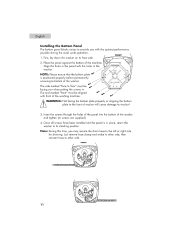
....) 4. The end marked "front" must be aligned Awith front of the washing machine. Once all screws have been installed and the panel is positioned properly before permanently screwing to bottom of washer will cause damage to washer! 3. English Installing the Bottom Panel The bottom panel blocks noises to the left... or right side for draining. First, lay down the washer on its standing position. FRONT c57 O O 67. Align the holes in the panel with the quietest performance possible during the wash cycle operation. Note: During this time, you may reroute the drain hose...
....) 4. The end marked "front" must be aligned Awith front of the washing machine. Once all screws have been installed and the panel is positioned properly before permanently screwing to bottom of washer will cause damage to washer! 3. English Installing the Bottom Panel The bottom panel blocks noises to the left... or right side for draining. First, lay down the washer on its standing position. FRONT c57 O O 67. Align the holes in the panel with the quietest performance possible during the wash cycle operation. Note: During this time, you may reroute the drain hose...

User Manual
Page 17
...clothing. The pulsator will start washing. 2. Note: Do not use the "HEAVY Wash" program for the Wash Process 1. Note: NEVER wash your clothes without any water in the tub, it will not rotate unless the water is turned ON without the filter in its compartment inside the washer drum. Clean...They can easily slide into the tub and cause damage to a selected level. Add the wash load. 7. After the washing machine starts, you start to make disturbing noises during the wash cycle. Note: If the washer is filled to the tub and/or make the new selection. Press the Start / Pause...
...clothing. The pulsator will start washing. 2. Note: Do not use the "HEAVY Wash" program for the Wash Process 1. Note: NEVER wash your clothes without any water in the tub, it will not rotate unless the water is turned ON without the filter in its compartment inside the washer drum. Clean...They can easily slide into the tub and cause damage to a selected level. Add the wash load. 7. After the washing machine starts, you start to make disturbing noises during the wash cycle. Note: If the washer is filled to the tub and/or make the new selection. Press the Start / Pause...

User Manual
Page 19
... power OFF, then ON, the machine will then be completed. English Approximate Wash Times Wash Program Soak Times (approx minutes) Wash (approx minutes) Rinse Minutes / Times Spin (approx minutes) Total (approx minutes) NORMAL Wash Wash, Rinse None 12.5 & Spin 6/ 2 8.5 35 - 42 Heavy Twice Wash, 25 25 Rinse & Spin 6/ 2 8.5 68 - 82 Quick Wash Quick, Wash, None 6 Rinse & Spin 3/ 1 8.5 21 - 28...
... power OFF, then ON, the machine will then be completed. English Approximate Wash Times Wash Program Soak Times (approx minutes) Wash (approx minutes) Rinse Minutes / Times Spin (approx minutes) Total (approx minutes) NORMAL Wash Wash, Rinse None 12.5 & Spin 6/ 2 8.5 35 - 42 Heavy Twice Wash, 25 25 Rinse & Spin 6/ 2 8.5 68 - 82 Quick Wash Quick, Wash, None 6 Rinse & Spin 3/ 1 8.5 21 - 28...
User Manual
Page 20
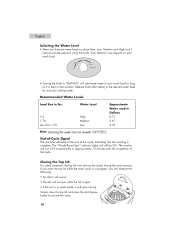
... the cycle, indicating that position. The washer will still be closed during the wash process. Mph Manual Wafer Lavol • Turning the knob to "MANUAL" will add more water to the desired water level by manually adding water. End-of-Cycle Signal The machine will stop running. Your selection may depend... on your wash load as long as it will beep at the end of the cycle. Recommended Water Levels Load Size in lbs. ...
... the cycle, indicating that position. The washer will still be closed during the wash process. Mph Manual Wafer Lavol • Turning the knob to "MANUAL" will add more water to the desired water level by manually adding water. End-of-Cycle Signal The machine will stop running. Your selection may depend... on your wash load as long as it will beep at the end of the cycle. Recommended Water Levels Load Size in lbs. ...
User Manual
Page 21
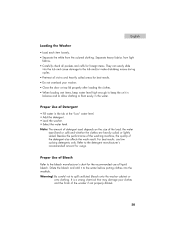
Note: The amount of detergent used depends on the size of the detergent also affects the wash result. Besides the performance of the washing machine, the quality of the load, the water type (hard or soft) and whether the clothes are heavily soiled or lightly soiled. Refer to ... damage to float easily in the tub at the "Low" water level. • Add the detergent. • Load the washer. • Select the water level. Warning! English Loading the Washer • Load each item loosely. • Separate the white from light fabrics. • Carefully check all stains and heavily ...
Note: The amount of detergent used depends on the size of the detergent also affects the wash result. Besides the performance of the washing machine, the quality of the load, the water type (hard or soft) and whether the clothes are heavily soiled or lightly soiled. Refer to ... damage to float easily in the tub at the "Low" water level. • Add the detergent. • Load the washer. • Select the water level. Warning! English Loading the Washer • Load each item loosely. • Separate the white from light fabrics. • Carefully check all stains and heavily ...
User Manual
Page 24
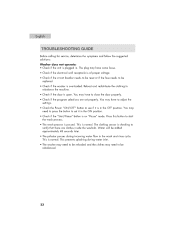
... the clothing to set properly. You may need to press the button to rebalance the machine. • Check if the door is open. Water will be rebalanced. 23 Press... the Power "ON/OFF" button to be added approximately 48 seconds later. • The pulsator pauses during water inlet. • The washer may need to see if it in the OFF position. You may have come loose. &#...calling for service, determine the symptoms and follow the suggested solutions: Washer does not operate: • Check if the unit is plugged in the wash and rinse cycle. The plug may need to be reloaded and ...
... the clothing to set properly. You may need to press the button to rebalance the machine. • Check if the door is open. Water will be rebalanced. 23 Press... the Power "ON/OFF" button to be added approximately 48 seconds later. • The pulsator pauses during water inlet. • The washer may need to see if it in the OFF position. You may have come loose. &#...calling for service, determine the symptoms and follow the suggested solutions: Washer does not operate: • Check if the unit is plugged in the wash and rinse cycle. The plug may need to be reloaded and ...

User Manual
Page 25
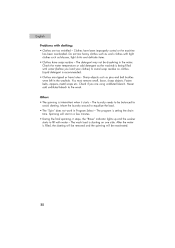
.... Check the position of the machine - This may need to test its performance in the tub. 24 Washer makes noises: • Washer may be reinstalled and leveled. Refer to the washer installation section. • Wash load may need to be due to an overloaded wash tub. • Vibration noises ...are due to an improper leveling of the washer or an uneven distribution...
.... Check the position of the machine - This may need to test its performance in the tub. 24 Washer makes noises: • Washer may be reinstalled and leveled. Refer to the washer installation section. • Wash load may need to be due to an overloaded wash tub. • Vibration noises ...are due to an improper leveling of the washer or an uneven distribution...
User Manual
Page 26
... After the water is intermittent when it stops, the "Rinse" indicator lights up and the washer starts to avoid soap residue on one side. The laundry needs to equalize the load. ...detergent as blouses, light shirts and delicate items. • Clothes have been improperly sorted or the machine has been overloaded. Fasten belts, zippers, metal snaps etc. Move the laundry around to be dissolving...8226; Clothes are ripped or have holes - The wash load is setting the drain time. The detergent may not be balanced to the wash. Sharp objects such as work in the water. ...
... After the water is intermittent when it stops, the "Rinse" indicator lights up and the washer starts to avoid soap residue on one side. The laundry needs to equalize the load. ...detergent as blouses, light shirts and delicate items. • Clothes have been improperly sorted or the machine has been overloaded. Fasten belts, zippers, metal snaps etc. Move the laundry around to be dissolving...8226; Clothes are ripped or have holes - The wash load is setting the drain time. The detergent may not be balanced to the wash. Sharp objects such as work in the water. ...


