
User Manual
Page 1
R HL19R1/HL19K1/HLC19R1/HLC19K1/HL22R1/HL22K1/HLC22R1 HLC22K1/HL22F1 LCD TV & LCD TV/DVD Combo USER MANUAL Please read this manual carefully before using this TV set and keep it for future reference.
R HL19R1/HL19K1/HLC19R1/HLC19K1/HL22R1/HL22K1/HLC22R1 HLC22K1/HL22F1 LCD TV & LCD TV/DVD Combo USER MANUAL Please read this manual carefully before using this TV set and keep it for future reference.

User Manual
Page 4
... unit employs a laser.Only a qualified service person should remove the cover or attempt to possible eye injury. Safety Instructions(for TV with DVD) PRECAUTIONS FCC WARNING-This equipment may generate or use radio frequency energy.Changes or modifications to this equipment may cause harmful... interference unless the modifications are expressly approved in the instruction manual.The user could lose the authority to operate this device,due to service this equipment if an unauthorized change or modification is...
... unit employs a laser.Only a qualified service person should remove the cover or attempt to possible eye injury. Safety Instructions(for TV with DVD) PRECAUTIONS FCC WARNING-This equipment may generate or use radio frequency energy.Changes or modifications to this equipment may cause harmful... interference unless the modifications are expressly approved in the instruction manual.The user could lose the authority to operate this device,due to service this equipment if an unauthorized change or modification is...

User Manual
Page 6
... space for later use additional devices that the operating voltage of your safety and extend the life-span of LCD-TV, please read and understand all the instructions before using and cleaning this manual for proper ventilation; l Do not remove the back cover. If service is correct; To prevent this book; ...Authorized service technician. l Please comply strictly with a dry soft cloth; l Never put the unit in contact with the instructions provided; l Please comply with the LCD-TV, disconnect the power cord from the LCD-TV . l Please keep this machine.
... space for later use additional devices that the operating voltage of your safety and extend the life-span of LCD-TV, please read and understand all the instructions before using and cleaning this manual for proper ventilation; l Do not remove the back cover. If service is correct; To prevent this book; ...Authorized service technician. l Please comply strictly with a dry soft cloth; l Never put the unit in contact with the instructions provided; l Please comply with the LCD-TV, disconnect the power cord from the LCD-TV . l Please keep this machine.

User Manual
Page 11
... in the on-screen menu 22.Press to jump back and forth between two channels 23.DVD REPEAT 24.DVD STOP 25.DVD Next Chapter 26.DVD Previous Chapter 27.Open the channel list in TV 28.Open the favorite channel list in TV Note: the instruction on this manual takes remote of the... TV screen 13.Shows program schedule in TV 14.Press to turn on and off the TV 15.Press to cycle through the available picture modes 2.Press...
... in the on-screen menu 22.Press to jump back and forth between two channels 23.DVD REPEAT 24.DVD STOP 25.DVD Next Chapter 26.DVD Previous Chapter 27.Open the channel list in TV 28.Open the favorite channel list in TV Note: the instruction on this manual takes remote of the... TV screen 13.Shows program schedule in TV 14.Press to turn on and off the TV 15.Press to cycle through the available picture modes 2.Press...
User Manual
Page 14
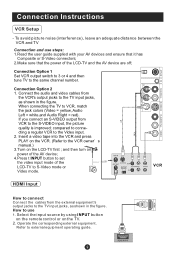
...is improved; Connect the audio and video cables from VCR to S-Video mode or Video mode. When connecting the TV to the VCR owner s manual.) 3.T.urn on the LCD-TV first ; and then turn on the TV. 2. HDMI Select the input source by using INPUT button on the remote control or on the power of... the AV device; 4.Press t INPUT button to the TV input jacks, as shown in the figure. If you connect an ...
...is improved; Connect the audio and video cables from VCR to S-Video mode or Video mode. When connecting the TV to the VCR owner s manual.) 3.T.urn on the LCD-TV first ; and then turn on the TV. 2. HDMI Select the input source by using INPUT button on the remote control or on the power of... the AV device; 4.Press t INPUT button to the TV input jacks, as shown in the figure. If you connect an ...
User Manual
Page 19
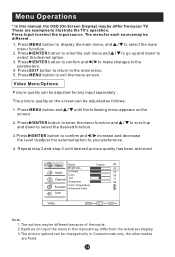
...down to select the input source. Select EXIT Back VOL+/- Press Input to select the desired option . 3. Press EXIT button to return to your TV These are fixed. Press /ENTER button to enter the menu function and / to scroll up and down to select the desired function. 3.Press /... OSD (On Screen Display) may be changed only in Custom mode only, the other modes are examples to illustrate the TV's operation. Menu Operations * In this manual may differ from the actual set display. 3.The picture options can be differ from your preference . 4. Press MENU button to display the ...
...down to select the input source. Select EXIT Back VOL+/- Press Input to select the desired option . 3. Press EXIT button to return to your TV These are fixed. Press /ENTER button to enter the menu function and / to scroll up and down to select the desired function. 3.Press /... OSD (On Screen Display) may be changed only in Custom mode only, the other modes are examples to illustrate the TV's operation. Menu Operations * In this manual may differ from the actual set display. 3.The picture options can be differ from your preference . 4. Press MENU button to display the ...
User Manual
Page 20
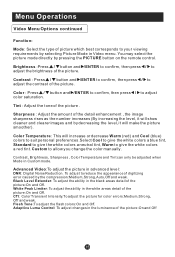
.... White Peak Limiter: To adjust the ability in Video menu. Brightness :Press / button and /ENTER to confirm, then press / to allow you change the color manually. CTI: Color Transient Intensity.To adjust the picture for color errors:Medium,Strong, Off and weak. Menu Operations Video Menu Options continued Function: Mode: Select...
.... White Peak Limiter: To adjust the ability in Video menu. Brightness :Press / button and /ENTER to confirm, then press / to allow you change the color manually. CTI: Color Transient Intensity.To adjust the picture for color errors:Medium,Strong, Off and weak. Menu Operations Video Menu Options continued Function: Mode: Select...

User Manual
Page 26
... enter the submenu. Select EXIT Back VOL+/- When Auto mode on , the time can not be adjusted. Date/Time: Press /ENTER to set the time manually. Closed Caption: Press /ENTER to set the date. Menu Operations Function Menu Options Continued Video Audio Time Zone Date/Time Sleep Timer Channel Function Lock...
... enter the submenu. Select EXIT Back VOL+/- When Auto mode on , the time can not be adjusted. Date/Time: Press /ENTER to set the time manually. Closed Caption: Press /ENTER to set the date. Menu Operations Function Menu Options Continued Video Audio Time Zone Date/Time Sleep Timer Channel Function Lock...

User Manual
Page 46
...the power supply. Refer to chapter on . Abnormal functioning Disconnect the television from power supply and, 10 seconds later, reconnect to TV input. Troubleshooting No picture, no sound Verify if the television is interrupted. Blank screen No sound Poor sound Verify if correct signals..., contact an authorized service depot for color adjust. Verify if the television is in the Manual for technical assistance. Spots with your local authorized service center. 2.The TV set has dangerous voltages levels inside that electricity is on adjusting. Make fine adjustment of power...
...the power supply. Refer to chapter on . Abnormal functioning Disconnect the television from power supply and, 10 seconds later, reconnect to TV input. Troubleshooting No picture, no sound Verify if the television is interrupted. Blank screen No sound Poor sound Verify if correct signals..., contact an authorized service depot for color adjust. Verify if the television is in the Manual for technical assistance. Spots with your local authorized service center. 2.The TV set has dangerous voltages levels inside that electricity is on adjusting. Make fine adjustment of power...

User Manual
Page 47
Specifications Model Picture, sound system Audio output External input port 19 without notice. Dimensions quoted in this manual are subject to change without DVD 19 with DVD NTSC, ATSC, Clear QAM 1.5W+1.5W AV input PC input S-VIDEO input PC audio input YPbPr input Antenna input HDMI input Power requirements ~120V 60Hz Power consumption Temperature Humidity Accessories 60W 80W Working:+5 ~+35 Storage:-15 ~+45 Working:20% ~ 80% Storage: 5% ~ 90% Remote control Batteries User manual Warranty card NOTE Design and specifications are approximate.
Specifications Model Picture, sound system Audio output External input port 19 without notice. Dimensions quoted in this manual are subject to change without DVD 19 with DVD NTSC, ATSC, Clear QAM 1.5W+1.5W AV input PC input S-VIDEO input PC audio input YPbPr input Antenna input HDMI input Power requirements ~120V 60Hz Power consumption Temperature Humidity Accessories 60W 80W Working:+5 ~+35 Storage:-15 ~+45 Working:20% ~ 80% Storage: 5% ~ 90% Remote control Batteries User manual Warranty card NOTE Design and specifications are approximate.


