
User Manual
Page 1
TFT-LCD TV OWNER'S MANUAL Please READ this manual carefully before operating your TV, and retain it for future reference. MODELS: HL26R HL37T HL32R HL42T HL40R HL47T HL42R HL52T
TFT-LCD TV OWNER'S MANUAL Please READ this manual carefully before operating your TV, and retain it for future reference. MODELS: HL26R HL37T HL32R HL42T HL40R HL47T HL42R HL52T
User Manual
Page 2
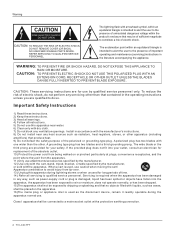
... splashing and that produce heat. 9) Do not defeat the safety purpose of electric shock, do so. A polarized plug has two blades with a protective earthing connection. 2 TV LCD-TFT A grounding type plug has two blades and a third grounding prong. The wide blade or the third prong are for use by the manufacturer, or...
... splashing and that produce heat. 9) Do not defeat the safety purpose of electric shock, do so. A polarized plug has two blades with a protective earthing connection. 2 TV LCD-TFT A grounding type plug has two blades and a third grounding prong. The wide blade or the third prong are for use by the manufacturer, or...
User Manual
Page 3
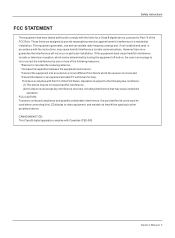
... accept any interference received, including interference that interference will not occur in particular installation. However there is connected. *Consult the dealer or an experienced radio/TV technician for a Class B digital device, pursuant to video equipment; This equipment generates, use and can be not cause harmful interference. (2) this...
... accept any interference received, including interference that interference will not occur in particular installation. However there is connected. *Consult the dealer or an experienced radio/TV technician for a Class B digital device, pursuant to video equipment; This equipment generates, use and can be not cause harmful interference. (2) this...
User Manual
Page 4
They are on label in getting the best use manual will need it to -use of your manual. You will guide you for purchasing the Haier product. This easy-to obtain warranty service. 4 TV LCD-TFT Model number serial number Date of purchase Staple your receipt to record the model and serial number. Remember to your product. Safety Instructions SAVE THESE INSTRUCTIONS Thank you in back of the unit.
They are on label in getting the best use manual will need it to -use of your manual. You will guide you for purchasing the Haier product. This easy-to obtain warranty service. 4 TV LCD-TFT Model number serial number Date of purchase Staple your receipt to record the model and serial number. Remember to your product. Safety Instructions SAVE THESE INSTRUCTIONS Thank you in back of the unit.
User Manual
Page 5
... s 9 Antenna Connection 9 Co nn ec ti ng a V CR 10 External A/V Source Setup 11 Co nn ec ti ng a D VD p la ye r 11 Connecting a DTV(digital TV 12 Connecting digital audio output 12 Co nn ec ti ng a c om pu te r 13 Monitor Out Setup 14 HD MI a nd D VI i np ut... 14 Cable sample 15 Connecting Headphones 16 Power source 16 Removing the table stand and installing a wall mount bracket 17 Operation Switching On/Off the TV set 18 Choose the Menu Language 18 Choose the input source 18 Channel Menu Channel Scan 19 Ch an ne l Sk ip 19 Se le...
... s 9 Antenna Connection 9 Co nn ec ti ng a V CR 10 External A/V Source Setup 11 Co nn ec ti ng a D VD p la ye r 11 Connecting a DTV(digital TV 12 Connecting digital audio output 12 Co nn ec ti ng a c om pu te r 13 Monitor Out Setup 14 HD MI a nd D VI i np ut... 14 Cable sample 15 Connecting Headphones 16 Power source 16 Removing the table stand and installing a wall mount bracket 17 Operation Switching On/Off the TV set 18 Choose the Menu Language 18 Choose the input source 18 Channel Menu Channel Scan 19 Ch an ne l Sk ip 19 Se le...
User Manual
Page 6
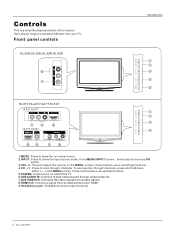
Front panel controls HL26R,HL32R,HL40R,HL42R Introduction MENU INPUT VOL+ VOL- R 1.MENU: Press to HDMI. 9.Headphone jack : Headphone audio output terminal. 6 TV LCD-TFT HL37T,HL52T HDMI3 IN VIDEO2 IN VIDEO L - In the MENU/INPUT screen, these buttons serve as OK button. 3.VOL -/+: ...stereo sound from an external device. 7.AV2 VIDEO IN: Connects the video signal from a video device. 8.HDMI3 IN: Connect a signal from your TV. CH+ CH- Controls This is a simplified representation of front panel. To scan quickly through channels. Here shown may be somewhat different from an...
Front panel controls HL26R,HL32R,HL40R,HL42R Introduction MENU INPUT VOL+ VOL- R 1.MENU: Press to HDMI. 9.Headphone jack : Headphone audio output terminal. 6 TV LCD-TFT HL37T,HL52T HDMI3 IN VIDEO2 IN VIDEO L - In the MENU/INPUT screen, these buttons serve as OK button. 3.VOL -/+: ...stereo sound from an external device. 7.AV2 VIDEO IN: Connects the video signal from a video device. 8.HDMI3 IN: Connect a signal from your TV. CH+ CH- Controls This is a simplified representation of front panel. To scan quickly through channels. Here shown may be somewhat different from an...
User Manual
Page 7
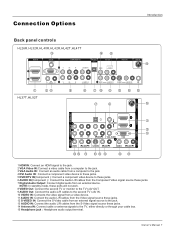
R 1 VIDEO L-AUDIO- Owner s Manual 7 Connection Options Introduction Back panel controls HL26R,HL32R,HL40R,HL42R,HL42T,HL47T HDMI IN 2 1 VGA IN VGA AUDIO COMPONENT IN OPTICAL OUT AV OUT VGA 2 Y Pb Pr L-AUDIO- R S-VIDEO L-AUDIO- R 1 Y Pb Pr AUDIO L-...AUDIO- NOTE: In standby mode, these ports will not work. 8 VIDEO Out: Connect the second TV or monitor to the TV`s AV OUT. 9 AUDIO Out: Connect the audio L/R cables to the second TV`s AV IN. 10 VIDEO IN: Connects the video signal from a video device. 11 AUDIO IN: Connect the audio...
R 1 VIDEO L-AUDIO- Owner s Manual 7 Connection Options Introduction Back panel controls HL26R,HL32R,HL40R,HL42R,HL42T,HL47T HDMI IN 2 1 VGA IN VGA AUDIO COMPONENT IN OPTICAL OUT AV OUT VGA 2 Y Pb Pr L-AUDIO- R S-VIDEO L-AUDIO- R 1 Y Pb Pr AUDIO L-...AUDIO- NOTE: In standby mode, these ports will not work. 8 VIDEO Out: Connect the second TV or monitor to the TV`s AV OUT. 9 AUDIO Out: Connect the audio L/R cables to the second TV`s AV IN. 10 VIDEO IN: Connects the video signal from a video device. 11 AUDIO IN: Connect the audio...
User Manual
Page 8
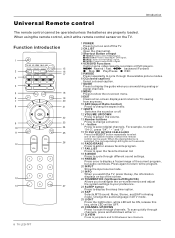
... displays on -screen menus and adjust the system settings to your preference. 23 SLEEP button Press to jump back and forth between two channels. 8 TV LCD-TFT To scan quickly through the available picture modes. 6 CC(closed caption) Select a closed caption. 7 GUIDE Press to display the guide when ...TODAY: Press to display a frozen image of the system modes in Analog mode. CH- Q.VIEW 1 POWER Press to turn on the TV. Function introduction TV DVD VCR SETBOX CABLE AUDIO SELECT CH.LIST FAV.LIST ADD/ERASE TODAY NEXT DAY PAGE- Change the audio language in DTV mode. 25...
... displays on -screen menus and adjust the system settings to your preference. 23 SLEEP button Press to jump back and forth between two channels. 8 TV LCD-TFT To scan quickly through the available picture modes. 6 CC(closed caption) Select a closed caption. 7 GUIDE Press to display the guide when ...TODAY: Press to display a frozen image of the system modes in Analog mode. CH- Q.VIEW 1 POWER Press to turn on the TV. Function introduction TV DVD VCR SETBOX CABLE AUDIO SELECT CH.LIST FAV.LIST ADD/ERASE TODAY NEXT DAY PAGE- Change the audio language in DTV mode. 25...
User Manual
Page 9
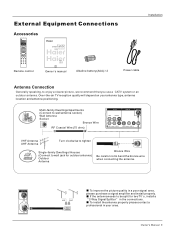
Q.VIEW Remote control TFT-LCD TV OWNER'S MANUAL Please READ this manual carefully before operating your TV, and retain it for outdoor antenna) Outdoor Antenna Bronze Wire Be careful not to bend the bronze wire when connecting the antenna. R VHF Antenna...) Wall Antenna Socket Bronze Wire RF Coaxial Wire (75 ohm) AV OUT VIDEO L-AUDIO-R VIDEO IN ANT IN 1 VIDEO L-AUDIO- MODELS: HL26R HL37T HL32R HL42T HL40R HL47T HL42R HL52T Owner`s manual Alkaline battery(AAA) 2 Power cable Installation Antenna Connection Generally speaking, to wall jack for future reference. Multi-family...
Q.VIEW Remote control TFT-LCD TV OWNER'S MANUAL Please READ this manual carefully before operating your TV, and retain it for outdoor antenna) Outdoor Antenna Bronze Wire Be careful not to bend the bronze wire when connecting the antenna. R VHF Antenna...) Wall Antenna Socket Bronze Wire RF Coaxial Wire (75 ohm) AV OUT VIDEO L-AUDIO-R VIDEO IN ANT IN 1 VIDEO L-AUDIO- MODELS: HL26R HL37T HL32R HL42T HL40R HL47T HL42R HL52T Owner`s manual Alkaline battery(AAA) 2 Power cable Installation Antenna Connection Generally speaking, to wall jack for future reference. Multi-family...
User Manual
Page 10
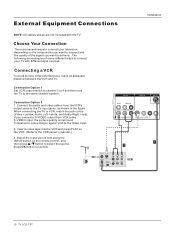
...then press / button to select the source, press OK button to connect your TV with different input sources. Connection Option 2 1. When connecting the TV to the TV input jacks, as shown in the figure. R 10 TV LCD-TFT The following are examples of the signal you want to connect and the ...AV OUT VIDEO L-AUDIO-R VIDEO IN ANT IN 1 VIDEO L-AUDIO- Connection Option 1 Set VCR output switch to channel 3 or 4 and then tune the TV to the S-VIDEO input, the picture quality is improved; compared to connecting a regular VCR to the VCR owner`s manual.) 3. Insert a video tape into ...
...then press / button to select the source, press OK button to connect your TV with different input sources. Connection Option 2 1. When connecting the TV to the TV input jacks, as shown in the figure. R 10 TV LCD-TFT The following are examples of the signal you want to connect and the ...AV OUT VIDEO L-AUDIO-R VIDEO IN ANT IN 1 VIDEO L-AUDIO- Connection Option 1 Set VCR output switch to channel 3 or 4 and then tune the TV to the S-VIDEO input, the picture quality is improved; compared to connecting a regular VCR to the VCR owner`s manual.) 3. Insert a video tape into ...
User Manual
Page 11
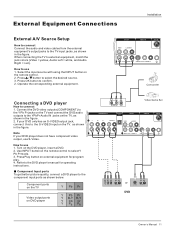
... video cables from the external equipment's output jacks to connect 1. as shown in the figure. Turn on the remote control. 2. Press Play button on the TV. Select the input source with using the INPUT button on the DVD player, insert a DVD. 2. R S-VIDEO L-AUDIO- Refer to use 1. Operate the corresponding... How to the component input ports as shown in the figure. Connect the DVD video outputs (COMPONENT) to the Y Pb Pr jacks on the TV, as shown below. Use INPUT button on DVD player Y Pb Pr Y B-Y R-Y Y Cb Cr Y PB PR Owner s Manual 11 Component ports on the...
... video cables from the external equipment's output jacks to connect 1. as shown in the figure. Turn on the remote control. 2. Press Play button on the TV. Select the input source with using the INPUT button on the DVD player, insert a DVD. 2. R S-VIDEO L-AUDIO- Refer to use 1. Operate the corresponding... How to the component input ports as shown in the figure. Connect the DVD video outputs (COMPONENT) to the Y Pb Pr jacks on the TV, as shown below. Use INPUT button on DVD player Y Pb Pr Y B-Y R-Y Y Cb Cr Y PB PR Owner s Manual 11 Component ports on the...
User Manual
Page 12
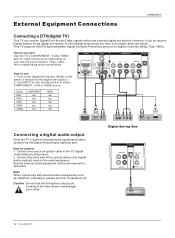
... Yes HDMI Yes Yes Yes Yes Yes DVI L- R HDMI Connecting a digital audio output Send the TV`s audio to use 1 1. Caution: Do not look into the optical output port. R 1 VIDEO 12 TV LCD-TFT Note When connecting with external audio equipments, such as shown below. How to the owner`s manual... for video connections, depending on your vision. Turn on the digital set-top box. (Refer to connect Use the TV`s COMPONENT , VGA or HDMI jack ...
... Yes HDMI Yes Yes Yes Yes Yes DVI L- R HDMI Connecting a digital audio output Send the TV`s audio to use 1 1. Caution: Do not look into the optical output port. R 1 VIDEO 12 TV LCD-TFT Note When connecting with external audio equipments, such as shown below. How to the owner`s manual... for video connections, depending on your vision. Turn on the digital set-top box. (Refer to connect Use the TV`s COMPONENT , VGA or HDMI jack ...

User Manual
Page 13
... 60Hz 75Hz HDMIIN 2 1 VGA IN VGA AUDIO COMPONENT IN VGA 2 Y Pb Pr L-AUDIO- Use theTV`s VGAor DVI (DigitalVisual Interface)AudioIN port foraudio connections, dependingon your TV. Ifusing asound card,adjust the VGA sound as required. If noiseis present, changethe VGAmode to 1024x768 . 2. R 1 Y Pb Pr AUDIO L-AUDIO- If the graphic card on...
... 60Hz 75Hz HDMIIN 2 1 VGA IN VGA AUDIO COMPONENT IN VGA 2 Y Pb Pr L-AUDIO- Use theTV`s VGAor DVI (DigitalVisual Interface)AudioIN port foraudio connections, dependingon your TV. Ifusing asound card,adjust the VGA sound as required. If noiseis present, changethe VGAmode to 1024x768 . 2. R 1 Y Pb Pr AUDIO L-AUDIO- If the graphic card on...
User Manual
Page 14
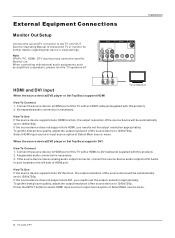
How To Use If the source device supports Auto HDMI function, the output resolution of Select Main source menu. 14 TV LCD-TFT Select HDMI input source in input source option of the source device will be automatically set the output resolution appropriately. If the ... resolution of the source device will be used for further details regarding that device`s input settings. External Equipment Connections Monitor Out Setup Connect the second TV or monitor to 1280x720p. R S-VIDEO L-AUDIO- AV OUT VIDEO L-AUDIO-R VIDEO IN ANT IN 1 VIDEO L-AUDIO- How To Use If the source ...
How To Use If the source device supports Auto HDMI function, the output resolution of Select Main source menu. 14 TV LCD-TFT Select HDMI input source in input source option of the source device will be automatically set the output resolution appropriately. If the ... resolution of the source device will be used for further details regarding that device`s input settings. External Equipment Connections Monitor Out Setup Connect the second TV or monitor to 1280x720p. R S-VIDEO L-AUDIO- AV OUT VIDEO L-AUDIO-R VIDEO IN ANT IN 1 VIDEO L-AUDIO- How To Use If the source ...
User Manual
Page 16
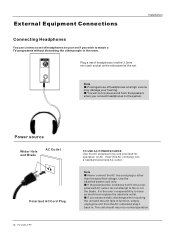
...unit should return to have an electrician replace the obsolete outlet. Power source Wider Hole and Blade AC Outlet Polarized AC Cord Plug 16 TV LCD-TFT TO USE AC POWER SOURCE Use the AC polarized line cord provided for operation on the side panel of the set. If the ...5mm mini-jack socket on AC. Note Prolonged use of headphones at a high volume may damage your set if you wish to watch a TV programme without disturbing the other than the specified voltage. External Equipment Connections Installation Connecting Headphones You can connect a set of headphones to your hearing.
...unit should return to have an electrician replace the obsolete outlet. Power source Wider Hole and Blade AC Outlet Polarized AC Cord Plug 16 TV LCD-TFT TO USE AC POWER SOURCE Use the AC polarized line cord provided for operation on the side panel of the set. If the ...5mm mini-jack socket on AC. Note Prolonged use of headphones at a high volume may damage your set if you wish to watch a TV programme without disturbing the other than the specified voltage. External Equipment Connections Installation Connecting Headphones You can connect a set of headphones to your hearing.
User Manual
Page 17
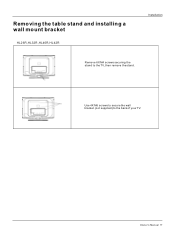
Removing the table stand and installing a wall mount bracket HL26R,HL32R,HL40R,HL42R Installation Remove 6X M4 screws securing the stand to the back of your TV. Owner s Manual 17 Use 4X M6 screws to secure the wall bracket (not supplied) to the TV, then remove the stand.
Removing the table stand and installing a wall mount bracket HL26R,HL32R,HL40R,HL42R Installation Remove 6X M4 screws securing the stand to the back of your TV. Owner s Manual 17 Use 4X M6 screws to secure the wall bracket (not supplied) to the TV, then remove the stand.
User Manual
Page 18
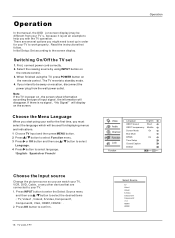
Initial Setup: Set according to confirm . 18 TV LCD-TFT Select Source TV Video1 Video2 S-Video Component1 Component2 VGA HDMI1 HDMI2 If you can watch your TV, VCR, DVD, Cable , or any other devices that follow. English Spanish or French Operation Video Audio Channel Function Lock Function Language English ... source so you intend to work properly. Press OK button to the screen display. Read the instructions that are several options you with the TV operation. First, connect power cord correctly. 2. If there is just an example to help you might need to set up in power on...
Initial Setup: Set according to confirm . 18 TV LCD-TFT Select Source TV Video1 Video2 S-Video Component1 Component2 VGA HDMI1 HDMI2 If you can watch your TV, VCR, DVD, Cable , or any other devices that follow. English Spanish or French Operation Video Audio Channel Function Lock Function Language English ... source so you intend to work properly. Press OK button to the screen display. Read the instructions that are several options you with the TV operation. First, connect power cord correctly. 2. If there is just an example to help you might need to set up in power on...

User Manual
Page 19
...Channel Scan 1 Press MENU button and then use / button to select Channel menu. 2 Press or OK button and then use buttons on the TV to set channel. When Cable is explained. Operation Video Audio Channel Function Lock Tuner Channel Scan Channel Skip Antenna Channel OK Scan / Select EXIT Back... Analog 5 Analog 5-1 Digital KPIX-DT 6 Analog 7 Analog 8 Analog 9 Analog 10 Analog Channel Skip OK Set / Select EXIT Back Owner s Manual 19 Channel menu This TV set has two methods to set channels, which are skip. In this section, how to use / button to set channel is selected, the...
...Channel Scan 1 Press MENU button and then use / button to select Channel menu. 2 Press or OK button and then use buttons on the TV to set channel. When Cable is explained. Operation Video Audio Channel Function Lock Tuner Channel Scan Channel Skip Antenna Channel OK Scan / Select EXIT Back... Analog 5 Analog 5-1 Digital KPIX-DT 6 Analog 7 Analog 8 Analog 9 Analog 10 Analog Channel Skip OK Set / Select EXIT Back Owner s Manual 19 Channel menu This TV set has two methods to set channels, which are skip. In this section, how to use / button to set channel is selected, the...
User Manual
Page 20
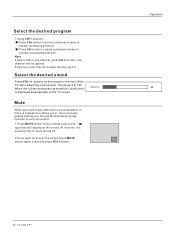
...pressed the volume level is very convenient. 1 Press MUTE button on the remote or the front of the TV set to adjust the volume level. At this time, the sound of the TV set is turned off. 2 If you , the sound elimination (mute) function is displayed automatically on the ...100. Select the desired program 1 Using CH+/- button to select a channel number in number decreasing direction. button, the channel will display on the TV screen. buttons. Volume Mute When you need to pay attention to recover the sound, press MUTE button again or directly press VOL+ button. Operation 20...
...pressed the volume level is very convenient. 1 Press MUTE button on the remote or the front of the TV set to adjust the volume level. At this time, the sound of the TV set is turned off. 2 If you , the sound elimination (mute) function is displayed automatically on the ...100. Select the desired program 1 Using CH+/- button to select a channel number in number decreasing direction. button, the channel will display on the TV screen. buttons. Volume Mute When you need to pay attention to recover the sound, press MUTE button again or directly press VOL+ button. Operation 20...
User Manual
Page 21
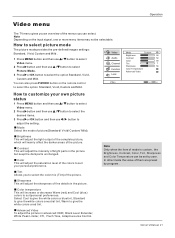
.... Sharpness This will adjust the intensity of bright parts in the picture but keep the dark parts unchanged. Owner s Manual 21 Operation Video menu The TV menu gives you an overview of the menus you to select the color mix (Tint) of the picture. How to select picture mode The picture...
.... Sharpness This will adjust the intensity of bright parts in the picture but keep the dark parts unchanged. Owner s Manual 21 Operation Video menu The TV menu gives you an overview of the menus you to select the color mix (Tint) of the picture. How to select picture mode The picture...


