User Manual
Page 2
... SERVICING TO QUALIFIED SERVICE PERSONNEL. The lightning flash with DVD models.) CAUTION: TO PREVENT ELECTRIC SHOCK DO NOT USE THIS POLARIZED PLUG WITH AN EXTENSION CORD, RECEPTACLE OR OTHER OUTLET UNLESS THE BLADES CAN BE FULLY INSERTED TO PREVENT BLADE EXPOSURE. CAUTION: These servicing instructions are qualified to the presence of important operating and maintenance (servicing) instructions in the operating instructions unless you are for TV...
... SERVICING TO QUALIFIED SERVICE PERSONNEL. The lightning flash with DVD models.) CAUTION: TO PREVENT ELECTRIC SHOCK DO NOT USE THIS POLARIZED PLUG WITH AN EXTENSION CORD, RECEPTACLE OR OTHER OUTLET UNLESS THE BLADES CAN BE FULLY INSERTED TO PREVENT BLADE EXPOSURE. CAUTION: These servicing instructions are qualified to the presence of important operating and maintenance (servicing) instructions in the operating instructions unless you are for TV...
User Manual
Page 5
... models. Component Setup 8 VCR Setup 9 HDMI Input 9 Cable TV Setup 10 External Component Source Setup 10 Basic Operating Instructions 11 Switch On/Off the TV set for specific details. Please refer to your original set 11 Choose the input source 11 Audio Control 11 Mute...11 INFO...11 Select the TV Channel You Want 12 Picture Mode 12 Audio Mode 12 Sleep...12 GUIDE 12 ARC button 12 .Button 13 CH.LIST button 13 FAVORATE button 1..3. CONTENT Safety Notice Items 1 Front Panel Controls 2 Connection Options 3 Remote Control 4 Remote Control Key Functions 5 Connection...
... models. Component Setup 8 VCR Setup 9 HDMI Input 9 Cable TV Setup 10 External Component Source Setup 10 Basic Operating Instructions 11 Switch On/Off the TV set for specific details. Please refer to your original set 11 Choose the input source 11 Audio Control 11 Mute...11 INFO...11 Select the TV Channel You Want 12 Picture Mode 12 Audio Mode 12 Sleep...12 GUIDE 12 ARC button 12 .Button 13 CH.LIST button 13 FAVORATE button 1..3. CONTENT Safety Notice Items 1 Front Panel Controls 2 Connection Options 3 Remote Control 4 Remote Control Key Functions 5 Connection...

User Manual
Page 6
... needed, please contact an Authorized service technician. l Never put the unit in contact with the LCD-TV, disconnect the power cord from the LCD-TV . l Please do as required when you are not recommended by manufacturer: l Before operation, please make sure that are installing, using : l Please read and understand all the instructions before operation; If service is correct; To prevent this machine. l Do not remove...
... needed, please contact an Authorized service technician. l Never put the unit in contact with the LCD-TV, disconnect the power cord from the LCD-TV . l Please do as required when you are not recommended by manufacturer: l Before operation, please make sure that are installing, using : l Please read and understand all the instructions before operation; If service is correct; To prevent this machine. l Do not remove...

User Manual
Page 8
... jacks. 6.Video in Connect video output from an external device to this jack. 7.USB input Connect a USB flash drive to view JPEG images or listen to MP3 songs. 8.VGA Connect to the VGA 15PIN analog output connector of the set as a PC display. 9.PC audio in Connect the audio output from the pc to the PC audio input port. 10. HDMI: Connect a HDMI device to receive digital audio and uncompressed digital video. 11. Connection Options DVD R1 series STOP PLAY/PAUSE OPEN/CLOSE K1 series OPEN/CLOSE PLAY/PAUSE...
... jacks. 6.Video in Connect video output from an external device to this jack. 7.USB input Connect a USB flash drive to view JPEG images or listen to MP3 songs. 8.VGA Connect to the VGA 15PIN analog output connector of the set as a PC display. 9.PC audio in Connect the audio output from the pc to the PC audio input port. 10. HDMI: Connect a HDMI device to receive digital audio and uncompressed digital video. 11. Connection Options DVD R1 series STOP PLAY/PAUSE OPEN/CLOSE K1 series OPEN/CLOSE PLAY/PAUSE...

User Manual
Page 9
... up the model alkaline batteries are loaded. As strong light may interfere with the signals, change your position to the +/marks inside the battery compartment. Remote Control Installing Batteries Remove the battery cover. Make sure that there is no obstacle between the remote controller and television set. Insert two size AAA batteries matching the +/-polarities of the battery to operate the remote control if the television cannot...
... up the model alkaline batteries are loaded. As strong light may interfere with the signals, change your position to the +/marks inside the battery compartment. Remote Control Installing Batteries Remove the battery cover. Make sure that there is no obstacle between the remote controller and television set. Insert two size AAA batteries matching the +/-polarities of the battery to operate the remote control if the television cannot...
User Manual
Page 10
... switch input source to DVD in 22.Open the channel list in TV SLEEP DISPLAY 12 32 13 OPEN/CLOSE PLAY/PAUSE STOP REPEAT 33 14 34 15 REV PREV NEXT 35 16 36 17 D.MENU D.CALL D.AUDIO SETUP 37 18 38 SEARCH ANGLE SUBTITLE PROGRAM 23.Select MONO, STEREO, SAP in NTSC system 24.Open the favourite channel list in 1 USB DVD 3.Display the guide when you are watching analog or 2 21 digital channels GUIDE...
... switch input source to DVD in 22.Open the channel list in TV SLEEP DISPLAY 12 32 13 OPEN/CLOSE PLAY/PAUSE STOP REPEAT 33 14 34 15 REV PREV NEXT 35 16 36 17 D.MENU D.CALL D.AUDIO SETUP 37 18 38 SEARCH ANGLE SUBTITLE PROGRAM 23.Select MONO, STEREO, SAP in NTSC system 24.Open the favourite channel list in 1 USB DVD 3.Display the guide when you are watching analog or 2 21 digital channels GUIDE...
User Manual
Page 11
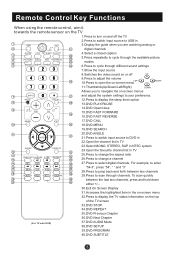
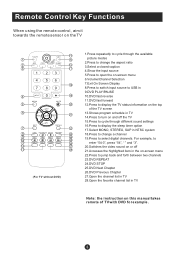
... a closed caption 4.Show the input source 5.Press to open the on-screen menu 6.Volume/Channel Selection 7.Exit On Screen Display 8.Press to switch input source to USB in the on-screen menu 22.Press to select digital channels. Remote Control Key Functions When using the remote control, aim it towards the remote sensor on the top of TV with DVD for example. ENTER VOL+ 21 EXIT CH- RECALL 7 22 USB PLAY/PAUSE STOP REPEAT 8 23 9 REV PREV NEXT 24 10 25 11 DISPLAY GUIDE...
... a closed caption 4.Show the input source 5.Press to open the on-screen menu 6.Volume/Channel Selection 7.Exit On Screen Display 8.Press to switch input source to USB in the on-screen menu 22.Press to select digital channels. Remote Control Key Functions When using the remote control, aim it towards the remote sensor on the top of TV with DVD for example. ENTER VOL+ 21 EXIT CH- RECALL 7 22 USB PLAY/PAUSE STOP REPEAT 8 23 9 REV PREV NEXT 24 10 25 11 DISPLAY GUIDE...
User Manual
Page 13
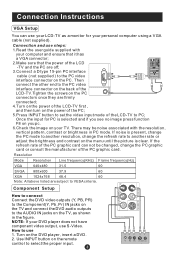
... the TV and connect the DVD audio outputs to the PC video interface connector on your personal computer using a VGA cable (not supplied). Turn on the power of the PC; 5.Press INPUT button to set the video input mode of the LCD -TV and the PC are subject to select the proper input. Connection Instructions VGA Setup You can not be noise associated with your DVD player does not have component video output, use 1. Once the input for your TV. Resolution Mode Resolution Line...
... the TV and connect the DVD audio outputs to the PC video interface connector on your personal computer using a VGA cable (not supplied). Turn on the power of the PC; 5.Press INPUT button to set the video input mode of the LCD -TV and the PC are subject to select the proper input. Connection Instructions VGA Setup You can not be noise associated with your DVD player does not have component video output, use 1. Once the input for your TV. Resolution Mode Resolution Line...
User Manual
Page 14
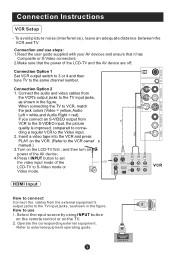
... video cables from the external equipment's output jacks to the TV input jacks, as shown in the figure. How to the same channel number. Pr R-AUDIO-L S-VIDEO IN R-AUDIO IN-L VIDEO Connection Option 2 1. If you connect an S-VIDEO output from VCR to S-Video mode or Video mode. and then turn on the TV. 2. HDMI Refer to VCR, match the jack colors (Video = yellow, Audio Left = white,and Audio Right = red). When connecting the TV to external equipment operating guide. Select the input source by using INPUT button on the remote control...
... video cables from the external equipment's output jacks to the TV input jacks, as shown in the figure. How to the same channel number. Pr R-AUDIO-L S-VIDEO IN R-AUDIO IN-L VIDEO Connection Option 2 1. If you connect an S-VIDEO output from VCR to S-Video mode or Video mode. and then turn on the TV. 2. HDMI Refer to VCR, match the jack colors (Video = yellow, Audio Left = white,and Audio Right = red). When connecting the TV to external equipment operating guide. Select the input source by using INPUT button on the remote control...

User Manual
Page 15
... jack colors (Video = yellow, Audio Left = white, and Audio Right = red). Operate the corresponding external equi- Select your local cable TV service provider(s). When connecting the TV to use 1. Select channels at the cable box or with the remote control for cable box. R-AUDIO IN-L VIDEO The TV cannot display TV programming unless a TV tuner device or cable TV converter box is connected to external equipment operating guide. Select 3 or 4 with channel switch on the remote control. 3. Refer to the TV. - Select the input source by using the INPUT button on cable box...
... jack colors (Video = yellow, Audio Left = white, and Audio Right = red). Operate the corresponding external equi- Select your local cable TV service provider(s). When connecting the TV to use 1. Select channels at the cable box or with the remote control for cable box. R-AUDIO IN-L VIDEO The TV cannot display TV programming unless a TV tuner device or cable TV converter box is connected to external equipment operating guide. Select 3 or 4 with channel switch on the remote control. 3. Refer to the TV. - Select the input source by using the INPUT button on cable box...
User Manual
Page 16
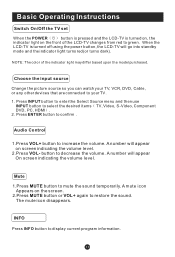
... TV set When the POWER button is pressed and the LCD-TV is turned off using the power button, the LCD-TV will go into standby mode and the indicator light turns red(or turns dark). NOTE: The color of the LCD-TV changes from red to green. Press ENTER button to display current program information. INFO Press INFO button to confirm . Audio Control 1.Press VOL+ button to mute the sound temporarily. Mute 1.Press MUTE button to increase the volume. The mute icon disappears. A number...
... TV set When the POWER button is pressed and the LCD-TV is turned off using the power button, the LCD-TV will go into standby mode and the indicator light turns red(or turns dark). NOTE: The color of the LCD-TV changes from red to green. Press ENTER button to display current program information. INFO Press INFO button to confirm . Audio Control 1.Press VOL+ button to mute the sound temporarily. Mute 1.Press MUTE button to increase the volume. The mute icon disappears. A number...

User Manual
Page 17
... the remote control or on the panel to see the information and can use the number buttons and button on the remote control for menu display . Picture Mode Press PICTURE button on the remote control to directly select TV channels and press ENTER to confirm. to select information for you to select the aspect ratio among Normal, Wide, Zoom and Cinema. (Display mode may differ from different inputs) For desired mode as follows...
... the remote control or on the panel to see the information and can use the number buttons and button on the remote control for menu display . Picture Mode Press PICTURE button on the remote control to directly select TV channels and press ENTER to confirm. to select information for you to select the aspect ratio among Normal, Wide, Zoom and Cinema. (Display mode may differ from different inputs) For desired mode as follows...

User Manual
Page 21
... right speakers. Repeat step 2 and step 3 until the following menu appears on and off. Function : Balance : Press / button and /ENTER to confirm, then press / to your lightning requirements by selecting Mode in Audio menu. You can be adjusted for any input as follows: 1. Video Balance 0 Bass 50 Audio Treble 50 Sound Surround On Channel Mode Off Equalizer Off Function AVL Off Lock Audio Only Audio ENTER Adjust...
... right speakers. Repeat step 2 and step 3 until the following menu appears on and off. Function : Balance : Press / button and /ENTER to confirm, then press / to your lightning requirements by selecting Mode in Audio menu. You can be adjusted for any input as follows: 1. Video Balance 0 Bass 50 Audio Treble 50 Sound Surround On Channel Mode Off Equalizer Off Function AVL Off Lock Audio Only Audio ENTER Adjust...
User Manual
Page 23
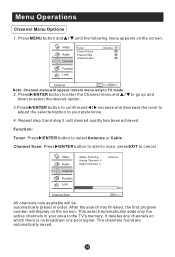
... has finished, the first program number will be automatically preset in TV mode. 2. Analog Channels: 4 Digital Channels: 3 Antenna Function Lock 40% Channel Scan EXIT Cancel All channels now available will display on which there is no broadcast or a poor signal. This search automatically adds only the active channels in your preference . 4. It deletes any channels on the screen. Function: Tuner: Press /ENTER button to the TV's memory. Video Audio Channel Tuner Channel Scan Channel Skip Channel Label Function Lock Antenna Channel CH+/-
... has finished, the first program number will be automatically preset in TV mode. 2. Analog Channels: 4 Digital Channels: 3 Antenna Function Lock 40% Channel Scan EXIT Cancel All channels now available will display on which there is no broadcast or a poor signal. This search automatically adds only the active channels in your preference . 4. It deletes any channels on the screen. Function: Tuner: Press /ENTER button to the TV's memory. Video Audio Channel Tuner Channel Scan Channel Skip Channel Label Function Lock Antenna Channel CH+/-

User Manual
Page 24
... pane as follows and this channel will be skipped next time you press / but you can press digits button to select the position of the item that is selected. Then press / to select Channel Index and Channel Label and / to select the channel. Video Audio Channel Function Lock 2 Analog 3 Analog 4 Analog 5 Analog 5-1 Digital 6 Analog 7 Analog 8 Analog 9 Analog 10 Analog Channel Skip ENTER Set CH+/- Video Channel Index 1 Channel Label Audio Channel Function Lock Channel Label Set CH+/- Select EXIT Back VOL...
... pane as follows and this channel will be skipped next time you press / but you can press digits button to select the position of the item that is selected. Then press / to select Channel Index and Channel Label and / to select the channel. Video Audio Channel Function Lock 2 Analog 3 Analog 4 Analog 5 Analog 5-1 Digital 6 Analog 7 Analog 8 Analog 9 Analog 10 Analog Channel Skip ENTER Set CH+/- Video Channel Index 1 Channel Label Audio Channel Function Lock Channel Label Set CH+/- Select EXIT Back VOL...

User Manual
Page 25
... to select language of the OSD display. To set On, the set will be on the screen. Video Language OSD Timeout English Short Audio OSD Transparency Middle Screen Mode Channel Blue Screen Full screen On DPMS On Function Time Setup Lock Closed Caption Default Function CH+/- Select EXIT Back VOL+/- 2. Function: Language: Press / button to your preference . 4. Time Zone: Press / to enter the submenu. Time Setup: Press /ENTER to select the...
... to select language of the OSD display. To set On, the set will be on the screen. Video Language OSD Timeout English Short Audio OSD Transparency Middle Screen Mode Channel Blue Screen Full screen On DPMS On Function Time Setup Lock Closed Caption Default Function CH+/- Select EXIT Back VOL+/- 2. Function: Language: Press / button to your preference . 4. Time Zone: Press / to enter the submenu. Time Setup: Press /ENTER to select the...

User Manual
Page 35
... according to the property of information code errors. To play interface. 12 3 4 5 67 1.Play mode: None/Dissolve/Wipe right/Wipeleft/ Wipe up takes about 3 second. Press USB button to confirm. USB Input 1.1.Supporting media and file format: Digital pictures (.JPG) and digital music (.MP3)files Due to differences in the file code and file mode, It is of other format. 3.External card reader supports most digital cards available in the market...
... according to the property of information code errors. To play interface. 12 3 4 5 67 1.Play mode: None/Dissolve/Wipe right/Wipeleft/ Wipe up takes about 3 second. Press USB button to confirm. USB Input 1.1.Supporting media and file format: Digital pictures (.JPG) and digital music (.MP3)files Due to differences in the file code and file mode, It is of other format. 3.External card reader supports most digital cards available in the market...

User Manual
Page 40
... external TV. This will normally be shown in the unit. Parental Password Default 1 Kid Saf 2 G 3 Pg 4 Pg 13 5 Pgr 6 R 7 Nc17 8 Adult SETUP PLAY/ENTER General Setup Page ASPECT RATIO DESCRIPTION When using a widescreen TV. NOTE: Preference page will appear above and below the picture. 16:9 You may select if you have a normal aspect ratio (4:3) TV. To access this feature to be specially coded. Black bars...
... external TV. This will normally be shown in the unit. Parental Password Default 1 Kid Saf 2 G 3 Pg 4 Pg 13 5 Pgr 6 R 7 Nc17 8 Adult SETUP PLAY/ENTER General Setup Page ASPECT RATIO DESCRIPTION When using a widescreen TV. NOTE: Preference page will appear above and below the picture. 16:9 You may select if you have a normal aspect ratio (4:3) TV. To access this feature to be specially coded. Black bars...
User Manual
Page 43
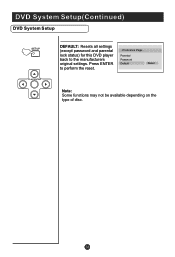
DVD System Setup(Continued) DVD System Setup SETUP PLAY/ENTER DEFAULT: Resets all settings (except password and parental lock status) for this DVD player back to perform the reset. ..Preference Page.. Press ENTER to the manufacturers original settings. Parental Password Default Reset Note: Some functions may not be available depending on the type of disc.
DVD System Setup(Continued) DVD System Setup SETUP PLAY/ENTER DEFAULT: Resets all settings (except password and parental lock status) for this DVD player back to perform the reset. ..Preference Page.. Press ENTER to the manufacturers original settings. Parental Password Default Reset Note: Some functions may not be available depending on the type of disc.
User Manual
Page 46
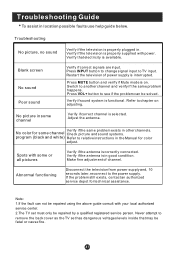
Press INPUT button to change signal input to chapter on . Restart the television of channel. Press MUTE button and verify if Mute mode is interrupted. Verify if the same problem exists in . No color for some channel Check picture and sound systems. program (black and white) Refer to relative instructions in some or all pictures Verify if the antenna is functional. Verify if the television is selected. No picture in the Manual for technical...
Press INPUT button to change signal input to chapter on . Restart the television of channel. Press MUTE button and verify if Mute mode is interrupted. Verify if the same problem exists in . No color for some channel Check picture and sound systems. program (black and white) Refer to relative instructions in some or all pictures Verify if the antenna is functional. Verify if the television is selected. No picture in the Manual for technical...


