User Manual
Page 2
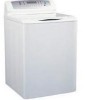
.... Do not use . 14. This washer must be washed in the presence of this material has been removed, to remove clothes while the tub or the agitator is spinning. 15. This will reduce the possibility of fire, electric shock, or injury to persons when using this use washer to a complete stop before it come to wash clothes soaked, spotted or washed in this appliance. 2. Do not operate washer unless all...
.... Do not use . 14. This washer must be washed in the presence of this material has been removed, to remove clothes while the tub or the agitator is spinning. 15. This will reduce the possibility of fire, electric shock, or injury to persons when using this use washer to a complete stop before it come to wash clothes soaked, spotted or washed in this appliance. 2. Do not operate washer unless all...
User Manual
Page 3
... guide you throw away your manual. If you for using the washer, turn on all the hot water faucet's and let the hot water run for a few minutes. This could be explosive and can explode. SAVE THESE INSTRUCTIONS DANGER Risk of purchase Staple your receipt to your old washer, take off the door so that children may be ensured to record the model and serial number...
... guide you throw away your manual. If you for using the washer, turn on all the hot water faucet's and let the hot water run for a few minutes. This could be explosive and can explode. SAVE THESE INSTRUCTIONS DANGER Risk of purchase Staple your receipt to your old washer, take off the door so that children may be ensured to record the model and serial number...
User Manual
Page 4
English Table Of Contents PAGE SAFETY INSTRUCTIONS 1 OPERATING INSTRUCTIONS 4-8 Parts and Features 4 Operations 5 Normal Operating Sounds 7 Lint Filter 8 Safety Lid Switch 8 CARE AND CLEANING GUIDE 9 Cleaning and Maintenance 9 Moving and Vacationing 9 Storage of your Washer 9 TROUBLESHOOTING 10 INSTALLATION INSTRUCTIONS 12-14 Tools and Materials Required 12 Unpacking your Washer 13 Leveling your Washer 13 Steps for Installation 14 ELECTRICAL CONNECTIONS 16 Grounding Instructions 16 Power Interruptions 16 WARRANTY 17 3
English Table Of Contents PAGE SAFETY INSTRUCTIONS 1 OPERATING INSTRUCTIONS 4-8 Parts and Features 4 Operations 5 Normal Operating Sounds 7 Lint Filter 8 Safety Lid Switch 8 CARE AND CLEANING GUIDE 9 Cleaning and Maintenance 9 Moving and Vacationing 9 Storage of your Washer 9 TROUBLESHOOTING 10 INSTALLATION INSTRUCTIONS 12-14 Tools and Materials Required 12 Unpacking your Washer 13 Leveling your Washer 13 Steps for Installation 14 ELECTRICAL CONNECTIONS 16 Grounding Instructions 16 Power Interruptions 16 WARRANTY 17 3

User Manual
Page 5
Top Lid 2. Leveling Legs 6. Front Panel 10. Filter, Filter Cover 11. Inner Tub 14. Control Panel Seat 4. Door Switch 8. Power Cord (120Volt/60Hz) 18. English OPERATING INSTRUCTIONS Parts and Features 1. Balance Ring 13. Pulsator 16. Drain Hose joint 17. Inner Cover 7. Bleach Injection Inlet 9. Hot Water Inlet Valve 20. Control Panel 3. Cabinet 5. Outer Tub Cover 12. Stick 15. Cold Water Inlet Value 19. Back Cover 4
Top Lid 2. Leveling Legs 6. Front Panel 10. Filter, Filter Cover 11. Inner Tub 14. Control Panel Seat 4. Door Switch 8. Power Cord (120Volt/60Hz) 18. English OPERATING INSTRUCTIONS Parts and Features 1. Balance Ring 13. Pulsator 16. Drain Hose joint 17. Inner Cover 7. Bleach Injection Inlet 9. Hot Water Inlet Valve 20. Control Panel 3. Cabinet 5. Outer Tub Cover 12. Stick 15. Cold Water Inlet Value 19. Back Cover 4

User Manual
Page 6
... stop. For washing color fabrics. • Quick - To maintain prior settings in the Hand Wash, Delicates and Quick Cycles. • Water level indicator will display a minimum delay of 2 hours. Soak • Selecting this button to manually replenish water. Cycles • Normal - Extra Rinse • Once a program is selected, the indicator light will shut off if only Spin is inactive when water reaches the overflow protection level. 5 Function automatically is selected. English Operations...
... stop. For washing color fabrics. • Quick - To maintain prior settings in the Hand Wash, Delicates and Quick Cycles. • Water level indicator will display a minimum delay of 2 hours. Soak • Selecting this button to manually replenish water. Cycles • Normal - Extra Rinse • Once a program is selected, the indicator light will shut off if only Spin is inactive when water reaches the overflow protection level. 5 Function automatically is selected. English Operations...

User Manual
Page 7
... washer is in pause mode, push this feature will automatically adjust water to shut off . Auto Temp Control • Models with slight agitation after water filling and then begins to resume operation. Delay Start Indicator • Indicates remaining minutes when cycle is ON push button once to the proper temperature. It may be affected by the water pressure. Soil Level • Select clothes soil level. • Wash cycle...
... washer is in pause mode, push this feature will automatically adjust water to shut off . Auto Temp Control • Models with slight agitation after water filling and then begins to resume operation. Delay Start Indicator • Indicates remaining minutes when cycle is ON push button once to the proper temperature. It may be affected by the water pressure. Soil Level • Select clothes soil level. • Wash cycle...

User Manual
Page 8
... washer tub spins at very high RPM. • Wash and Rinse cycles going on product container for best results. • Do not overload your washer. • When loading wet items, keep the lid up, the agitation will also make clicking sounds. 7 Normal Operating Sounds The following sounds are normally heard during the first wash fill. Separate heavy clothes from light clothes. • Carefully check all stains and heavily soiled areas for recommended use of the washer...
... washer tub spins at very high RPM. • Wash and Rinse cycles going on product container for best results. • Do not overload your washer. • When loading wet items, keep the lid up, the agitation will also make clicking sounds. 7 Normal Operating Sounds The following sounds are normally heard during the first wash fill. Separate heavy clothes from light clothes. • Carefully check all stains and heavily soiled areas for recommended use of the washer...

User Manual
Page 9
... shaft into the corresponding outer tub cover shaft groove. 4. Do not disassemble after each wash. 1. Pull up the lint filter from the inner tub. Insert the inner cover shaft of the corresponding outer tub cover shaft groove. 3. English 2. Install the Inner Cover 1. Open the top lid of the washing machine. 2. Lint Filter • The lint filter must be used during washing • It must be...
... shaft into the corresponding outer tub cover shaft groove. 4. Do not disassemble after each wash. 1. Pull up the lint filter from the inner tub. Insert the inner cover shaft of the corresponding outer tub cover shaft groove. 3. English 2. Install the Inner Cover 1. Open the top lid of the washing machine. 2. Lint Filter • The lint filter must be used during washing • It must be...
User Manual
Page 10
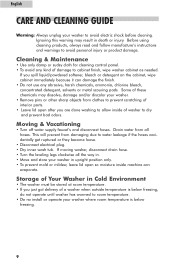
... electrical plug. • Dry inner wash tub. Moving & Vacationing • Turn off water supply faucet's and disconnect hoses. If you spill liquid/powdered softener, bleach or detergent on the cabinet, wipe cabinet immediately because it can evaporate. This will prevent from damaging due to avoid personal injury or product damage. If moving washer, disconnect drain hose. • Turn the leveling legs clockwise all hoses. Storage of Your Washer in Cold Environment...
... electrical plug. • Dry inner wash tub. Moving & Vacationing • Turn off water supply faucet's and disconnect hoses. If you spill liquid/powdered softener, bleach or detergent on the cabinet, wipe cabinet immediately because it can evaporate. This will prevent from damaging due to avoid personal injury or product damage. If moving washer, disconnect drain hose. • Turn the leveling legs clockwise all hoses. Storage of Your Washer in Cold Environment...
User Manual
Page 11
... properly installing drain hose or fill hoses. hot to hot and cold to cold.) • Water leaks: This is normal in delicate of hand-washable cycle, which has short soak period where your clothes are properly connected. (e.g. You may need to be readjusted. • Water temperature is incorrect: Check your drain hose properly. Straighten up . In order to drain properly, make sure the inlet hoses are being soaked for a short period of time. Check water level...
... properly installing drain hose or fill hoses. hot to hot and cold to cold.) • Water leaks: This is normal in delicate of hand-washable cycle, which has short soak period where your clothes are properly connected. (e.g. You may need to be readjusted. • Water temperature is incorrect: Check your drain hose properly. Straighten up . In order to drain properly, make sure the inlet hoses are being soaked for a short period of time. Check water level...
User Manual
Page 12
... change, buttons or other heavy objects could make noise (read proper instructions on the floor and uneven distribution of fabric softener. Call service 11 You many need to remove small loose sharp objects. Notes: Trouble Codes E0 E1 E2 E3 E4 E5 E7 Reason Top lid not closed during wash operation The washer is out of balance Water inlet valve closed during delay start sequence Blockage of drain hose. Problems with clothes: • Clothes are...
... change, buttons or other heavy objects could make noise (read proper instructions on the floor and uneven distribution of fabric softener. Call service 11 You many need to remove small loose sharp objects. Notes: Trouble Codes E0 E1 E2 E3 E4 E5 E7 Reason Top lid not closed during wash operation The washer is out of balance Water inlet valve closed during delay start sequence Blockage of drain hose. Problems with clothes: • Clothes are...
User Manual
Page 13
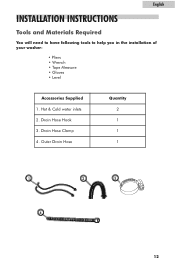
Hot & Cold water inlets 2. Drain Hose Clamp 4. English INSTALLATION INSTRUCTIONS Tools and Materials Required You will need to have following tools to help you in the installation of your washer: • Pliers • Wrench • Tape Measure • Gloves • Level Accessories Supplied 1. Drain Hose Hook 3. Outer Drain Hose Quantity 2 1 1 1 12
Hot & Cold water inlets 2. Drain Hose Clamp 4. English INSTALLATION INSTRUCTIONS Tools and Materials Required You will need to have following tools to help you in the installation of your washer: • Pliers • Wrench • Tape Measure • Gloves • Level Accessories Supplied 1. Drain Hose Hook 3. Outer Drain Hose Quantity 2 1 1 1 12

User Manual
Page 14
... its final position, you can level your washer. • Leveling legs can be adjusted by turning them counterclockwise to raise your washer. English Unpacking Your Washer • Remove all adhesive tape holding the washer accessories inside and outside. • Open the top lid to lower your washer or turning them clockwise to remove the styrofoam drum brace. which are located on the four bottom corners...
... its final position, you can level your washer. • Leveling legs can be adjusted by turning them counterclockwise to raise your washer. English Unpacking Your Washer • Remove all adhesive tape holding the washer accessories inside and outside. • Open the top lid to lower your washer or turning them clockwise to remove the styrofoam drum brace. which are located on the four bottom corners...
User Manual
Page 15
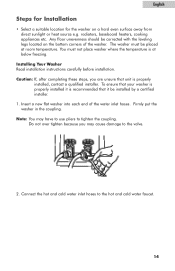
... hot and cold water inlet hoses to the hot and cold water faucet. 14 The washer must not place washer where the temperature is at room temperature. radiators, baseboard heaters, cooking appliances etc. To ensure that it be corrected with the leveling legs located on a hard even surface away from direct sunlight or heat source e.g. Caution: If, after completing these steps, you may have to use...
... hot and cold water inlet hoses to the hot and cold water faucet. 14 The washer must not place washer where the temperature is at room temperature. radiators, baseboard heaters, cooking appliances etc. To ensure that it be corrected with the leveling legs located on a hard even surface away from direct sunlight or heat source e.g. Caution: If, after completing these steps, you may have to use...

User Manual
Page 16
Using the drain hose clamp. Plug in the washer to the outer drain hose tube. 5. Install the drain hose hook to a regular 120 volt / 60 Hz, 15 amp outlet. 15 attach the drain hose to avoid soap residue remaining on clothes. 4. Note: Hot water needs to be at least 120ºF - 140ºF. (49ºC - 60ºC) for the soap to dissolve and to the unit as shown below. Connect the other end to their respective washer inlet located at the rear of at a temperature of the washer. English 3.
Using the drain hose clamp. Plug in the washer to the outer drain hose tube. 5. Install the drain hose hook to a regular 120 volt / 60 Hz, 15 amp outlet. 15 attach the drain hose to avoid soap residue remaining on clothes. 4. Note: Hot water needs to be at least 120ºF - 140ºF. (49ºC - 60ºC) for the soap to dissolve and to the unit as shown below. Connect the other end to their respective washer inlet located at the rear of at a temperature of the washer. English 3.
User Manual
Page 17
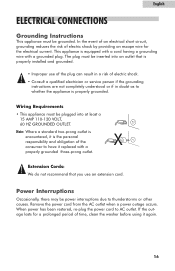
... encountered, it is equipped with a cord having a grounding wire with a properly grounded three-prong outlet. Remove the power cord from the AC outlet when a power outage occurs. In the event of an electrical short circuit, grounding reduces the risk of time, clean the washer before using it replaced with a grounded plug. Wiring Requirements • This appliance must be power interruptions due to thunderstorms or other...
... encountered, it is equipped with a cord having a grounding wire with a properly grounded three-prong outlet. Remove the power cord from the AC outlet when a power outage occurs. In the event of an electrical short circuit, grounding reduces the risk of time, clean the washer before using it replaced with a grounded plug. Wiring Requirements • This appliance must be power interruptions due to thunderstorms or other...

User Manual
Page 18
... LIMITED WARRANTY In Home Service Full ONE Year Warranty For 12 months from the date of original retail purchase, Haier will repair or replace any product modification, alteration or adjustment not authorized by improper installation or maintenance. Second through Seventh Year Haier will provide the inner stainless steel wash tub if defective in materials or workmanship. Note: This warranty commences on how long an implied warranty lasts...
... LIMITED WARRANTY In Home Service Full ONE Year Warranty For 12 months from the date of original retail purchase, Haier will repair or replace any product modification, alteration or adjustment not authorized by improper installation or maintenance. Second through Seventh Year Haier will provide the inner stainless steel wash tub if defective in materials or workmanship. Note: This warranty commences on how long an implied warranty lasts...


