Product Manual
Page 7
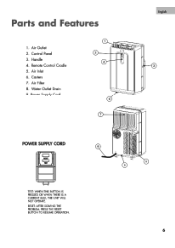
Air Outlet 2. RESET: AFTER SOLVING THE PROBLEM, PRESS THE RESET BUTTON TO RESUME OPERATION. Air Inlet 6. Handle 4. TEST: WHEN THIS BUTTON IS PRESSED OR WHEN THERE IS A CURRENT LEAK, THE UNIT WILL NOT OPERATE. Remote Control Cradle 5. Parts and Features 1. Power Supply Cord 2 4 7 POWER SUPPLY CORD I F. 9 F. English 3 6 Air Filter 8. Casters 7. Control Panel 3. Water Outlet Drain 9.
Air Outlet 2. RESET: AFTER SOLVING THE PROBLEM, PRESS THE RESET BUTTON TO RESUME OPERATION. Air Inlet 6. Handle 4. TEST: WHEN THIS BUTTON IS PRESSED OR WHEN THERE IS A CURRENT LEAK, THE UNIT WILL NOT OPERATE. Remote Control Cradle 5. Parts and Features 1. Power Supply Cord 2 4 7 POWER SUPPLY CORD I F. 9 F. English 3 6 Air Filter 8. Casters 7. Control Panel 3. Water Outlet Drain 9.
Product Manual
Page 10
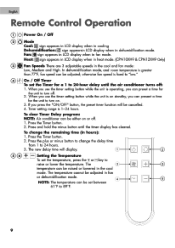
...hour delay until the timer display has cleared. Press the Timer button. 2. Heat: ®sign appears in LCD display when in heat mode. (CPN10XH9 & CPN12XH9 Only) CE Fan Speeds There are 3 adjustable speeds in hours): 1. When you can be adjusted in dehumidification mode. If you can be... cancelled. 4. English Remote Control Operation 0 I()I .J.1On / Off Timer To set the Timer for a 1 to 24 hours. 3. Press the Timer button. 2. Press and ...
...hour delay until the timer display has cleared. Press the Timer button. 2. Heat: ®sign appears in LCD display when in heat mode. (CPN10XH9 & CPN12XH9 Only) CE Fan Speeds There are 3 adjustable speeds in hours): 1. When you can be adjusted in dehumidification mode. If you can be... cancelled. 4. English Remote Control Operation 0 I()I .J.1On / Off Timer To set the Timer for a 1 to 24 hours. 3. Press the Timer button. 2. Press and ...


