
User Manual
Page 18
... 163 11.1 Taking Photos and Videos 164 Capture modes...164 Camera controls...166 On-screen controls and indicators 166 Menu Panel...168 Zooming...169 The Review screen 171 Advanced Options 172 11.2 Viewing Photos and Videos Using Album 175 Select a photo or video to view 175 View an image...176 Play...
... 163 11.1 Taking Photos and Videos 164 Capture modes...164 Camera controls...166 On-screen controls and indicators 166 Menu Panel...168 Zooming...169 The Review screen 171 Advanced Options 172 11.2 Viewing Photos and Videos Using Album 175 Select a photo or video to view 175 View an image...176 Play...
User Manual
Page 105
...mail, clear the Use the same user name and password for more information, see "To customize download and format settings." 6. Note Tap Review all download settings link at the bottom of messages that you can enter them on your e-mail provider uses an SSL connection for sending ...sent and downloaded on your ISP or e-mail provider for the Incoming mail server and Outgoing mail server settings so you can tap the Review all download settings to choose download options, message format, and other settings. For more secured e-mail. Options Automatic Send/Receive Download ...
...mail, clear the Use the same user name and password for more information, see "To customize download and format settings." 6. Note Tap Review all download settings link at the bottom of messages that you can enter them on your e-mail provider uses an SSL connection for sending ...sent and downloaded on your ISP or e-mail provider for the Incoming mail server and Outgoing mail server settings so you can tap the Review all download settings to choose download options, message format, and other settings. For more secured e-mail. Options Automatic Send/Receive Download ...
User Manual
Page 107
...2. See "To specify e-mail server settings" for details. 8. Note Tap Review all download settings to enter e-mail server settings on the right side of the desired contact is displayed, touch the displayed photo and then touch Send e-mail. Exchanging Messages 107 7. When the photo of the screen.... Send/Receive list, choose how frequent you can create a new e-mail message. Create a new e-mail message Depending on the Mail tab, touch Menu > Accounts > Accounts and then select an e-mail account from an empty message 1. Tip To choose from other e-mail accounts that are...
...2. See "To specify e-mail server settings" for details. 8. Note Tap Review all download settings to enter e-mail server settings on the right side of the desired contact is displayed, touch the displayed photo and then touch Send e-mail. Exchanging Messages 107 7. When the photo of the screen.... Send/Receive list, choose how frequent you can create a new e-mail message. Create a new e-mail message Depending on the Mail tab, touch Menu > Accounts > Accounts and then select an e-mail account from an empty message 1. Tip To choose from other e-mail accounts that are...

User Manual
Page 138
...; Mail or Hotmail address and password, select the Save password checkbox, then tap Next. 4. Choose what information you can show and customize your device. 6. After reviewing them, tap Accept. 3. After synchronization is complete, tap Done. If you select Sync e-mail, your Windows Live™ Mail or Hotmail inbox messages will see...
...; Mail or Hotmail address and password, select the Save password checkbox, then tap Next. 4. Choose what information you can show and customize your device. 6. After reviewing them, tap Accept. 3. After synchronization is complete, tap Done. If you select Sync e-mail, your Windows Live™ Mail or Hotmail inbox messages will see...

User Manual
Page 171
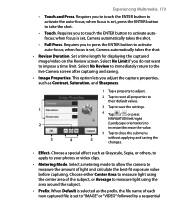
View View the captured image or video in Contacts Picture mode, tap this icon to assign the photo to the live Camera screen. Send Send the captured image or video via e-mail or MMS. Assign to Contact After capturing in the Album program. Icon Function Back Return to a selected contact. Review screen icons Delete Delete the captured image or video. Experiencing Multimedia 171 The Review screen After capturing, the Review screen lets you view, send, or delete the photo or video clip by tapping an icon at the bottom of the screen.
View View the captured image or video in Contacts Picture mode, tap this icon to assign the photo to the live Camera screen. Send Send the captured image or video via e-mail or MMS. Assign to Contact After capturing in the Album program. Icon Function Back Return to a selected contact. Review screen icons Delete Delete the captured image or video. Experiencing Multimedia 171 The Review screen After capturing, the Review screen lets you view, send, or delete the photo or video clip by tapping an icon at the bottom of the screen.
User Manual
Page 173
when focus is set , press the ENTER button to take the shot. • Touch. when focus is set , Camera automatically takes the shot. • Review Duration. When Default is selected as Grayscale, Sepia, or others, to apply to measure light using the area around the subject. • Prefix... the auto-focus; Set a time length for displaying the captured image/video on the Review screen. when focus is set , Camera automatically takes the shot. • Full Press. Requires you to touch the ENTER button to measure light using the center area of light and calculate the best...
when focus is set , press the ENTER button to take the shot. • Touch. when focus is set , Camera automatically takes the shot. • Review Duration. When Default is selected as Grayscale, Sepia, or others, to apply to measure light using the area around the subject. • Prefix... the auto-focus; Set a time length for displaying the captured image/video on the Review screen. when focus is set , Camera automatically takes the shot. • Full Press. Requires you to touch the ENTER button to measure light using the center area of light and calculate the best...
User Manual
Page 218
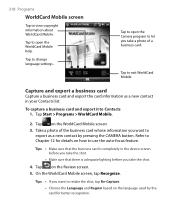
... of the business card whose information you want to export as a new contact in the device screen before you take the shot. 4. Tap on the Review screen. 5. Tap on the WorldCard Mobile screen. 3. Tips • If you take the shot. • Make sure that the business card is adequate lighting before...
... of the business card whose information you want to export as a new contact in the device screen before you take the shot. 4. Tap on the Review screen. 5. Tap on the WorldCard Mobile screen. 3. Tips • If you take the shot. • Make sure that the business card is adequate lighting before...
User Manual
Page 252
... - USB 142 Multimedia 98, 163 Multitap 80 Music tab (Home screen) 64 N News channels (web feeds) 143 Notes 190, 202 Now Playing - soft reset 236 Review screen (Camera) 171 Ring tone 70, 229 Ring type 229 RSS Hub e-mail 110 - hard reset 236 - add audio clip 101 - add photo/video 100...
... - USB 142 Multimedia 98, 163 Multitap 80 Music tab (Home screen) 64 N News channels (web feeds) 143 Notes 190, 202 Now Playing - soft reset 236 Review screen (Camera) 171 Ring tone 70, 229 Ring type 229 RSS Hub e-mail 110 - hard reset 236 - add audio clip 101 - add photo/video 100...


