User Manual
Page 129
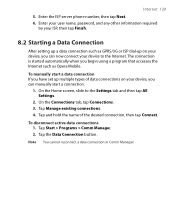
Enter your user name, password, and any other information required by your ISP, then tap Finish. 8.2 Starting a Data Connection After setting up a data connection such as Opera Mobile. ... to the Settings tab and then tap All Settings. 2. To disconnect active data connections 1. Tap Start > Programs > Comm Manager. 2. Internet 129 5. To manually start a data connection If you can manually start a connection. 1. Note You cannot reconnect a data connection in Comm Manager. On the Home screen, slide to the Internet. Tap the Data...
Enter your user name, password, and any other information required by your ISP, then tap Finish. 8.2 Starting a Data Connection After setting up a data connection such as Opera Mobile. ... to the Settings tab and then tap All Settings. 2. To disconnect active data connections 1. Tap Start > Programs > Comm Manager. 2. Internet 129 5. To manually start a data connection If you can manually start a connection. 1. Note You cannot reconnect a data connection in Comm Manager. On the Home screen, slide to the Internet. Tap the Data...
User Manual
Page 213
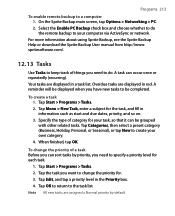
... To enable remote backup to the task list. For more information about using Sprite Backup, see the Sprite Backup Help or download the Sprite Backup User manual from http://www. Your tasks are displayed in red. Overdue tasks are assigned a Normal priority by priority, you can sort tasks by default. Tap Menu...
... To enable remote backup to the task list. For more information about using Sprite Backup, see the Sprite Backup Help or download the Sprite Backup User manual from http://www. Your tasks are displayed in red. Overdue tasks are assigned a Normal priority by priority, you can sort tasks by default. Tap Menu...

Quick Start Guide
Page 6
... away when you turn on your device for the first time. Inside the Box You should find the following items inside the box. • The Touch Diamond Phone • Battery • Extra Stylus • AC Adapter • Screen protector • Quick Start Guide and TouchFLO 3D Guide • Wired stereo headset ... Disc that you get started with the device. The Applications Disc also includes some programs that came with your device, please refer to the User Manual PDF that we feel that you want to the Touch Diamond Quick Start Guide Congratulations on your purchase of the...
... away when you turn on your device for the first time. Inside the Box You should find the following items inside the box. • The Touch Diamond Phone • Battery • Extra Stylus • AC Adapter • Screen protector • Quick Start Guide and TouchFLO 3D Guide • Wired stereo headset ... Disc that you get started with the device. The Applications Disc also includes some programs that came with your device, please refer to the User Manual PDF that we feel that you want to the Touch Diamond Quick Start Guide Congratulations on your purchase of the...

Quick Start Guide
Page 12
12 Quick Start Guide 7. The default home screen of the device is the TouchFLO™ 3D Home screen which allows finger-touch access to the most important functions such as contacts, text messages, e-mail, Internet, and more information about TouchFLO 3D, please refer to the Home screen. For more . The Home Screen After the device restarts from configuring your data connections, you are taken to the TouchFLO 3D Guide and User Manual.
12 Quick Start Guide 7. The default home screen of the device is the TouchFLO™ 3D Home screen which allows finger-touch access to the most important functions such as contacts, text messages, e-mail, Internet, and more information about TouchFLO 3D, please refer to the Home screen. For more . The Home Screen After the device restarts from configuring your data connections, you are taken to the TouchFLO 3D Guide and User Manual.
Quick Start Guide
Page 15
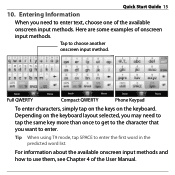
... T9 mode, tap SPACE to choose another onscreen input method. Depending on the keyboard. Quick Start Guide 15 10. Here are some examples of the User Manual.
... T9 mode, tap SPACE to choose another onscreen input method. Depending on the keyboard. Quick Start Guide 15 10. Here are some examples of the User Manual.

Quick Start Guide
Page 18
To connect to an open (unsecured) wireless network, then tap OK. Tap the open Wi-Fi network 1. On the Settings screen, tap Communications > Wi-Fi to Chapter 8 of the detected wireless networks are displayed on Wi-Fi. 3. The network names of the User Manual. Set Up Wi-Fi Connect to a Wi-Fi hotspot to the Settings tab. 2. On the Home screen, slide to browse the Internet. To learn how to connect to a secured network, please refer to turn on a pop-up message window. 18 Quick Start Guide 14.
To connect to an open (unsecured) wireless network, then tap OK. Tap the open Wi-Fi network 1. On the Settings screen, tap Communications > Wi-Fi to Chapter 8 of the detected wireless networks are displayed on Wi-Fi. 3. The network names of the User Manual. Set Up Wi-Fi Connect to a Wi-Fi hotspot to the Settings tab. 2. On the Home screen, slide to browse the Internet. To learn how to connect to a secured network, please refer to turn on a pop-up message window. 18 Quick Start Guide 14.
Quick Start Guide
Page 28
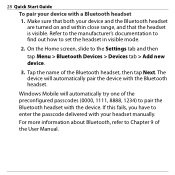
Tap the name of the User Manual. If this fails, you have to enter the passcode delivered with the Bluetooth headset. The device will automatically try one of the preconfigured passcodes (0000, ... Mobile will automatically pair the device with your device and the Bluetooth headset are turned on and within close range, and that both your headset manually. For more information about Bluetooth, refer to the Settings tab and then tap Menu > Bluetooth Devices > Devices tab > Add new device. 3. On the Home screen...
Tap the name of the User Manual. If this fails, you have to enter the passcode delivered with the Bluetooth headset. The device will automatically try one of the preconfigured passcodes (0000, ... Mobile will automatically pair the device with your device and the Bluetooth headset are turned on and within close range, and that both your headset manually. For more information about Bluetooth, refer to the Settings tab and then tap Menu > Bluetooth Devices > Devices tab > Add new device. 3. On the Home screen...

Quick Start Guide
Page 30
On the Tasks screen, tap Tap here to enter the task. Tap the ENTER button on the onscreen keyboard. Refer to Chapter 12 of the User Manual to learn more about the advanced features of Things to Do Use Tasks to help you remember things that you have to -do . To create a to do list 1. Tip You can also tap outside the field to add a new task and then enter the task name. 3. Tap Start > Programs > Tasks. 2. 30 Quick Start Guide 20. Keeping Track of Tasks.
On the Tasks screen, tap Tap here to enter the task. Tap the ENTER button on the onscreen keyboard. Refer to Chapter 12 of the User Manual to learn more about the advanced features of Things to Do Use Tasks to help you remember things that you have to -do . To create a to do list 1. Tip You can also tap outside the field to add a new task and then enter the task name. 3. Tap Start > Programs > Tasks. 2. 30 Quick Start Guide 20. Keeping Track of Tasks.
Quick Start Guide
Page 32
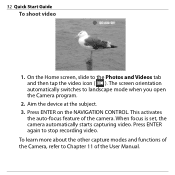
To learn more about the other capture modes and functions of the Camera, refer to the Photos and Videos tab and then tap the video icon ( ). Aim the device at the subject. 3. Press ENTER on the NAVIGATION CONTROL. 32 Quick Start Guide To shoot video 1. The screen orientation automatically switches to stop recording video. This activates the auto-focus feature of the User Manual. Press ENTER again to landscape mode when you open the Camera program. 2. When focus is set, the camera automatically starts capturing video. On the Home screen, slide to Chapter 11 of the camera.
To learn more about the other capture modes and functions of the Camera, refer to the Photos and Videos tab and then tap the video icon ( ). Aim the device at the subject. 3. Press ENTER on the NAVIGATION CONTROL. 32 Quick Start Guide To shoot video 1. The screen orientation automatically switches to stop recording video. This activates the auto-focus feature of the User Manual. Press ENTER again to landscape mode when you open the Camera program. 2. When focus is set, the camera automatically starts capturing video. On the Home screen, slide to Chapter 11 of the camera.
Quick Start Guide
Page 34
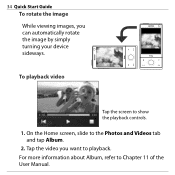
On the Home screen, slide to show the playback controls. 1. To playback video Tap the screen to the Photos and Videos tab and tap Album. 2. For more information about Album, refer to Chapter 11 of the User Manual. Tap the video you can automatically rotate the image by simply turning your device sideways. 34 Quick Start Guide To rotate the image While viewing images, you want to playback.
On the Home screen, slide to show the playback controls. 1. To playback video Tap the screen to the Photos and Videos tab and tap Album. 2. For more information about Album, refer to Chapter 11 of the User Manual. Tap the video you can automatically rotate the image by simply turning your device sideways. 34 Quick Start Guide To rotate the image While viewing images, you want to playback.

Quick Start Guide
Page 35
Install ActiveSync 4.5 on the Operating System of your PC, you can refer to Chapter 5 of the User Manual to know which information and files you will need either Microsoft ActiveSync® 4.5 (or later) or Windows Mobile® Device Center to synchronize and then ...
Install ActiveSync 4.5 on the Operating System of your PC, you can refer to Chapter 5 of the User Manual to know which information and files you will need either Microsoft ActiveSync® 4.5 (or later) or Windows Mobile® Device Center to synchronize and then ...

Quick Start Guide
Page 36
Click Finish. Select the information you want to Chapter 5 of the User Manual. 36 Quick Start Guide 5. On the screen, click Set up your device and then click Set Up. Enter the name for your device. 2. For more information about synchronization, refer to synchronize and click Next. 3. Windows Mobile Device Center will open. To synchronize your PC using the supplied USB cable. Connect your device to the PC. Select whether or not to allow wireless data connections on your device while it is connected to your device with a Windows Vista PC 1. Click Next. 6.
Click Finish. Select the information you want to Chapter 5 of the User Manual. 36 Quick Start Guide 5. On the screen, click Set up your device and then click Set Up. Enter the name for your device. 2. For more information about synchronization, refer to synchronize and click Next. 3. Windows Mobile Device Center will open. To synchronize your PC using the supplied USB cable. Connect your device to the PC. Select whether or not to allow wireless data connections on your device while it is connected to your device with a Windows Vista PC 1. Click Next. 6.

Quick Start Guide
Page 39
... After synchronizing music files to your device. The song starts to music 1. Touch and hold on this bar to display the Jog bar: Drag right or left on your device, you want to the TouchFLO 3D Guide and User Manual. To listen to playback. Slide to the All Songs tab and then tap...
... After synchronizing music files to your device. The song starts to music 1. Touch and hold on this bar to display the Jog bar: Drag right or left on your device, you want to the TouchFLO 3D Guide and User Manual. To listen to playback. Slide to the All Songs tab and then tap...
Quick Start Guide
Page 40
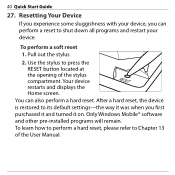
... pre-installed programs will remain. To learn how to perform a hard reset, please refer to press the RESET button located at the opening of the User Manual. After a hard reset, the device is restored to shut down all programs and restart your device, you first purchased it and turned it on. Use...
... pre-installed programs will remain. To learn how to perform a hard reset, please refer to press the RESET button located at the opening of the User Manual. After a hard reset, the device is restored to shut down all programs and restart your device, you first purchased it and turned it on. Use...


