Owners Manual
Page 2
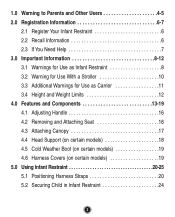
... for Use as Infant Restraint 8 3.2 Warning for Use With a Stroller 10 3.3 Additional Warnings for Use as Carrier 11 3.4 Height and Weight Limits 12 4.0 Features and Components 13-19 4.1 Adjusting Handle 16 4.2 Removing and Attaching Seat 16 4.3 Attaching Canopy 17 4.4 Head Support (on certain models 18 4.5 Cold Weather Boot (on certain models 19 4.6 Harness Covers (on certain models 19 5.0 Using Infant Restraint 20-25 5.1 Positioning Harness Straps 20 5.2 Securing Child in Infant Restraint...
... for Use as Infant Restraint 8 3.2 Warning for Use With a Stroller 10 3.3 Additional Warnings for Use as Carrier 11 3.4 Height and Weight Limits 12 4.0 Features and Components 13-19 4.1 Adjusting Handle 16 4.2 Removing and Attaching Seat 16 4.3 Attaching Canopy 17 4.4 Head Support (on certain models 18 4.5 Cold Weather Boot (on certain models 19 4.6 Harness Covers (on certain models 19 5.0 Using Infant Restraint 20-25 5.1 Positioning Harness Straps 20 5.2 Securing Child in Infant Restraint...

Owners Manual
Page 3
... Seat Requirements 26 6.2 Vehicle Seat Belt Requirements 27 6.2.1 UNSAFE Vehicle Belt Systems 28 6.2.2 SAFE Vehicle Belt Systems 29 6.3 LATCH Locations 32 7.0 How to Install the Infant Restraint/Base 33-40 7.1 Installing the Infant Restraint Without Base Using Vehicle Belt 33 7.2 Installing the Infant Restraint and Base Using Vehicle Belt 34 7.3 Using LATCH to Install Base 37 7.4 Reclining Infant Restraint/Base 38 8.0 Additional Information 41-43 8.1 Airplane Use 41 8.2 Storing LATCH 41 8.3 Cleaning and Maintenance 42 Replacement Parts...
... Seat Requirements 26 6.2 Vehicle Seat Belt Requirements 27 6.2.1 UNSAFE Vehicle Belt Systems 28 6.2.2 SAFE Vehicle Belt Systems 29 6.3 LATCH Locations 32 7.0 How to Install the Infant Restraint/Base 33-40 7.1 Installing the Infant Restraint Without Base Using Vehicle Belt 33 7.2 Installing the Infant Restraint and Base Using Vehicle Belt 34 7.3 Using LATCH to Install Base 37 7.4 Reclining Infant Restraint/Base 38 8.0 Additional Information 41-43 8.1 Airplane Use 41 8.2 Storing LATCH 41 8.3 Cleaning and Maintenance 42 Replacement Parts...

Owners Manual
Page 5
Properly securing the infant restraint in the vehicle using a seat belt designed to use with infant restraints, even though they can easily be threaded through the infant restraint! 5 Many seat belts are NOT safe to restrain an infant restraint or by using LATCH. Properly reclining the infant restraint. 7. Properly routing the vehicle seat belt or LATCH. 6. 5.
Properly securing the infant restraint in the vehicle using a seat belt designed to use with infant restraints, even though they can easily be threaded through the infant restraint! 5 Many seat belts are NOT safe to restrain an infant restraint or by using LATCH. Properly reclining the infant restraint. 7. Properly routing the vehicle seat belt or LATCH. 6. 5.
Owners Manual
Page 6
.... Send your infant restraint. The model number and manufactured in (date) to http://www.NHTSA.gov • Graco: 1-800-345-4109 or www.gracobaby.com 6 Child restraints could be found on a label on the bottom of your name, address and model number/manufactured in (date) can be recalled for safety reasons. You must register this restraint to the seat cover and mail...
.... Send your infant restraint. The model number and manufactured in (date) to http://www.NHTSA.gov • Graco: 1-800-345-4109 or www.gracobaby.com 6 Child restraints could be found on a label on the bottom of your name, address and model number/manufactured in (date) can be recalled for safety reasons. You must register this restraint to the seat cover and mail...
Owners Manual
Page 9
...risk of the infant restraint. „DO NOT use any accessories or parts supplied by other difficulties in a sharp turn, sudden stop or crash. Remove it or make sure unsecured LATCH connectors are properly stored on base. • REPLACE THE INFANT RESTRAINT AND BASE AFTER AN ACCIDENT... ownerÊs manual as well as pre-term babies or those who have tested positive for infant restraint installation. • NEVER LEAVE YOUR CHILD UNATTENDED. • NEVER LEAVE AN INFANT RESTRAINT AND BASE UNSECURED IN YOUR VEHICLE. • SOME SPECIAL NEEDS CHILDREN, such as these instructions for...
...risk of the infant restraint. „DO NOT use any accessories or parts supplied by other difficulties in a sharp turn, sudden stop or crash. Remove it or make sure unsecured LATCH connectors are properly stored on base. • REPLACE THE INFANT RESTRAINT AND BASE AFTER AN ACCIDENT... ownerÊs manual as well as pre-term babies or those who have tested positive for infant restraint installation. • NEVER LEAVE YOUR CHILD UNATTENDED. • NEVER LEAVE AN INFANT RESTRAINT AND BASE UNSECURED IN YOUR VEHICLE. • SOME SPECIAL NEEDS CHILDREN, such as these instructions for...
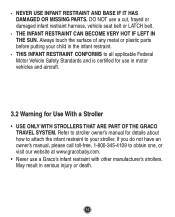
Owners Manual
Page 10
... ownerÊs manual, please call toll-free, 1-800-345-4109 to all applicable Federal Motor Vehicle Safety Standards and is certified for Use With a Stroller • USE ONLY WITH STROLLERS THAT ARE PART OF THE GRACO TRAVEL SYSTEM. • NEVER USE INFANT RESTRAINT AND BASE IF IT HAS DAMAGED OR MISSING PARTS. Always touch the surface of any metal or plastic parts before putting your stroller...
... ownerÊs manual, please call toll-free, 1-800-345-4109 to all applicable Federal Motor Vehicle Safety Standards and is certified for Use With a Stroller • USE ONLY WITH STROLLERS THAT ARE PART OF THE GRACO TRAVEL SYSTEM. • NEVER USE INFANT RESTRAINT AND BASE IF IT HAS DAMAGED OR MISSING PARTS. Always touch the surface of any metal or plastic parts before putting your stroller...

Owners Manual
Page 11
... locks into position before lifting carrier. Never leave child in loose restraint straps. DO NOT hang strings on soft surfaces and suffocate child. DO NOT attach strings to toys. 11 DO NOT place items with a string around a childÊs neck, such as Carrier • FALL HAZARD: ChildÊ...;s movements can slide carrier. DO NOT place carrier near edges of a shopping cart. • SUFFOCATION HAZARD: Infant carrier can strangle in carrier when straps are loose or ...
... locks into position before lifting carrier. Never leave child in loose restraint straps. DO NOT hang strings on soft surfaces and suffocate child. DO NOT attach strings to toys. 11 DO NOT place items with a string around a childÊs neck, such as Carrier • FALL HAZARD: ChildÊ...;s movements can slide carrier. DO NOT place carrier near edges of a shopping cart. • SUFFOCATION HAZARD: Infant carrier can strangle in carrier when straps are loose or ...

Owners Manual
Page 12
3.4 Height and Weight Limits TO AVOID SERIOUS INJURY OR DEATH DO NOT USE THE INFANT RESTRAINT WITH A CHILD LARGER OR SMALLER THAN THE WEIGHT AND HEIGHT RANGE LISTED BELOW. Your child MUST meet the following requirements: • WEIGHT: 5-30 lbs. (2.3-13.6 kg) AND • HEIGHT: 32 inches (81 cm) or less in height. 12
3.4 Height and Weight Limits TO AVOID SERIOUS INJURY OR DEATH DO NOT USE THE INFANT RESTRAINT WITH A CHILD LARGER OR SMALLER THAN THE WEIGHT AND HEIGHT RANGE LISTED BELOW. Your child MUST meet the following requirements: • WEIGHT: 5-30 lbs. (2.3-13.6 kg) AND • HEIGHT: 32 inches (81 cm) or less in height. 12

Owners Manual
Page 14
The locking clip is properly reclined. Canopy Level indicator* OwnerÊs manual pocket Metal junction plate *Level Indicator **Locking Clip REAR VIEW Release handle Harness slot Anchor Clip Harness storage for a smaller child Locking clip Harness adjustment storage** strap The level indicator is attached to use it with certain types of the infant restraint. You will need to the side of the infant restraint and indicates whether or not the infant restraint is stored on the bottom of vehicle seat belts. 14
The locking clip is properly reclined. Canopy Level indicator* OwnerÊs manual pocket Metal junction plate *Level Indicator **Locking Clip REAR VIEW Release handle Harness slot Anchor Clip Harness storage for a smaller child Locking clip Harness adjustment storage** strap The level indicator is attached to use it with certain types of the infant restraint. You will need to the side of the infant restraint and indicates whether or not the infant restraint is stored on the bottom of vehicle seat belts. 14

Owners Manual
Page 16
... to be sure it is locked firmly in position. – Carrying A B — C D Sitting 4.2 Removing and Attaching Infant Restraint To remove, squeeze release handle at back of infant restraint and lift out of base as shown ˜. ˜ To put infant restraint in base, push infant restraint down until it is the sitting position, NEVER use position B in place —. 3. Pull...
... to be sure it is locked firmly in position. – Carrying A B — C D Sitting 4.2 Removing and Attaching Infant Restraint To remove, squeeze release handle at back of infant restraint and lift out of base as shown ˜. ˜ To put infant restraint in base, push infant restraint down until it is the sitting position, NEVER use position B in place —. 3. Pull...
Owners Manual
Page 19
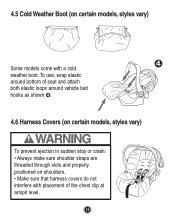
4.5 Cold Weather Boot (on shoulders. • Make sure that harness covers do not interfere with a cold ™ weather boot. To use, wrap elastic around bottom of seat and attach both elastic loops around vehicle belt hooks as shown ™. 4.6 Harness Covers (on certain models, styles vary) To prevent ejection in sudden stop or crash: • Always make sure shoulder straps are threaded through slots and properly positioned on certain models, styles vary) Some models come with placement of the chest clip at armpit level. 19
4.5 Cold Weather Boot (on shoulders. • Make sure that harness covers do not interfere with a cold ™ weather boot. To use, wrap elastic around bottom of seat and attach both elastic loops around vehicle belt hooks as shown ™. 4.6 Harness Covers (on certain models, styles vary) To prevent ejection in sudden stop or crash: • Always make sure shoulder straps are threaded through slots and properly positioned on certain models, styles vary) Some models come with placement of the chest clip at armpit level. 19

Owners Manual
Page 20
.... 2. If the harness straps must be adjusted: remove child from base and rotate handle down to the following instructions. 1. Place child in infant restraint as shown –. 3. The harness straps must be properly adjusted to the proper harness slots by doing the following: Use harness slots even with or just below childÊs shoulders 20 Remove infant restraint from infant restraint and move harness straps to fit your childÊs shoulders...
.... 2. If the harness straps must be adjusted: remove child from base and rotate handle down to the following instructions. 1. Place child in infant restraint as shown –. 3. The harness straps must be properly adjusted to the proper harness slots by doing the following: Use harness slots even with or just below childÊs shoulders 20 Remove infant restraint from infant restraint and move harness straps to fit your childÊs shoulders...

Owners Manual
Page 25
... the childÊs body into an unnatural position ›. 25 Position harness clip in a relatively straight line without sagging. It lies in middle of chest, gracobaby.com level with the armpits. 8. Snap harness clip pieces together ™. ™ gracobaby.com 6. A snug strap should be able to tighten straps as shown š. CHECK that harness straps are flat and snug on the harness clip...
... the childÊs body into an unnatural position ›. 25 Position harness clip in a relatively straight line without sagging. It lies in middle of chest, gracobaby.com level with the armpits. 8. Snap harness clip pieces together ™. ™ gracobaby.com 6. A snug strap should be able to tighten straps as shown š. CHECK that harness straps are flat and snug on the harness clip...
Owners Manual
Page 27
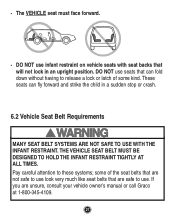
... of the seat belts that are not safe to use look very much like seat belts that are unsure, consult your vehicle ownerÊs manual or call Graco at 1-800-345-4109. 27 If you are safe to use seats that will not lock in a sudden stop or crash. 6.2 Vehicle Seat Belt Requirements MANY SEAT BELT SYSTEMS ARE NOT SAFE TO USE WITH THE INFANT RESTRAINT. THE VEHICLE SEAT BELT MUST BE...
... of the seat belts that are not safe to use look very much like seat belts that are unsure, consult your vehicle ownerÊs manual or call Graco at 1-800-345-4109. 27 If you are safe to use seats that will not lock in a sudden stop or crash. 6.2 Vehicle Seat Belt Requirements MANY SEAT BELT SYSTEMS ARE NOT SAFE TO USE WITH THE INFANT RESTRAINT. THE VEHICLE SEAT BELT MUST BE...
Owners Manual
Page 29
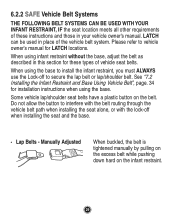
... using the base to install the infant restraint, you must ALWAYS use the Lock-off to interfere with the belt routing through the vehicle belt path when installing the seat alone, or with the lock-off when installing the seat and the base. • Lap Belts - Do not allow the button to secure the lap belt or lap/shoulder belt. Please refer to vehicle ownerÊs manual for installation instructions when using infant...
... using the base to install the infant restraint, you must ALWAYS use the Lock-off to interfere with the belt routing through the vehicle belt path when installing the seat alone, or with the lock-off when installing the seat and the base. • Lap Belts - Do not allow the button to secure the lap belt or lap/shoulder belt. Please refer to vehicle ownerÊs manual for installation instructions when using infant...

Owners Manual
Page 31
... use with locking clip as described in another way as shown – and —. 4. Locking clip goes here, 1/2 inch (1 cm) from the buckle 31 Unbuckle the belt without the base unless your vehicle owner's manual. Check that slides Belt with the infant restraint) when using the infant restraint without allowing it to prevent movement of the lap portion of the belt. To Install Locking Clip: (DO NOT use a locking clip...
... use with locking clip as described in another way as shown – and —. 4. Locking clip goes here, 1/2 inch (1 cm) from the buckle 31 Unbuckle the belt without the base unless your vehicle owner's manual. Check that slides Belt with the infant restraint) when using the infant restraint without allowing it to prevent movement of the lap portion of the belt. To Install Locking Clip: (DO NOT use a locking clip...

Owners Manual
Page 34
Tighten the vehicle seat belt. Refer to your vehicle ownerÊs manual and the instructions in „6.2.2 SAFE Vehicle Belt Systems‰, page.29-31, on tightening your free hand on a vehicle seat. Test infant restraint for secure installation as described in a rear-facing position on the infant — restraint — and pull and tighten the vehicle belt. 5. Open the lock-off and route...
Tighten the vehicle seat belt. Refer to your vehicle ownerÊs manual and the instructions in „6.2.2 SAFE Vehicle Belt Systems‰, page.29-31, on tightening your free hand on a vehicle seat. Test infant restraint for secure installation as described in a rear-facing position on the infant — restraint — and pull and tighten the vehicle belt. 5. Open the lock-off and route...

Owners Manual
Page 39
... to lower the foot –. Readjust the vehicle seat belt as necessary to secure the infant restraint firmly in the level indicator when the infant ˜ restraint is resting on Base: Turn the knob clockwise to the desired setting – to raise the foot —. When using only the infant restraint, if there is completely extended then raise...
... to lower the foot –. Readjust the vehicle seat belt as necessary to secure the infant restraint firmly in the level indicator when the infant ˜ restraint is resting on Base: Turn the knob clockwise to the desired setting – to raise the foot —. When using only the infant restraint, if there is completely extended then raise...

Owners Manual
Page 41
... the infant restraint securely. 8.2 Storing LATCH 1. Repeat step 3 for connector with a lap only belt leaving the lock off fully opened to allow for buckle clearance. After fastening onto storage bar, pull on board. 8.0 Additional Information 8.1 Airplane Use When installing in an airplane using the shell only installing follow the same instructions as in forward-facing aircraft seat. If using the base, install the...
... the infant restraint securely. 8.2 Storing LATCH 1. Repeat step 3 for connector with a lap only belt leaving the lock off fully opened to allow for buckle clearance. After fastening onto storage bar, pull on board. 8.0 Additional Information 8.1 Airplane Use When installing in an airplane using the shell only installing follow the same instructions as in forward-facing aircraft seat. If using the base, install the...

Owners Manual
Page 44
Replacement Parts To purchase parts or accessories or for warranty information in the United States, please contact us at the following: www.gracobaby.com or 1-800-345-4109 44
Replacement Parts To purchase parts or accessories or for warranty information in the United States, please contact us at the following: www.gracobaby.com or 1-800-345-4109 44


