
Owners Manual
Page 2
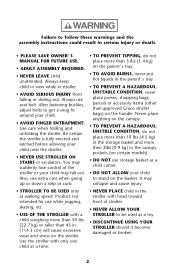
... fastening buckles, adjust belts to get a snug fit around your child near the stroller. • NEVER USE STROLLER ON STAIRS or escalators. Always use while jogging, skating, etc. • USE OF THE STROLLER with head toward front of the stroller or your child to stand on the handle. Failure to follow these warnings and the assembly instructions could result in stroller. • AVOID SERIOUS INJURY...
... fastening buckles, adjust belts to get a snug fit around your child near the stroller. • NEVER USE STROLLER ON STAIRS or escalators. Always use while jogging, skating, etc. • USE OF THE STROLLER with head toward front of the stroller or your child to stand on the handle. Failure to follow these warnings and the assembly instructions could result in stroller. • AVOID SERIOUS INJURY...
Owners Manual
Page 3
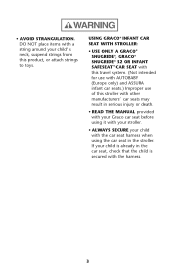
... items with the car seat harness when using it with your stroller. • ALWAYS SECURE your child with a string around your child' s neck, suspend strings from this stroller with other manufacturers' car seats may result in the car seat, check that the child is secured with the harness. 3 USING GRACO® INFANT CAR SEAT WITH STROLLER: • USE ONLY A GRACO® SNUGRIDE®, GRACO® SNUGRIDE® 32 OR INFANT SAFESEAT™ CAR SEAT with this travel system. (Not intended for use...
... items with the car seat harness when using it with your stroller. • ALWAYS SECURE your child with a string around your child' s neck, suspend strings from this stroller with other manufacturers' car seats may result in the car seat, check that the child is secured with the harness. 3 USING GRACO® INFANT CAR SEAT WITH STROLLER: • USE ONLY A GRACO® SNUGRIDE®, GRACO® SNUGRIDE® 32 OR INFANT SAFESEAT™ CAR SEAT with this travel system. (Not intended for use...
Owners Manual
Page 34
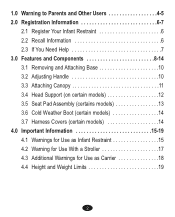
... Help 7 3.0 Features and Components 8-14 3.1 Removing and Attaching Base 10 3.2 Adjusting Handle 10 3.3 Attaching Canopy 11 3.4 Head Support (on certain models 12 3.5 Seat Pad Assembly (certains models 13 3.6 Cold Weather Boot (certain models 14 3.7 Harness Covers (certain models 14 4.0 Important Information 15-19 4.1 Warnings for Use as Infant Restraint 15 4.2 Warning for Use With a Stroller 17 4.3 Additional Warnings for Use as Carrier 18 4.4 Height and Weight Limits 19 2
... Help 7 3.0 Features and Components 8-14 3.1 Removing and Attaching Base 10 3.2 Adjusting Handle 10 3.3 Attaching Canopy 11 3.4 Head Support (on certain models 12 3.5 Seat Pad Assembly (certains models 13 3.6 Cold Weather Boot (certain models 14 3.7 Harness Covers (certain models 14 4.0 Important Information 15-19 4.1 Warnings for Use as Infant Restraint 15 4.2 Warning for Use With a Stroller 17 4.3 Additional Warnings for Use as Carrier 18 4.4 Height and Weight Limits 19 2
Owners Manual
Page 35
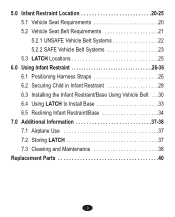
5.0 Infant Restraint Location 20-25 5.1 Vehicle Seat Requirements 20 5.2 Vehicle Seat Belt Requirements 21 5.2.1 UNSAFE Vehicle Belt Systems 22 5.2.2 SAFE Vehicle Belt Systems 23 5.3 LATCH Locations 25 6.0 Using Infant Restraint 26-36 6.1 Positioning Harness Straps 26 6.2 Securing Child in Infant Restraint 28 6.3 Installing the Infant Restraint/Base Using Vehicle Belt . . .30 6.4 Using LATCH to Install Base 33 6.5 Reclining Infant Restraint/Base 34 7.0 Additional Information 37-38 7.1 Airplane Use 37 7.2 Storing LATCH 37 7.3 Cleaning and Maintenance 38 Replacement Parts 40 3
5.0 Infant Restraint Location 20-25 5.1 Vehicle Seat Requirements 20 5.2 Vehicle Seat Belt Requirements 21 5.2.1 UNSAFE Vehicle Belt Systems 22 5.2.2 SAFE Vehicle Belt Systems 23 5.3 LATCH Locations 25 6.0 Using Infant Restraint 26-36 6.1 Positioning Harness Straps 26 6.2 Securing Child in Infant Restraint 28 6.3 Installing the Infant Restraint/Base Using Vehicle Belt . . .30 6.4 Using LATCH to Install Base 33 6.5 Reclining Infant Restraint/Base 34 7.0 Additional Information 37-38 7.1 Airplane Use 37 7.2 Storing LATCH 37 7.3 Cleaning and Maintenance 38 Replacement Parts 40 3
Owners Manual
Page 37
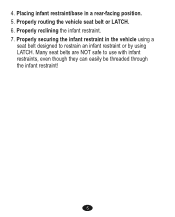
Properly routing the vehicle seat belt or LATCH. 6. Properly securing the infant restraint in a rear-facing position. 5. 4. Placing infant restraint/base in the vehicle using LATCH. Many seat belts are NOT safe to restrain an infant restraint or by using a seat belt designed to use with infant restraints, even though they can easily be threaded through the infant restraint! 5 Properly reclining the infant restraint. 7.
Properly routing the vehicle seat belt or LATCH. 6. Properly securing the infant restraint in a rear-facing position. 5. 4. Placing infant restraint/base in the vehicle using LATCH. Many seat belts are NOT safe to restrain an infant restraint or by using a seat belt designed to use with infant restraints, even though they can easily be threaded through the infant restraint! 5 Properly reclining the infant restraint. 7.
Owners Manual
Page 38
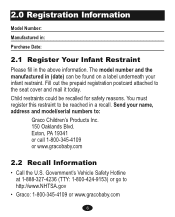
... on a label underneath your name, address and model/serial numbers to http://www.NHTSA.gov • Graco: 1-800-345-4109 or www.gracobaby.com 6 Send your infant restraint. Fill out the prepaid registration postcard attached to be recalled for safety reasons. You must register this restraint to the seat cover and mail it today. Exton, PA 19341...
... on a label underneath your name, address and model/serial numbers to http://www.NHTSA.gov • Graco: 1-800-345-4109 or www.gracobaby.com 6 Send your infant restraint. Fill out the prepaid registration postcard attached to be recalled for safety reasons. You must register this restraint to the seat cover and mail it today. Exton, PA 19341...
Owners Manual
Page 42
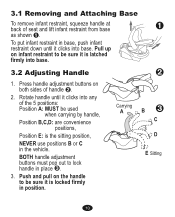
... adjustment buttons on both sides of seat and lift infant restraint from base – as shown –. 3.1 Removing and Attaching Base To remove infant restraint, squeeze handle at back of handle —. 2. Pull up on the handle to lock handle in position. ˜ Carrying A B C D E Sitting 10 Push and pull on infant restraint to be used when carrying by handle, Position...
... adjustment buttons on both sides of seat and lift infant restraint from base – as shown –. 3.1 Removing and Attaching Base To remove infant restraint, squeeze handle at back of handle —. 2. Pull up on the handle to lock handle in position. ˜ Carrying A B C D E Sitting 10 Push and pull on infant restraint to be used when carrying by handle, Position...
Owners Manual
Page 44
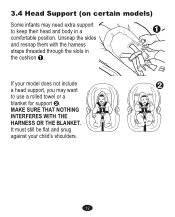
It must still be flat and snug against your model does not include a head support, you may need extra support to use a rolled towel or a blanket for support —. Unsnap the sides and resnap them with the harness straps threaded through the slots in a – comfortable position. If your child's shoulders. 12 3.4 Head Support (on certain models) Some infants may want — to keep their head and body in the cushion –. MAKE SURE THAT NOTHING INTERFERES WITH THE HARNESS OR THE BLANKET.
It must still be flat and snug against your model does not include a head support, you may need extra support to use a rolled towel or a blanket for support —. Unsnap the sides and resnap them with the harness straps threaded through the slots in a – comfortable position. If your child's shoulders. 12 3.4 Head Support (on certain models) Some infants may want — to keep their head and body in the cushion –. MAKE SURE THAT NOTHING INTERFERES WITH THE HARNESS OR THE BLANKET.
Owners Manual
Page 46
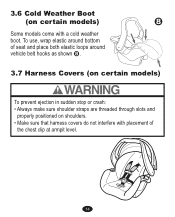
To use, wrap elastic around bottom of the chest clip at armpit level. 14 3.6 Cold Weather Boot (on shoulders. • Make sure that harness covers do not interfere with placement of seat and place both elastic loops around vehicle belt hooks as shown . 3.7 Harness Covers (on certain models) To prevent ejection in sudden stop or crash: • Always make sure shoulder straps are threaded through slots and properly positioned on certain models) Some models come with a cold weather boot.
To use, wrap elastic around bottom of the chest clip at armpit level. 14 3.6 Cold Weather Boot (on shoulders. • Make sure that harness covers do not interfere with placement of seat and place both elastic loops around vehicle belt hooks as shown . 3.7 Harness Covers (on certain models) To prevent ejection in sudden stop or crash: • Always make sure shoulder straps are threaded through slots and properly positioned on certain models) Some models come with a cold weather boot.
Owners Manual
Page 48
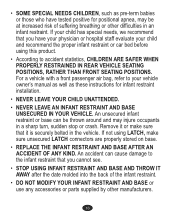
... owner's manual as well as pre-term babies or those who have your physician or hospital staff evaluate your child has special needs, we recommend that you cannot see. • STOP USING INFANT RESTRAINT AND BASE AND THROW IT AWAY after the date ...base. • REPLACE THE INFANT RESTRAINT AND BASE AFTER AN ACCIDENT OF ANY KIND. If your child and recommend the proper infant restraint or car bed before using LATCH, make sure that you have tested positive for infant restraint installation. • NEVER LEAVE YOUR CHILD UNATTENDED. • NEVER LEAVE AN INFANT RESTRAINT AND BASE...
... owner's manual as well as pre-term babies or those who have your physician or hospital staff evaluate your child has special needs, we recommend that you cannot see. • STOP USING INFANT RESTRAINT AND BASE AND THROW IT AWAY after the date ...base. • REPLACE THE INFANT RESTRAINT AND BASE AFTER AN ACCIDENT OF ANY KIND. If your child and recommend the proper infant restraint or car bed before using LATCH, make sure that you have tested positive for infant restraint installation. • NEVER LEAVE YOUR CHILD UNATTENDED. • NEVER LEAVE AN INFANT RESTRAINT AND BASE...
Owners Manual
Page 49
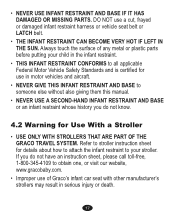
... someone else without also giving them this manual. • NEVER USE A SECOND-HAND INFANT RESTRAINT AND BASE or an infant restraint whose history you do not have an instruction sheet, please call toll-free, 1-800-345-4109 to stroller instruction sheet for Use With a Stroller • USE ONLY WITH STROLLERS THAT ARE PART OF THE GRACO TRAVEL SYSTEM. If you do not know. 4.2 Warning for details...
... someone else without also giving them this manual. • NEVER USE A SECOND-HAND INFANT RESTRAINT AND BASE or an infant restraint whose history you do not have an instruction sheet, please call toll-free, 1-800-345-4109 to stroller instruction sheet for Use With a Stroller • USE ONLY WITH STROLLERS THAT ARE PART OF THE GRACO TRAVEL SYSTEM. If you do not know. 4.2 Warning for details...
Owners Manual
Page 50
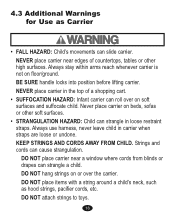
...strings on or over on soft surfaces and suffocate child. DO NOT place items with a string around a child's neck, such as Carrier • FALL HAZARD: Child's movements can slide carrier. 4.3 Additional Warnings for Use as hood strings, pacifier cords, etc. Always ...locks into position before lifting carrier. KEEP STRINGS AND CORDS AWAY FROM CHILD. Never place carrier on floor/ground. Always use harness, never leave child in loose restraint straps. Strings and cords can strangle a child. DO NOT place carrier near edges of a shopping cart. • SUFFOCATION HAZARD: Infant...
...strings on or over on soft surfaces and suffocate child. DO NOT place items with a string around a child's neck, such as Carrier • FALL HAZARD: Child's movements can slide carrier. 4.3 Additional Warnings for Use as hood strings, pacifier cords, etc. Always ...locks into position before lifting carrier. KEEP STRINGS AND CORDS AWAY FROM CHILD. Never place carrier on floor/ground. Always use harness, never leave child in loose restraint straps. Strings and cords can strangle a child. DO NOT place carrier near edges of a shopping cart. • SUFFOCATION HAZARD: Infant...
Owners Manual
Page 53
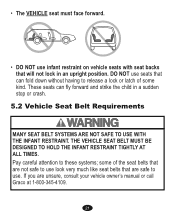
... seat belts that are unsure, consult your vehicle owner's manual or call Graco at 1-800-345-4109. 21 some kind. If you are safe to these systems; • The VEHICLE seat must face forward. • DO NOT use infant restraint on vehicle seats with seat backs that will not lock in a sudden stop or crash. 5.2 Vehicle Seat Belt Requirements MANY SEAT BELT SYSTEMS ARE NOT SAFE TO USE WITH THE INFANT...
... seat belts that are unsure, consult your vehicle owner's manual or call Graco at 1-800-345-4109. 21 some kind. If you are safe to these systems; • The VEHICLE seat must face forward. • DO NOT use infant restraint on vehicle seats with seat backs that will not lock in a sudden stop or crash. 5.2 Vehicle Seat Belt Requirements MANY SEAT BELT SYSTEMS ARE NOT SAFE TO USE WITH THE INFANT...
Owners Manual
Page 56
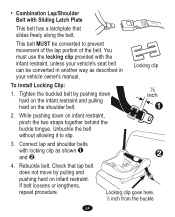
... move by pushing down on the shoulder belt. ½ inch – 2. Locking clip To Install Locking Clip: 1. While pushing down hard on the infant restraint and pulling hard on infant restraint, pinch the two straps together behind the buckle tongue. Rebuckle belt. Locking clip goes here, 1/2 inch from the buckle 24 You must use the locking clip provided with locking clip as described in another way as...
... move by pushing down on the shoulder belt. ½ inch – 2. Locking clip To Install Locking Clip: 1. While pushing down hard on the infant restraint and pulling hard on infant restraint, pinch the two straps together behind the buckle tongue. Rebuckle belt. Locking clip goes here, 1/2 inch from the buckle 24 You must use the locking clip provided with locking clip as described in another way as...
Owners Manual
Page 58
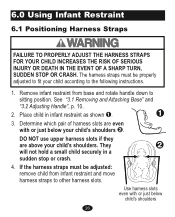
...: remove child from base and rotate handle down to other harness slots. Remove infant restraint from infant restraint and move harness straps to sitting position. Use harness slots even with or just below child's shoulders 26 Determine which pair of harness slots are above your child according to fit your child's shoulders. Place child in a sudden stop or crash. 4. The harness straps must be properly adjusted to the following instructions...
...: remove child from base and rotate handle down to other harness slots. Remove infant restraint from infant restraint and move harness straps to sitting position. Use harness slots even with or just below child's shoulders 26 Determine which pair of harness slots are above your child according to fit your child's shoulders. Place child in a sudden stop or crash. 4. The harness straps must be properly adjusted to the following instructions...
Owners Manual
Page 64
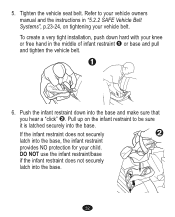
... tight installation, push down into the base. 32 Tighten the vehicle seat belt. DO NOT use the infant restraint/base if the infant restraint does not securely latch into the base and make sure that you hear a "click" —. Push the infant restraint down hard with your vehicle belt. Pull up on the infant restraint to your vehicle owners manual and the instructions in "5.2.2 SAFE Vehicle Belt Systems...
... tight installation, push down into the base. 32 Tighten the vehicle seat belt. DO NOT use the infant restraint/base if the infant restraint does not securely latch into the base and make sure that you hear a "click" —. Push the infant restraint down hard with your vehicle belt. Pull up on the infant restraint to your vehicle owners manual and the instructions in "5.2.2 SAFE Vehicle Belt Systems...
Owners Manual
Page 67
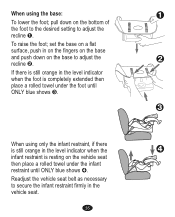
... a flat surface, push in on the fingers on the base and push down on the bottom of the foot to the desired setting to adjust the recline –. Readjust the vehicle seat belt as necessary to adjust the recline —. — If there is still orange in the level ... until ONLY blue shows ™. When using only the infant restraint, if there is still orange in the level indicator when the ™ infant restraint is completely extended then place a rolled towel under the infant restraint until ONLY blue shows ˜. ˜ When using the base: – To lower the foot; ...
... a flat surface, push in on the fingers on the base and push down on the bottom of the foot to the desired setting to adjust the recline –. Readjust the vehicle seat belt as necessary to adjust the recline —. — If there is still orange in the level ... until ONLY blue shows ™. When using only the infant restraint, if there is still orange in the level indicator when the ™ infant restraint is completely extended then place a rolled towel under the infant restraint until ONLY blue shows ˜. ˜ When using the base: – To lower the foot; ...
Owners Manual
Page 69
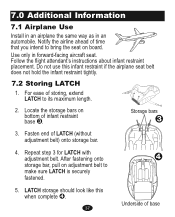
... length. 2. Notify the airline ahead of infant restraint base ˜. LATCH storage should look like this infant restraint if the airplane seat belt does not hold the infant restraint tightly. 7.2 Storing LATCH 1. Do not use this when complete ™. 37 Underside of LATCH (without adjustment belt) onto storage bar. 4. 7.0 Additional Information 7.1 Airplane Use Install in an airplane the same way...
... length. 2. Notify the airline ahead of infant restraint base ˜. LATCH storage should look like this infant restraint if the airplane seat belt does not hold the infant restraint tightly. 7.2 Storing LATCH 1. Do not use this when complete ™. 37 Underside of LATCH (without adjustment belt) onto storage bar. 4. 7.0 Additional Information 7.1 Airplane Use Install in an airplane the same way...
Owners Manual
Page 70
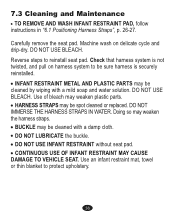
... reinstall seat pad. 7.3 Cleaning and Maintenance ! TO REMOVE AND WASH INFANT RESTRAINT PAD, follow instructions in "6.1 Positioning Harness Straps", p. 26-27. DO NOT USE BLEACH. Machine wash on harness system to be spot cleaned or replaced. Check that harness system is securely reinstalled. ! INFANT RESTRAINT METAL AND PLASTIC PARTS may be cleaned by wiping with a damp cloth. ! Carefully remove the seat pad. DO NOT USE INFANT RESTRAINT without seat pad...
... reinstall seat pad. 7.3 Cleaning and Maintenance ! TO REMOVE AND WASH INFANT RESTRAINT PAD, follow instructions in "6.1 Positioning Harness Straps", p. 26-27. DO NOT USE BLEACH. Machine wash on harness system to be spot cleaned or replaced. Check that harness system is securely reinstalled. ! INFANT RESTRAINT METAL AND PLASTIC PARTS may be cleaned by wiping with a damp cloth. ! Carefully remove the seat pad. DO NOT USE INFANT RESTRAINT without seat pad...

Owners Manual
Page 72
Replacement Parts To purchase parts or accessories in the United States for your Graco product, please contact us at the following: www.gracobaby.com or 1-800-345-4109 40
Replacement Parts To purchase parts or accessories in the United States for your Graco product, please contact us at the following: www.gracobaby.com or 1-800-345-4109 40


