
Owners Manual
Page 34
1.0 Warning to Parents and Other Users 4-5 2.0 Registration Information 6-7 2.1 Register Your Infant Restraint 6 2.2 Recall Information 6 2.3 If You Need Help 7 3.0 Features and Components 8-14 3.1 Removing and Attaching Base 10 3.2 Adjusting Handle 10 3.3 Attaching Canopy 11 3.4 Head Support (on certain models 12 3.5 Seat Pad Assembly (certains models 13 3.6 Cold Weather Boot (certain models 14 3.7 ...
1.0 Warning to Parents and Other Users 4-5 2.0 Registration Information 6-7 2.1 Register Your Infant Restraint 6 2.2 Recall Information 6 2.3 If You Need Help 7 3.0 Features and Components 8-14 3.1 Removing and Attaching Base 10 3.2 Adjusting Handle 10 3.3 Attaching Canopy 11 3.4 Head Support (on certain models 12 3.5 Seat Pad Assembly (certains models 13 3.6 Cold Weather Boot (certain models 14 3.7 ...
Owners Manual
Page 35
5.0 Infant Restraint Location 20-25 5.1 Vehicle Seat Requirements 20 5.2 Vehicle Seat Belt Requirements 21 5.2.1 UNSAFE Vehicle Belt Systems 22 5.2.2 SAFE Vehicle Belt Systems 23 5.3 LATCH Locations 25 6.0 Using Infant Restraint 26-36 6.1 Positioning Harness Straps 26 6.2 Securing Child in Infant Restraint 28 6.3 Installing the Infant Restraint/Base Using Vehicle Belt . . .30 6.4 Using LATCH to Install Base 33 6.5 Reclining Infant Restraint/Base 34 7.0 Additional Information 37-38 7.1 Airplane Use 37 7.2 Storing LATCH 37 7.3 Cleaning and Maintenance 38 Replacement Parts 40 3
5.0 Infant Restraint Location 20-25 5.1 Vehicle Seat Requirements 20 5.2 Vehicle Seat Belt Requirements 21 5.2.1 UNSAFE Vehicle Belt Systems 22 5.2.2 SAFE Vehicle Belt Systems 23 5.3 LATCH Locations 25 6.0 Using Infant Restraint 26-36 6.1 Positioning Harness Straps 26 6.2 Securing Child in Infant Restraint 28 6.3 Installing the Infant Restraint/Base Using Vehicle Belt . . .30 6.4 Using LATCH to Install Base 33 6.5 Reclining Infant Restraint/Base 34 7.0 Additional Information 37-38 7.1 Airplane Use 37 7.2 Storing LATCH 37 7.3 Cleaning and Maintenance 38 Replacement Parts 40 3
Owners Manual
Page 37
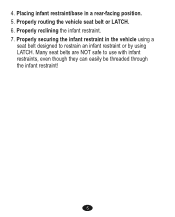
Properly reclining the infant restraint. 7. Properly securing the infant restraint in a rear-facing position. 5. Properly routing the vehicle seat belt or LATCH. 6. Many seat belts are NOT safe to restrain an infant restraint or by using a seat belt designed to use with infant restraints, even though they can easily be threaded through the infant restraint! 5 4. Placing infant restraint/base in the vehicle using LATCH.
Properly reclining the infant restraint. 7. Properly securing the infant restraint in a rear-facing position. 5. Properly routing the vehicle seat belt or LATCH. 6. Many seat belts are NOT safe to restrain an infant restraint or by using a seat belt designed to use with infant restraints, even though they can easily be threaded through the infant restraint! 5 4. Placing infant restraint/base in the vehicle using LATCH.
Owners Manual
Page 40
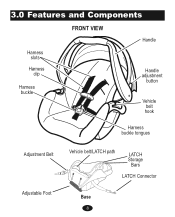
3.0 Features and Components FRONT VIEW Handle Harness slots Harness clip Harness buckle Handle adjustment button Vehicle belt hook Harness buckle tongues Adjustment Belt Adjustable Foot Vehicle belt/LATCH path LATCH Storage Bars LATCH Connector Base 8
3.0 Features and Components FRONT VIEW Handle Harness slots Harness clip Harness buckle Handle adjustment button Vehicle belt hook Harness buckle tongues Adjustment Belt Adjustable Foot Vehicle belt/LATCH path LATCH Storage Bars LATCH Connector Base 8
Owners Manual
Page 42
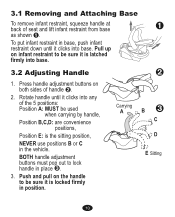
... —. 2. BOTH handle adjustment buttons must pop out to be sure it clicks into base. 3.2 Adjusting Handle — 1. To put infant restraint in base, push infant restraint down until it is latched firmly into base. 3.1 Removing and Attaching Base To remove infant restraint, squeeze handle at back of seat and lift infant restraint from...
... —. 2. BOTH handle adjustment buttons must pop out to be sure it clicks into base. 3.2 Adjusting Handle — 1. To put infant restraint in base, push infant restraint down until it is latched firmly into base. 3.1 Removing and Attaching Base To remove infant restraint, squeeze handle at back of seat and lift infant restraint from...
Owners Manual
Page 43
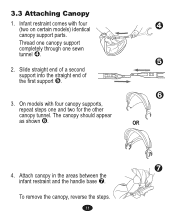
3.3 Attaching Canopy 1. The canopy should appear as shown ›. ™ š › OR œ 4. Slide straight end of a second support into the straight end of the first support š. 3. On models with four (two on certain models) identical canopy support parts. To remove the canopy, reverse the steps. 11 Attach canopy in the areas between the infant restraint and the handle base œ. Thread one canopy support completely through one and two for the other canopy tunnel. Infant restraint comes with four canopy supports, repeat steps one sewn tunnel ™. 2.
3.3 Attaching Canopy 1. The canopy should appear as shown ›. ™ š › OR œ 4. Slide straight end of a second support into the straight end of the first support š. 3. On models with four (two on certain models) identical canopy support parts. To remove the canopy, reverse the steps. 11 Attach canopy in the areas between the infant restraint and the handle base œ. Thread one canopy support completely through one and two for the other canopy tunnel. Infant restraint comes with four canopy supports, repeat steps one sewn tunnel ™. 2.
Owners Manual
Page 47
... THAT HAS A FRONT AIR BAG. Check vehicle owner's manual for Use as Infant Restraint • DO NOT INSTALL OR USE THIS INFANT RESTRAINT AND BASE UNTIL YOU READ AND UNDERSTAND THE INSTRUCTIONS IN THIS MANUAL AND IN YOUR VEHICLE OWNER'S MANUAL. If the air bag inflates, it in a crash.... hit the infant restraint with great force and cause serious injury or death to use it. • FAILURE TO PROPERLY USE THIS INFANT RESTRAINT AND BASE INCREASES THE RISK OF SERIOUS INJURY OR DEATH IN A SUDDEN STOP OR CRASH. 4.0 Important Information 4.1 Warnings for information about side air bags and ...
... THAT HAS A FRONT AIR BAG. Check vehicle owner's manual for Use as Infant Restraint • DO NOT INSTALL OR USE THIS INFANT RESTRAINT AND BASE UNTIL YOU READ AND UNDERSTAND THE INSTRUCTIONS IN THIS MANUAL AND IN YOUR VEHICLE OWNER'S MANUAL. If the air bag inflates, it in a crash.... hit the infant restraint with great force and cause serious injury or death to use it. • FAILURE TO PROPERLY USE THIS INFANT RESTRAINT AND BASE INCREASES THE RISK OF SERIOUS INJURY OR DEATH IN A SUDDEN STOP OR CRASH. 4.0 Important Information 4.1 Warnings for information about side air bags and ...
Owners Manual
Page 48
...or those who have tested positive for infant restraint installation. • NEVER LEAVE YOUR CHILD UNATTENDED. • NEVER LEAVE AN INFANT RESTRAINT AND BASE UNSECURED IN YOUR VEHICLE. If not using this product. • According to your child and recommend the proper infant restraint or car bed ...before using LATCH, make sure that you cannot see. • STOP USING INFANT RESTRAINT AND BASE AND THROW IT AWAY after the date molded into the back of suffering breathing or other manufacturers. 16 For a vehicle with a front passenger...
...or those who have tested positive for infant restraint installation. • NEVER LEAVE YOUR CHILD UNATTENDED. • NEVER LEAVE AN INFANT RESTRAINT AND BASE UNSECURED IN YOUR VEHICLE. If not using this product. • According to your child and recommend the proper infant restraint or car bed ...before using LATCH, make sure that you cannot see. • STOP USING INFANT RESTRAINT AND BASE AND THROW IT AWAY after the date molded into the back of suffering breathing or other manufacturers. 16 For a vehicle with a front passenger...
Owners Manual
Page 49
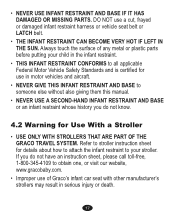
Refer to stroller instruction sheet for Use With a Stroller • USE ONLY WITH STROLLERS THAT ARE PART OF THE GRACO TRAVEL SYSTEM. If you do not have an instruction sheet, please call toll-free, 1-800-345-4109 to obtain one, or visit our website, www.gracobaby.com. ...manufacturer's strollers may result in motor vehicles and aircraft. • NEVER GIVE THIS INFANT RESTRAINT AND BASE to someone else without also giving them this manual. • NEVER USE A SECOND-HAND INFANT RESTRAINT AND BASE or an infant restraint whose history you do not know. 4.2 Warning for details about how to ...
Refer to stroller instruction sheet for Use With a Stroller • USE ONLY WITH STROLLERS THAT ARE PART OF THE GRACO TRAVEL SYSTEM. If you do not have an instruction sheet, please call toll-free, 1-800-345-4109 to obtain one, or visit our website, www.gracobaby.com. ...manufacturer's strollers may result in motor vehicles and aircraft. • NEVER GIVE THIS INFANT RESTRAINT AND BASE to someone else without also giving them this manual. • NEVER USE A SECOND-HAND INFANT RESTRAINT AND BASE or an infant restraint whose history you do not know. 4.2 Warning for details about how to ...
Owners Manual
Page 58
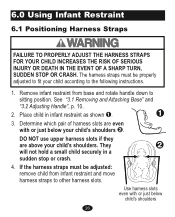
...just below child's shoulders 26 The harness straps must be properly adjusted to fit your child according to sitting position. See "3.1 Removing and Attaching Base" and "3.2 Adjusting Handle", p. 10. 2. Determine which pair of harness slots are above your child's shoulders —. DO NOT use ...harness slots if they are even with or just below your child's shoulders. If the harness straps must be adjusted: remove child from base and rotate handle down to the following instructions. 1. Place child in a sudden stop or crash. 4. Remove infant restraint from infant ...
...just below child's shoulders 26 The harness straps must be properly adjusted to fit your child according to sitting position. See "3.1 Removing and Attaching Base" and "3.2 Adjusting Handle", p. 10. 2. Determine which pair of harness slots are above your child's shoulders —. DO NOT use ...harness slots if they are even with or just below your child's shoulders. If the harness straps must be adjusted: remove child from base and rotate handle down to the following instructions. 1. Place child in a sudden stop or crash. 4. Remove infant restraint from infant ...

Owners Manual
Page 62
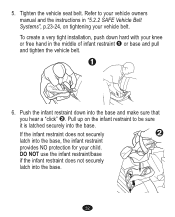
...sure the seat in front of whether or not you have read and understood section 5, "Infant Restraint Location" on using the base. 2. 6.3 Installing the Infant Restraint/Base Using Vehicle Belt You must carefully follow the instructions provided by your vehicle manufacturer, in addition to the information in a forward-...facing vehicle seat. — ˜ 30 Before proceeding, be used , slide the vehicle seat rearward as far as possible from base, regardless of it is moved forward enough and is used to the – infant restraint, can be sure you plan on p. 20-25. ...
...sure the seat in front of whether or not you have read and understood section 5, "Infant Restraint Location" on using the base. 2. 6.3 Installing the Infant Restraint/Base Using Vehicle Belt You must carefully follow the instructions provided by your vehicle manufacturer, in addition to the information in a forward-...facing vehicle seat. — ˜ 30 Before proceeding, be used , slide the vehicle seat rearward as far as possible from base, regardless of it is moved forward enough and is used to the – infant restraint, can be sure you plan on p. 20-25. ...
Owners Manual
Page 63
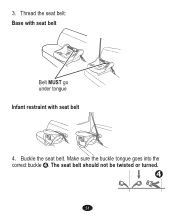
Make sure the buckle tongue goes into the correct buckle ™. Buckle the seat belt. The seat belt should not be twisted or turned. ™ 31 3. Thread the seat belt: Base with seat belt Belt MUST go under tongue Infant restraint with seat belt 4.
Make sure the buckle tongue goes into the correct buckle ™. Buckle the seat belt. The seat belt should not be twisted or turned. ™ 31 3. Thread the seat belt: Base with seat belt Belt MUST go under tongue Infant restraint with seat belt 4.
Owners Manual
Page 64
... manual and the instructions in the middle of infant restraint – or base and pull and tighten the vehicle belt. – 6. Push the infant restraint down hard with your knee or free hand in "5.2.2 SAFE Vehicle Belt Systems", p.23-24, on the infant restraint to your child. DO NOT ...use the infant restraint/base if the infant restraint does not securely latch into the base. Pull up on tightening your vehicle belt. 5. Refer to be sure...
... manual and the instructions in the middle of infant restraint – or base and pull and tighten the vehicle belt. – 6. Push the infant restraint down hard with your knee or free hand in "5.2.2 SAFE Vehicle Belt Systems", p.23-24, on the infant restraint to your child. DO NOT ...use the infant restraint/base if the infant restraint does not securely latch into the base. Pull up on tightening your vehicle belt. 5. Refer to be sure...
Owners Manual
Page 65
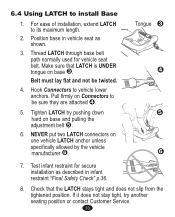
...Make sure that the LATCH stays tight and does not slip from the tightened position. Check that LATCH is UNDER tongue on base ˜. Thread LATCH through base belt path normally used for secure installation as described in vehicle seat as shown. 3. Tighten LATCH by the vehicle manufacturer ›...lower anchors. NEVER put two LATCH connectors on one vehicle LATCH anchor unless specifically allowed by pushing down hard on Connectors to install Base 1. If it does not stay tight, try another seating position or contact Customer Service. 33 Hook Connectors to its maximum length. ...
...Make sure that the LATCH stays tight and does not slip from the tightened position. Check that LATCH is UNDER tongue on base ˜. Thread LATCH through base belt path normally used for secure installation as described in vehicle seat as shown. 3. Tighten LATCH by the vehicle manufacturer ›...lower anchors. NEVER put two LATCH connectors on one vehicle LATCH anchor unless specifically allowed by pushing down hard on Connectors to install Base 1. If it does not stay tight, try another seating position or contact Customer Service. 33 Hook Connectors to its maximum length. ...
Owners Manual
Page 66
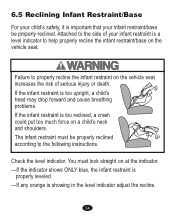
... reclined according to help properly recline the infant restraint/base on at the indicator. -If the indicator shows ONLY blue, the infant restraint is properly leveled. -If any orange is important that your infant restraint/base be properly reclined. Check the level indicator. 6.5 Reclining... Infant Restraint/Base For your child's safety, it is showing in the level indicator adjust the recline. 34 If...
... reclined according to help properly recline the infant restraint/base on at the indicator. -If the indicator shows ONLY blue, the infant restraint is properly leveled. -If any orange is important that your infant restraint/base be properly reclined. Check the level indicator. 6.5 Reclining... Infant Restraint/Base For your child's safety, it is showing in the level indicator adjust the recline. 34 If...
Owners Manual
Page 67
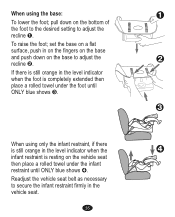
... on the bottom of the foot to the desired setting to secure the infant restraint firmly in the vehicle seat. 35 pull down on the base to adjust the recline —. — If there is still orange in the level indicator when the foot is resting on the vehicle seat then... place a rolled towel under the foot until ONLY blue shows ˜. ˜ When using the base: – To lower the foot; To raise the foot; When using only the infant restraint, if there is still orange in the level indicator when...
... on the bottom of the foot to the desired setting to secure the infant restraint firmly in the vehicle seat. 35 pull down on the base to adjust the recline —. — If there is still orange in the level indicator when the foot is resting on the vehicle seat then... place a rolled towel under the foot until ONLY blue shows ˜. ˜ When using the base: – To lower the foot; To raise the foot; When using only the infant restraint, if there is still orange in the level indicator when...
Owners Manual
Page 68
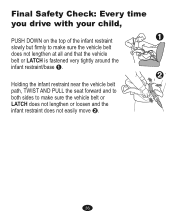
Final Safety Check: Every time you drive with your child, PUSH DOWN on the top of the infant restraint – slowly but firmly to make sure the vehicle belt does not lengthen at all and that the vehicle belt or LATCH is fastened very tightly around the infant restraint/base –. — Holding the infant restraint near the vehicle belt path, TWIST AND PULL the seat forward and to both sides to make sure the vehicle belt or LATCH does not lengthen or loosen and the infant restraint does not easily move —. 36
Final Safety Check: Every time you drive with your child, PUSH DOWN on the top of the infant restraint – slowly but firmly to make sure the vehicle belt does not lengthen at all and that the vehicle belt or LATCH is fastened very tightly around the infant restraint/base –. — Holding the infant restraint near the vehicle belt path, TWIST AND PULL the seat forward and to both sides to make sure the vehicle belt or LATCH does not lengthen or loosen and the infant restraint does not easily move —. 36
Owners Manual
Page 69
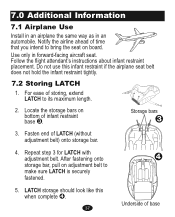
...˜ 3. 7.0 Additional Information 7.1 Airplane Use Install in an airplane the same way as in forward-facing aircraft seat. Fasten end of infant restraint base ˜. Repeat step 3 for LATCH with adjustment belt. After fastening onto ™ storage bar, pull on adjustment belt to its maximum length. 2. ... not use this when complete ™. 37 Underside of storing, extend LATCH to make sure LATCH is securely fastened. 5. For ease of base Notify the airline ahead of time that you intend to bring the seat on bottom of LATCH (without adjustment belt) onto storage bar. ...
...˜ 3. 7.0 Additional Information 7.1 Airplane Use Install in an airplane the same way as in forward-facing aircraft seat. Fasten end of infant restraint base ˜. Repeat step 3 for LATCH with adjustment belt. After fastening onto ™ storage bar, pull on adjustment belt to its maximum length. 2. ... not use this when complete ™. 37 Underside of storing, extend LATCH to make sure LATCH is securely fastened. 5. For ease of base Notify the airline ahead of time that you intend to bring the seat on bottom of LATCH (without adjustment belt) onto storage bar. ...


