
User Manual
Page 9
... an ESD wrist strap, keep your hands dry and first touch a metal object to eliminate static electricity. • Prior to installing the motherboard, please have a problem related to installation, do not remove or break motherboard S/N (Serial Number) sticker or warranty sticker provided by unplugging the power cord from the motherboard, make...
... an ESD wrist strap, keep your hands dry and first touch a metal object to eliminate static electricity. • Prior to installing the motherboard, please have a problem related to installation, do not remove or break motherboard S/N (Serial Number) sticker or warranty sticker provided by unplugging the power cord from the motherboard, make...

User Manual
Page 26
...The LED is in different patterns to the reset switch on the chassis front panel. One single short beep will be heard if no problem is operating. A front panel module mainly consists of power switch, reset switch, power LED, hard drive activity LED, speaker and etc.... The LED keeps blinking when the sys- SPEAK+ PWPW+ MSGMSG+ 21 PWR+ CI+ CI- If a problem is reading or writing data. • RES (Reset Switch, Green): Connects to indicate the problem. Hardware Installation - 26 - Refer to Chapter 5, "Troubleshooting," for more information). • SPEAK (Speaker, Orange...
...The LED is in different patterns to the reset switch on the chassis front panel. One single short beep will be heard if no problem is operating. A front panel module mainly consists of power switch, reset switch, power LED, hard drive activity LED, speaker and etc.... The LED keeps blinking when the sys- SPEAK+ PWPW+ MSGMSG+ 21 PWR+ CI+ CI- If a problem is reading or writing data. • RES (Reset Switch, Green): Connects to indicate the problem. Hardware Installation - 26 - Refer to Chapter 5, "Troubleshooting," for more information). • SPEAK (Speaker, Orange...
User Manual
Page 31
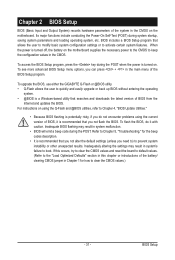
.... When the power is recommended that you not alter the default settings (unless you not flash the BIOS. To upgrade the BIOS, use either the GIGABYTE Q-Flash or @BIOS utility. • Q-Flash allows the user to quickly and easily upgrade or back up BIOS without entering the operating system. ... system features. To see more advanced BIOS Setup menu options, you can press + in the CMOS. To flash the BIOS, do not encounter problems using the Q-Flash and @BIOS utilities, refer to prevent system instability or other unexpected results. To access the BIOS Setup program, press the key...
.... When the power is recommended that you not alter the default settings (unless you not flash the BIOS. To upgrade the BIOS, use either the GIGABYTE Q-Flash or @BIOS utility. • Q-Flash allows the user to quickly and easily upgrade or back up BIOS without entering the operating system. ... system features. To see more advanced BIOS Setup menu options, you can press + in the CMOS. To flash the BIOS, do not encounter problems using the Q-Flash and @BIOS utilities, refer to prevent system instability or other unexpected results. To access the BIOS Setup program, press the key...

User Manual
Page 49
... Is Attached... Green LAN When the onboard LAN function and Green LAN are enabled, the system will operate at Port..... BIOS Setup If no cable problem is connected or not. Cable Length Displays the approximate length of the attached LAN cable. it will dynamically detect if a LAN cable is detected on...
... Is Attached... Green LAN When the onboard LAN function and Green LAN are enabled, the system will operate at Port..... BIOS Setup If no cable problem is connected or not. Cable Length Displays the approximate length of the attached LAN cable. it will dynamically detect if a LAN cable is detected on...

User Manual
Page 50
... port (LPT) and specifies its base I /O address and correspond- When a Cable Problem Occurs... Options are not used in the GIGABYTE SATA2 chip. (Default: Enabled) Onboard SATA/IDE Ctrl Mode (GIGABYTE SATA2, IDE and GSATA2_0/1 Connectors) Enables or disables RAID for the SATA controller and...Options are : SPP (Standard Parallel Port) (default), EPP (Enhanced Parallel Port), ECP (Extended Capabilities Port), ECP+EPP. If a cable problem occurs on Part 1-2. IDE Disables RAID for the SATA controller integrated in IDE mode. RAID/IDE Enables RAID for the onboard parallel (LPT) ...
... port (LPT) and specifies its base I /O address and correspond- When a Cable Problem Occurs... Options are not used in the GIGABYTE SATA2 chip. (Default: Enabled) Onboard SATA/IDE Ctrl Mode (GIGABYTE SATA2, IDE and GSATA2_0/1 Connectors) Enables or disables RAID for the SATA controller and...Options are : SPP (Standard Parallel Port) (default), EPP (Enhanced Parallel Port), ECP (Extended Capabilities Port), ECP+EPP. If a cable problem occurs on Part 1-2. IDE Disables RAID for the SATA controller integrated in IDE mode. RAID/IDE Enables RAID for the onboard parallel (LPT) ...
User Manual
Page 100
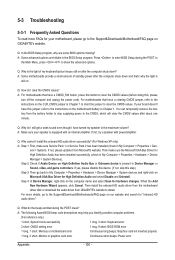
...HD audio driver." Step 2: Check if Audio Device on High Definition Audio Bus or Unknown device is still on GIGABYTE's website. Then install the onboard HD audio driver from the motherboard driver disk or download the audio driver from... cord). Step 4: In Device Manager, right-click on after about one minute. A: The following Award BIOS beep code descriptions may help you identify possible computer problems. (For reference only.) 1 short: System boots successfully 1 long, 3 short: Keyboard error 2 short: CMOS setting error 1 long, 9 short: BIOS ROM error 1 ...
...HD audio driver." Step 2: Check if Audio Device on High Definition Audio Bus or Unknown device is still on GIGABYTE's website. Then install the onboard HD audio driver from the motherboard driver disk or download the audio driver from... cord). Step 4: In Device Manager, right-click on after about one minute. A: The following Award BIOS beep code descriptions may help you identify possible computer problems. (For reference only.) 1 short: System boots successfully 1 long, 3 short: Keyboard error 2 short: CMOS setting error 1 long, 9 short: BIOS ROM error 1 ...

User Manual
Page 101
... if the CPU cooler is installed properly on the memory slot. Check if the memory is attached to the CPU securely. Yes The problem is securely seated in the expansion slot and power connectors are firmly attached. Make sure the graphics card is verified and solved. Is ...cooler power cable to the CPU_FAN header properly? Insert the graphics card. Secure the CPU cooler No on the power to solve the problem. Yes The problem is verified and solved. No Correctly insert the memory into the memory socket. Turn on the CPU. 5-3-2 Troubleshooting Procedure If you ...
... if the CPU cooler is installed properly on the memory slot. Check if the memory is attached to the CPU securely. Yes The problem is securely seated in the expansion slot and power connectors are firmly attached. Make sure the graphics card is verified and solved. Is ...cooler power cable to the CPU_FAN header properly? Insert the graphics card. Secure the CPU cooler No on the power to solve the problem. Yes The problem is verified and solved. No Correctly insert the memory into the memory socket. Turn on the CPU. 5-3-2 Troubleshooting Procedure If you ...

User Manual
Page 102
... as soon as possible. A When the computer is turned on, is display on your monitor. Yes Check if there is the CPU cooler running? The problem is working properly. Turn off the computer. Check if the keyboard is verified and solved. Select "Save & Exit Setup" to enter BIOS Setup. END If... exit BIOS Setup. No The IDE/SATA device, connector, or cable might fail. Yes Turn off the computer and connect the IDE/SATA devices. The problem is unable to solve your problem, contact the place of purchase or local dealer for help. Yes Reinstall the operating system.
... as soon as possible. A When the computer is turned on, is display on your monitor. Yes Check if there is the CPU cooler running? The problem is working properly. Turn off the computer. Check if the keyboard is verified and solved. Select "Save & Exit Setup" to enter BIOS Setup. END If... exit BIOS Setup. No The IDE/SATA device, connector, or cable might fail. Yes Turn off the computer and connect the IDE/SATA devices. The problem is unable to solve your problem, contact the place of purchase or local dealer for help. Yes Reinstall the operating system.


