Manual
Page 5
... respective owners. Notice Please do not remove any labels on VGA card, this may void the warranty of this VGA card Due to rapid change in technology, some of the specifications might be out of date before publication of waste electrical and electronic equipment ! The author assumes no responsibility for the recycling of this booklet. GV-RX60P128DE/ GV-RX60P256DP Radeon X600 Pro Graphics Accelerator User's Manual Rev. 104...
... respective owners. Notice Please do not remove any labels on VGA card, this may void the warranty of this VGA card Due to rapid change in technology, some of the specifications might be out of date before publication of waste electrical and electronic equipment ! The author assumes no responsibility for the recycling of this booklet. GV-RX60P128DE/ GV-RX60P256DP Radeon X600 Pro Graphics Accelerator User's Manual Rev. 104...
Manual
Page 6
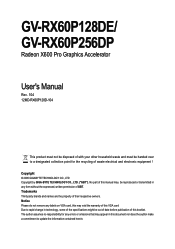
...4 2.2. Utilities on Driver CD 13 3.1.5. Minimum System Requirement 3 2. Hardware Installation 4 2.1. Windows® 2000 Driver Installation 32 4. Reflash BIOS in Windows mode 34 5.2. Software Installation 9 3.1. Operating System Requirement 9 3.1.2. Appendix 34 5.1. English Table of Contents 1. Windows® XP Driver and Utilities Installation 9 3.1.1. DirectX Installation ...10 3.1.3. Troubleshooting Tips 33 5. How to Reflash the BIOS 34 5.1.1. Resolutions and Color Depth Table (In Windows® XP 35 GV-RX60P128DE/GV-RX60P256DP Graphics Accelerator...
...4 2.2. Utilities on Driver CD 13 3.1.5. Minimum System Requirement 3 2. Hardware Installation 4 2.1. Windows® 2000 Driver Installation 32 4. Reflash BIOS in Windows mode 34 5.2. Software Installation 9 3.1. Operating System Requirement 9 3.1.2. Appendix 34 5.1. English Table of Contents 1. Windows® XP Driver and Utilities Installation 9 3.1.1. DirectX Installation ...10 3.1.3. Troubleshooting Tips 33 5. How to Reflash the BIOS 34 5.1.1. Resolutions and Color Depth Table (In Windows® XP 35 GV-RX60P128DE/GV-RX60P256DP Graphics Accelerator...

Manual
Page 7
Introduction 1.1. English 1. Minimum System Requirement • IBM® or 100% PC compatible with 128MB DDR memory (For GV-RX60P128DE only) • Supports DirectX 9.0 • Supports TV-Out • Supports D-Sub and DVI-I connector 1.2. Features • Powered by ATI X600 Pro Visual Processing Unit (VPU) • Supports the newest PCI Express x 16 • Integrated with 256MB DDR memory (For GV-RX60P256DP only) • Integrated with Pentium® III 650MHz or AMD Athlon 650MHz class...
Introduction 1.1. English 1. Minimum System Requirement • IBM® or 100% PC compatible with 128MB DDR memory (For GV-RX60P128DE only) • Supports DirectX 9.0 • Supports TV-Out • Supports D-Sub and DVI-I connector 1.2. Features • Powered by ATI X600 Pro Visual Processing Unit (VPU) • Supports the newest PCI Express x 16 • Integrated with 256MB DDR memory (For GV-RX60P256DP only) • Integrated with Pentium® III 650MHz or AMD Athlon 650MHz class...

Manual
Page 8
DVI-I to D-Sub Adapter VGA Output NTSC / PAL TV Projector AV Output OR VGA Output Analog LCD Monitor Analog Monitor GV-RX60P128DE/GV-RX60P256DP Graphics Accelerator - 4 - Hardware Installation 2.1. English 2. Board Layout 1) GV-RX60P128DE DVI-I Connector TV-Out VGA Monitor Connector (15-pin) Digital LCD Monitor Analog LCD Monitor DVI Output DVI-I Connector TV-out (S-Video) VGA Monitor Connector (15pin)
DVI-I to D-Sub Adapter VGA Output NTSC / PAL TV Projector AV Output OR VGA Output Analog LCD Monitor Analog Monitor GV-RX60P128DE/GV-RX60P256DP Graphics Accelerator - 4 - Hardware Installation 2.1. English 2. Board Layout 1) GV-RX60P128DE DVI-I Connector TV-Out VGA Monitor Connector (15-pin) Digital LCD Monitor Analog LCD Monitor DVI Output DVI-I Connector TV-out (S-Video) VGA Monitor Connector (15pin)

Manual
Page 9
2) GV-RX60P256DP English DVI-I Connector TV-Out VGA Monitor Connector (15-pin) Digital LCD Monitor Analog LCD Monitor DVI Output DVI-I Connector TV-out (S-Video) VGA Monitor Connector (15pin) Hardware Installation DVI-I to D-Sub Adapter VGA Output NTSC / PAL TV Projector AV Output OR VGA Output Analog LCD Monitor Analog Monitor - 5 -
2) GV-RX60P256DP English DVI-I Connector TV-Out VGA Monitor Connector (15-pin) Digital LCD Monitor Analog LCD Monitor DVI Output DVI-I Connector TV-out (S-Video) VGA Monitor Connector (15pin) Hardware Installation DVI-I to D-Sub Adapter VGA Output NTSC / PAL TV Projector AV Output OR VGA Output Analog LCD Monitor Analog Monitor - 5 -

Manual
Page 11
..., see you may need to install your computer. Hardware Installation Now that you have prepared your computer has any existing graphics card from the back of your computer's manual for help in removing the cover. 3. Hardware Installation Or, if your computer, you are ready to disable it on -board graphics capability, you computer documentation. - 7 - If necessary, consult your computer. 2. Remove any on the motherboard. English 2.2.
..., see you may need to install your computer. Hardware Installation Now that you have prepared your computer has any existing graphics card from the back of your computer's manual for help in removing the cover. 3. Hardware Installation Or, if your computer, you are ready to disable it on -board graphics capability, you computer documentation. - 7 - If necessary, consult your computer. 2. Remove any on the motherboard. English 2.2.

Manual
Page 12
.... 2. GV-RX60P128DE/GV-RX60P256DP Graphics Accelerator - 8 - If you wish to connect a VGA monitor via the adapter, connect the 15-pin display cable of the VGA monitor to proceed with the PCI Express x 16 slot, and press it in place, and replace the computer cover. 3. Replace the screw to next chapter for detailed instructions. If necessary, remove the metal cover from this slot; then align your graphics card with the installation of the adapter. Locate...
.... 2. GV-RX60P128DE/GV-RX60P256DP Graphics Accelerator - 8 - If you wish to connect a VGA monitor via the adapter, connect the 15-pin display cable of the VGA monitor to proceed with the PCI Express x 16 slot, and press it in place, and replace the computer cover. 3. Replace the screw to next chapter for detailed instructions. If necessary, remove the metal cover from this slot; then align your graphics card with the installation of the adapter. Locate...

Manual
Page 13
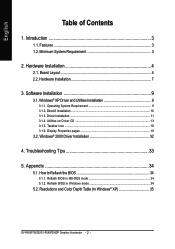
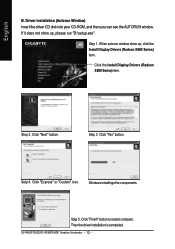
... show up, run "D:\setup.exe"). Software Installation Then you can follow the subsection 3.1.3 "Driver installation" to be Drive D: The installation of SIS, or VIA chipsets, please install the appropriate driver program for that your CD-ROM Drive letter to install the driver for motherboard driver. - 9 - English 3. When you insert the driver CD into your motherboard nearest dealer for your graphics card driver. (Please follow the guides to setup your graphics accelerator.) 3.1. Windows® XP Driver and Utilities Installation 3.1.1.
... show up, run "D:\setup.exe"). Software Installation Then you can follow the subsection 3.1.3 "Driver installation" to be Drive D: The installation of SIS, or VIA chipsets, please install the appropriate driver program for that your CD-ROM Drive letter to install the driver for motherboard driver. - 9 - English 3. When you insert the driver CD into your motherboard nearest dealer for your graphics card driver. (Please follow the guides to setup your graphics accelerator.) 3.1. Windows® XP Driver and Utilities Installation 3.1.1.

Manual
Page 15
... your graphics accelerator, please insert it automatically. Step 2: Found new hardware wizard: Searching and installing The wizard will automatically detect a new hardware in the system and pop out a "New Hardware Found" message. Software Installation Step 1: Found new hardware wizard: Video controller (VGA Compatible) Click "Next" button to install the driver. (There is a driver CD disk that came with your computer at the first time, the windows will search for the driver and install it...
... your graphics accelerator, please insert it automatically. Step 2: Found new hardware wizard: Searching and installing The wizard will automatically detect a new hardware in the system and pop out a "New Hardware Found" message. Software Installation Step 1: Found new hardware wizard: Video controller (VGA Compatible) Click "Next" button to install the driver. (There is a driver CD disk that came with your computer at the first time, the windows will search for the driver and install it...
Manual
Page 16
... AUTORUN window. Click "Finish" button to restart computer. Step 1. Step 2. Click "Express" or "Custom" icon. Click "Yes" button. Setp 4. Step 5. Then the driver installation is completed. Click "Next" button. When autorun window show up , click the Install Display Drivers (Radeon X600 Series) item. Windows installings the components. Click the Install Display Drivers (Radeon X600 Series) item. English B. GV-RX60P128DE/GV-RX60P256DP Graphics Accelerator - 12 - If it does not show up , please run "D:\setup.exe...
... AUTORUN window. Click "Finish" button to restart computer. Step 1. Step 2. Click "Express" or "Custom" icon. Click "Yes" button. Setp 4. Step 5. Then the driver installation is completed. Click "Next" button. When autorun window show up , click the Install Display Drivers (Radeon X600 Series) item. Windows installings the components. Click the Install Display Drivers (Radeon X600 Series) item. English B. GV-RX60P128DE/GV-RX60P256DP Graphics Accelerator - 12 - If it does not show up , please run "D:\setup.exe...
Manual
Page 20
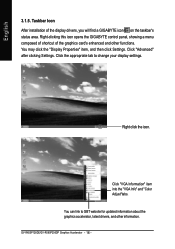
... icon. GV-RX60P128DE/GV-RX60P256DP Graphics Accelerator - 16 - English 3.1.5. You can link to change your display settings. Taskbar Icon After installation of the graphics card's enhanced and other information. Right-clicking this icon opens the GIGABYTE control panel, showing a menu composed of shortcut of the display drivers, you will find a GIGABYTE icon on the taskbar's status area. You may click the "Display Properties" item, and then click Settings. Click "VGA Information...
... icon. GV-RX60P128DE/GV-RX60P256DP Graphics Accelerator - 16 - English 3.1.5. You can link to change your display settings. Taskbar Icon After installation of the graphics card's enhanced and other information. Right-clicking this icon opens the GIGABYTE control panel, showing a menu composed of shortcut of the display drivers, you will find a GIGABYTE icon on the taskbar's status area. You may click the "Display Properties" item, and then click Settings. Click "VGA Information...
Manual
Page 22
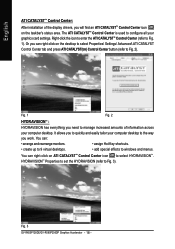
... of the display drivers, you work. Fig. 3 GV-RX60P128DE/GV-RX60P256DP Graphics Accelerator - 18 - Fig. 1 Fig. 2 HYDRAVISIONTM : HYDRAVISION has everything you need to select HYDRAVISIONTM. The ATI CATALYSTTM Control Center is used to windows and menus. You can : • arrange and rearrange monitors. • assign Hot Key shortcuts. • create up to 9 virtual desktops. • add special effects to configure all your computer desktop. HYDRAVISIONTM Properties to set the...
... of the display drivers, you work. Fig. 3 GV-RX60P128DE/GV-RX60P256DP Graphics Accelerator - 18 - Fig. 1 Fig. 2 HYDRAVISIONTM : HYDRAVISION has everything you need to select HYDRAVISIONTM. The ATI CATALYSTTM Control Center is used to windows and menus. You can : • arrange and rearrange monitors. • assign Hot Key shortcuts. • create up to 9 virtual desktops. • add special effects to configure all your computer desktop. HYDRAVISIONTM Properties to set the...

Manual
Page 23
English 3.1.6. Software Installation Display Properties pages To access Display Properties pages, right-click the GIGABYTE icon on the taskbar and select Display Properties or right-click on Desktop and then select Properties. The Display Properties dialog box shows the information of display adapter, color, the range of display area, and the refresh rate. You can click the item to change the color quality. Display Matrix Model CRT+TV CRT+DVI DVI+TV DVI+TV+CRT GV-RX60P128DE/GV-RX60P256DP Yes Yes Yes Yes...
English 3.1.6. Software Installation Display Properties pages To access Display Properties pages, right-click the GIGABYTE icon on the taskbar and select Display Properties or right-click on Desktop and then select Properties. The Display Properties dialog box shows the information of display adapter, color, the range of display area, and the refresh rate. You can click the item to change the color quality. Display Matrix Model CRT+TV CRT+DVI DVI+TV DVI+TV+CRT GV-RX60P128DE/GV-RX60P256DP Yes Yes Yes Yes...

Manual
Page 25
... Screen „ Enable System Tray menu „ Select a Language ... „ Select a Skin ... „ Restore facotry defaults ... - 21 - English Profiles Properties: You can be quickly activated manually, through a Hotkey, or by file association. Software Installation Preferences Properties: Use the Preferences page to a specific graphics card. Define and save your own personal video settings that can use profiles to create customized environments for your computer, you need to select the appropriate card...
... Screen „ Enable System Tray menu „ Select a Language ... „ Select a Skin ... „ Restore facotry defaults ... - 21 - English Profiles Properties: You can be quickly activated manually, through a Hotkey, or by file association. Software Installation Preferences Properties: Use the Preferences page to a specific graphics card. Define and save your own personal video settings that can use profiles to create customized environments for your computer, you need to select the appropriate card...

Manual
Page 26
... the installed versions of Windows and Microsoft DirectX. „ The System Hardware tab includes information such as the installed CPU type and speed, the installed BIOS and version, and the installed motherboard chipset. „ The Graphics Software tab includes information such as installed 2D and 3D driver versions and OpenGL version. „ The Graphics Hardware tab includes information such as the installed graphics ID, bus type, and BIOS version. GV-RX60P128DE/GV-RX60P256DP Graphics Accelerator - 22 - The CATALYST Control Center Help...
... the installed versions of Windows and Microsoft DirectX. „ The System Hardware tab includes information such as the installed CPU type and speed, the installed BIOS and version, and the installed motherboard chipset. „ The Graphics Software tab includes information such as installed 2D and 3D driver versions and OpenGL version. „ The Graphics Hardware tab includes information such as the installed graphics ID, bus type, and BIOS version. GV-RX60P128DE/GV-RX60P256DP Graphics Accelerator - 22 - The CATALYST Control Center Help...

Manual
Page 32
Setting for performance is best used for situations where a high level of realism is required for the object's shape and reflective properties. „ SMARTSHADERTM SMARTSHADER technology incorporates major advances in the area of Pixel Shaders, which translates into better rendering performance. GV-RX60P128DE/GV-RX60P256DP Graphics Accelerator - 28 - English „ TRUFORMTM TRUFORM is a technology developed by providing highlights on every pixel rendered...
Setting for performance is best used for situations where a high level of realism is required for the object's shape and reflective properties. „ SMARTSHADERTM SMARTSHADER technology incorporates major advances in the area of Pixel Shaders, which translates into better rendering performance. GV-RX60P128DE/GV-RX60P256DP Graphics Accelerator - 28 - English „ TRUFORMTM TRUFORM is a technology developed by providing highlights on every pixel rendered...

Manual
Page 34
... use the Contrast control. „ Color - Video : With Video setting you view streaming video. Adjusting the Gamma can be useful for 3D games that display dimly lit scenes. GV-RX60P128DE/GV-RX60P256DP Graphics Accelerator - 30 - Full-screen 3D Adjusting the Gamma control alters the overall richness of gamma, brightness, or contrast. Adjusting the Brightness and Contrast can set Gamma, Brightness, Contrast, Saturation, and Hue. „ Theater Mode Use Theater Mode to these elements. „ Color Desktop Adjust...
... use the Contrast control. „ Color - Video : With Video setting you view streaming video. Adjusting the Gamma can be useful for 3D games that display dimly lit scenes. GV-RX60P128DE/GV-RX60P256DP Graphics Accelerator - 30 - Full-screen 3D Adjusting the Gamma control alters the overall richness of gamma, brightness, or contrast. Adjusting the Brightness and Contrast can set Gamma, Brightness, Contrast, Saturation, and Hue. „ Theater Mode Use Theater Mode to these elements. „ Color Desktop Adjust...
Manual
Page 36
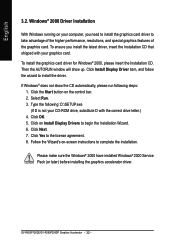
... to complete the installation. GV-RX60P128DE/GV-RX60P256DP Graphics Accelerator - 32 - Click Next. 7. Please make sure the Windows® 2000 have installed Windows® 2000 Service Pack (or later) before installing the graphics accelerator driver. Then the AUTORUN window will show the CD automatically, please run following : D:\SETUP.exe (If D is not your CD-ROM drive, substitute D with your computer, you install the latest driver, insert the Installation CD that shipped...
... to complete the installation. GV-RX60P128DE/GV-RX60P256DP Graphics Accelerator - 32 - Click Next. 7. Please make sure the Windows® 2000 have installed Windows® 2000 Service Pack (or later) before installing the graphics accelerator driver. Then the AUTORUN window will show the CD automatically, please run following : D:\SETUP.exe (If D is not your CD-ROM drive, substitute D with your computer, you install the latest driver, insert the Installation CD that shipped...

Manual
Page 37
... Windows Advanced Options Menu appears, select Safe Mode and press Enter. Troubleshooting Tips For more assistance, use the Troubleshooting Guide located in graphics to be disabled or to the monitor's manual.) - 33 - English 4. If necessary, adjust your monitor's setting by monitor's adjust panel to make the screen looks focused, crisp, and sharp. (Please refer to become the secondary display.) „ Make sure you selected the appropriate display device and graphics card...
... Windows Advanced Options Menu appears, select Safe Mode and press Enter. Troubleshooting Tips For more assistance, use the Troubleshooting Guide located in graphics to be disabled or to the monitor's manual.) - 33 - English 4. If necessary, adjust your monitor's setting by monitor's adjust panel to make the screen looks focused, crisp, and sharp. (Please refer to become the secondary display.) „ Make sure you selected the appropriate display device and graphics card...

Manual
Page 38
... floppy disk. Select the BIOS file from GIGABYTE website and extract it detects the current BIOS on -screen instructions. Update BIOS through the Internet a. GV-RX60P128DE/GV-RX60P256DP Graphics Accelerator - 34 - Then @VGA will not download/update the BIOS if it to Reflash the BIOS 5.1.1. English 5. Restart the computer in MS-DOS mode. (For Windows 2000/XP, you . (@VGA will automatically download the BIOS for your card from GIGABYTE @VGA server and do the update for your card...
... floppy disk. Select the BIOS file from GIGABYTE website and extract it detects the current BIOS on -screen instructions. Update BIOS through the Internet a. GV-RX60P128DE/GV-RX60P256DP Graphics Accelerator - 34 - Then @VGA will not download/update the BIOS if it to Reflash the BIOS 5.1.1. English 5. Restart the computer in MS-DOS mode. (For Windows 2000/XP, you . (@VGA will automatically download the BIOS for your card from GIGABYTE @VGA server and do the update for your card...


