
Manual
Page 5
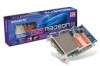
... change in technology, some of the specifications might be reproduced or transmitted in any errors or omissions that may void the warranty of this VGA card Due to a designated collection point for any from without the expressed, written permission of their respective owners. GV-RX16P256D-RH/ GV-RX16P256DE-RH Radeon X1600 Pro Graphics Accelerator User's Manual Rev. 102 12MD-RX16P2DR-102R * The WEEE marking on VGA card, this may appear in this document...
... change in technology, some of the specifications might be reproduced or transmitted in any errors or omissions that may void the warranty of this VGA card Due to a designated collection point for any from without the expressed, written permission of their respective owners. GV-RX16P256D-RH/ GV-RX16P256DE-RH Radeon X1600 Pro Graphics Accelerator User's Manual Rev. 102 12MD-RX16P2DR-102R * The WEEE marking on VGA card, this may appear in this document...
Manual
Page 6
... Troubleshooting Tips 36 5. Windows® XP Driver and Utilities Installation 11 3.1.1. Hardware Installation 4 2.1. Windows® 2000 Driver Installation 35 4. Reflash BIOS in Windows mode 37 5.2. Minimum System Requirement 3 2. Display Properties pages 21 3.2. How to Reflash the BIOS 37 5.1.1. Hardware Installation 7 3. DirectX Installation ...12 3.1.3. Appendix 37 5.1. English Table of Contents 1. Operating System Requirement 11 3.1.2. Introduction 3 1.1. Resolutions and Color Depth Table (In Windows® XP 38 GV-RX16P256D(DE)-RH Graphics...
... Troubleshooting Tips 36 5. Windows® XP Driver and Utilities Installation 11 3.1.1. Hardware Installation 4 2.1. Windows® 2000 Driver Installation 35 4. Reflash BIOS in Windows mode 37 5.2. Minimum System Requirement 3 2. Display Properties pages 21 3.2. How to Reflash the BIOS 37 5.1.1. Hardware Installation 7 3. DirectX Installation ...12 3.1.3. Appendix 37 5.1. English Table of Contents 1. Operating System Requirement 11 3.1.2. Introduction 3 1.1. Resolutions and Color Depth Table (In Windows® XP 38 GV-RX16P256D(DE)-RH Graphics...
Manual
Page 7
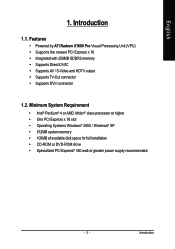
...; 100MB of available disk space for full installation • CD-ROM or DVD-ROM drive • Specialized PCI Express® 350 watt or greater power supply recommended. - 3 - Features • Powered by ATI Radeon X1600 Pro Visual Processing Unit (VPU) • Supports the newest PCI Express x 16 • Integrated with 256MB GDDR2 memory • Supports DirectX 9.0C • Supports AV / S-Video and HDTV output • Supports TV-Out connector • Supports DVI-I connector 1.2. Introduction English 1. Introduction...
...; 100MB of available disk space for full installation • CD-ROM or DVD-ROM drive • Specialized PCI Express® 350 watt or greater power supply recommended. - 3 - Features • Powered by ATI Radeon X1600 Pro Visual Processing Unit (VPU) • Supports the newest PCI Express x 16 • Integrated with 256MB GDDR2 memory • Supports DirectX 9.0C • Supports AV / S-Video and HDTV output • Supports TV-Out connector • Supports DVI-I connector 1.2. Introduction English 1. Introduction...

Manual
Page 8
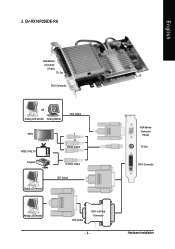
Hardware Installation 2.1. VGA Monitor Connector (15-pin) TV-Out DVI-I to D-Sub Connector GV-RX16P256D(DE)-RH Graphics Accelerator - 4 - Board Layout 1. English 2. GV-RX16P256D-RH VGA Monitor Connector (15-pin) TV_Out DVI-I Connector OR Analog LCD Monitor Analog Monitor VGA Output HDTV NTSC / PAL TV Projector Digital LCD Monitor Y Pr Pb/AV Output S-Video Output DVI Output Analog LCD Monitor VGA Output DVI-I Connector
Hardware Installation 2.1. VGA Monitor Connector (15-pin) TV-Out DVI-I to D-Sub Connector GV-RX16P256D(DE)-RH Graphics Accelerator - 4 - Board Layout 1. English 2. GV-RX16P256D-RH VGA Monitor Connector (15-pin) TV_Out DVI-I Connector OR Analog LCD Monitor Analog Monitor VGA Output HDTV NTSC / PAL TV Projector Digital LCD Monitor Y Pr Pb/AV Output S-Video Output DVI Output Analog LCD Monitor VGA Output DVI-I Connector
Manual
Page 9
VGA Monitor Connector (15-pin) TV-Out DVI-I to D-Sub Connector - 5 - GV-RX16P256DE-RH VGA Monitor Connector (15-pin) TV_Out DVI-I Connector OR Analog LCD Monitor Analog Monitor VGA Output HDTV NTSC / PAL TV Projector Digital LCD Monitor Y Pr Pb/AV Output S-Video Output DVI Output Analog LCD Monitor VGA Output DVI-I Connector Hardware Installation English 2.
VGA Monitor Connector (15-pin) TV-Out DVI-I to D-Sub Connector - 5 - GV-RX16P256DE-RH VGA Monitor Connector (15-pin) TV_Out DVI-I Connector OR Analog LCD Monitor Analog Monitor VGA Output HDTV NTSC / PAL TV Projector Digital LCD Monitor Y Pr Pb/AV Output S-Video Output DVI Output Analog LCD Monitor VGA Output DVI-I Connector Hardware Installation English 2.
Manual
Page 11
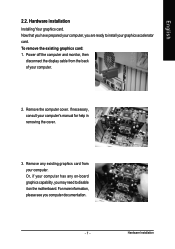
... has any existing graphics card from the back of your computer's manual for help in removing the cover. 3. Power off the computer and monitor, then disconnect the display cable from your graphics accelerator card. To remove the existing graphics card: 1. If necessary, consult your computer. 2. Hardware Installation Remove the computer cover. Remove any on-board graphics capability, you are ready to disable it on the motherboard. Hardware installation Installing Your graphics card. For more...
... has any existing graphics card from the back of your computer's manual for help in removing the cover. 3. Power off the computer and monitor, then disconnect the display cable from your graphics accelerator card. To remove the existing graphics card: 1. If necessary, consult your computer. 2. Hardware Installation Remove the computer cover. Remove any on-board graphics capability, you are ready to disable it on the motherboard. Hardware installation Installing Your graphics card. For more...
Manual
Page 12
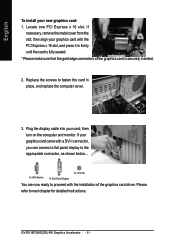
... the slot; If your graphics card with the PCI Express x 16 slot, and press it in place, and replace the computer cover. 3. GV-RX16P256D(DE)-RH Graphics Accelerator - 8 - Plug the display cable into your new graphics card: 1. then turn on the computer and monitor. To VGA Monitor To Flat Panel Display To TV/VCR You are now ready to proceed with a DVI-I connector, you can connect a flat panel display to the appropriate connector, as shown below...
... the slot; If your graphics card with the PCI Express x 16 slot, and press it in place, and replace the computer cover. 3. GV-RX16P256D(DE)-RH Graphics Accelerator - 8 - Plug the display cable into your new graphics card: 1. then turn on the computer and monitor. To VGA Monitor To Flat Panel Display To TV/VCR You are now ready to proceed with a DVI-I connector, you can connect a flat panel display to the appropriate connector, as shown below...
Manual
Page 14
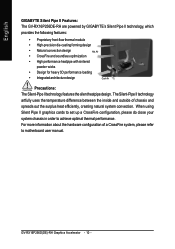
... Precautions: The Silent-Pipe II technology features the silent heatpipe design. GV-RX16P256D(DE)-RH Graphics Accelerator - 10 - For more information about the hardware configuration of chassis and spreads out the surplus heat efficiently, creating natural system convection. When using Silent Pipe II graphics cards to set up a CrossFire configuration, please do close your system chassis in order to motherboard user manual. The Silent-Pipe II technology artfully uses the temperature difference between...
... Precautions: The Silent-Pipe II technology features the silent heatpipe design. GV-RX16P256D(DE)-RH Graphics Accelerator - 10 - For more information about the hardware configuration of chassis and spreads out the surplus heat efficiently, creating natural system convection. When using Silent Pipe II graphics cards to set up a CrossFire configuration, please do close your system chassis in order to motherboard user manual. The Silent-Pipe II technology artfully uses the temperature difference between...
Manual
Page 15
... not show up, run "D:\setup.exe"). Then you insert the driver CD into your graphics accelerator.) 3.1. Windows® XP Driver and Utilities Installation 3.1.1. Software Installation Operating System Requirement • When loading the graphics card drivers for the system, please make sure your system has installed DirectX 9 or later version. • If you can follow the subsection 3.1.3 "Driver installation" to be Drive D: The installation of Windows® 2000 / Windows® XP drivers is very simple. Or...
... not show up, run "D:\setup.exe"). Then you insert the driver CD into your graphics accelerator.) 3.1. Windows® XP Driver and Utilities Installation 3.1.1. Software Installation Operating System Requirement • When loading the graphics card drivers for the system, please make sure your system has installed DirectX 9 or later version. • If you can follow the subsection 3.1.3 "Driver installation" to be Drive D: The installation of Windows® 2000 / Windows® XP drivers is very simple. Or...
Manual
Page 17
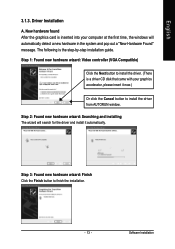
... at the first time, the windows will search for the driver and install it now.) Or click the Cancel button to install the driver from AUTORUN window. Step 2: Found new hardware wizard: Searching and installing The wizard will automatically detect a new hardware in the system and pop out a "New Hardware Found" message. Step 1: Found new hardware wizard: Video controller (VGA Compatible) Click the Next button to finish the installation. - 13 - Software Installation Driver Installation A.
... at the first time, the windows will search for the driver and install it now.) Or click the Cancel button to install the driver from AUTORUN window. Step 2: Found new hardware wizard: Searching and installing The wizard will automatically detect a new hardware in the system and pop out a "New Hardware Found" message. Step 1: Found new hardware wizard: Video controller (VGA Compatible) Click the Next button to finish the installation. - 13 - Software Installation Driver Installation A.
Manual
Page 18
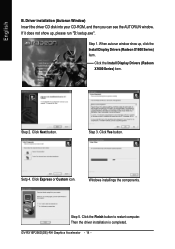
Click the Install Display Drivers (Radeon X1600 Series) item. Step 5. GV-RX16P256D(DE)-RH Graphics Accelerator - 14 - Click Express or Custom icon. Windows installings the components. When autorun window show up , click the Install Display Drivers (Radeon X1600 Series) item. Click Yes button. Then the driver installation is completed. Driver installation (Autorun Window) Insert the driver CD disk into your CD-ROM, and then you can see the AUTORUN window. Step 1. Step 3. Click the Finish button to...
Click the Install Display Drivers (Radeon X1600 Series) item. Step 5. GV-RX16P256D(DE)-RH Graphics Accelerator - 14 - Click Express or Custom icon. Windows installings the components. When autorun window show up , click the Install Display Drivers (Radeon X1600 Series) item. Click Yes button. Then the driver installation is completed. Driver installation (Autorun Window) Insert the driver CD disk into your CD-ROM, and then you can see the AUTORUN window. Step 1. Step 3. Click the Finish button to...
Manual
Page 22
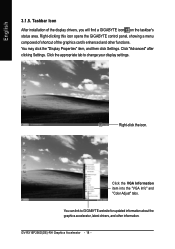
... to change your display settings. English 3.1.5. Click the VGA Information item into the "VGA Info" and "Color Adjust" tabs. GV-RX16P256D(DE)-RH Graphics Accelerator - 18 - Click the appropriate tab to GIGABYTE website for updated information about the graphics accelerator, latest drivers, and other functions. Right-click the icon. Click "Advanced" after clicking Settings. You may click the "Display Properties" item, and then click Settings. Taskbar Icon After installation of the graphics card...
... to change your display settings. English 3.1.5. Click the VGA Information item into the "VGA Info" and "Color Adjust" tabs. GV-RX16P256D(DE)-RH Graphics Accelerator - 18 - Click the appropriate tab to GIGABYTE website for updated information about the graphics accelerator, latest drivers, and other functions. Right-click the icon. Click "Advanced" after clicking Settings. You may click the "Display Properties" item, and then click Settings. Taskbar Icon After installation of the graphics card...

Manual
Page 24
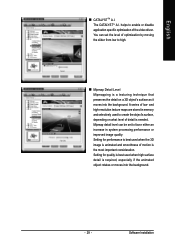
... used to the way you will find an ATI CATALYSTTM Control Center icon on the taskbar's status area. It allows you to quickly and easily tailor your computer desktop to configure all your computer desktop. Fig. 3 GV-RX16P256D(DE)-RH Graphics Accelerator - 20 - English ATI CATALYSTTM Control Center: After installation of information across your graphics card settings. You can right-click on the desktop to select Properties>Settings>Advanced>ATI CATALYST Control Center...
... used to the way you will find an ATI CATALYSTTM Control Center icon on the taskbar's status area. It allows you to quickly and easily tailor your computer desktop to configure all your computer desktop. Fig. 3 GV-RX16P256D(DE)-RH Graphics Accelerator - 20 - English ATI CATALYSTTM Control Center: After installation of information across your graphics card settings. You can right-click on the desktop to select Properties>Settings>Advanced>ATI CATALYST Control Center...
Manual
Page 25
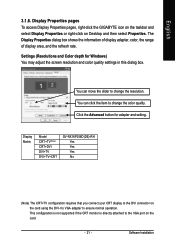
... the refresh rate. Software Installation Click the Advanced button for Windows) You may adjust the screen resolution and color quality settings in this dialog box. You can click the item to change the color quality. Settings (Resolutions and Color depth for adapter and setting. Display Matrix Model CRT+TV(Note) CRT+DVI DVI+TV DVI+TV+CRT GV-RX16P256D(DE)-RH Yes Yes Yes No (Note) The CRT+TV configuration requires that you connect your CRT display to the DVI connector on the card using the DVI-I to VGA adapter...
... the refresh rate. Software Installation Click the Advanced button for Windows) You may adjust the screen resolution and color quality settings in this dialog box. You can click the item to change the color quality. Settings (Resolutions and Color depth for adapter and setting. Display Matrix Model CRT+TV(Note) CRT+DVI DVI+TV DVI+TV+CRT GV-RX16P256D(DE)-RH Yes Yes Yes No (Note) The CRT+TV configuration requires that you connect your CRT display to the DVI connector on the card using the DVI-I to VGA adapter...
Manual
Page 27
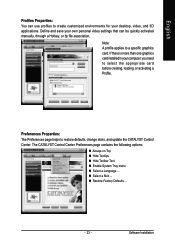
... Toolbar Text Enable System Tray menu Select a Language ... Select a Skin ... English Profiles Properties: You can be quickly activated manually, through a Hotkey, or by file association. Software Installation Restore Factory Defaults ... - 23 - Define and save your desktop, video, and 3D applications. Preferences Properties: The Preferences page helps to create customized environments for your own personal video settings that can use profiles to restore defaults, change skins, and update the CATALYST Control Center.
... Toolbar Text Enable System Tray menu Select a Language ... Select a Skin ... English Profiles Properties: You can be quickly activated manually, through a Hotkey, or by file association. Software Installation Restore Factory Defaults ... - 23 - Define and save your desktop, video, and 3D applications. Preferences Properties: The Preferences page helps to create customized environments for your own personal video settings that can use profiles to restore defaults, change skins, and update the CATALYST Control Center.
Manual
Page 33
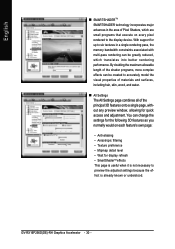
... either an increase in memory and selectively used when high surface detail is a texturing technique that preserves the detail on what level of low- Setting for performance is best used when the 3D image is animated and smoothness of optimization by moving the slider from low to enable or disable application specific optimization of the video driver. Software Installation The CATALYSTTM A.I . helps to...
... either an increase in memory and selectively used when high surface detail is a texturing technique that preserves the detail on what level of low- Setting for performance is best used when the 3D image is animated and smoothness of optimization by moving the slider from low to enable or disable application specific optimization of the video driver. Software Installation The CATALYSTTM A.I . helps to...
Manual
Page 34
..., more complex effects can change the settings for the following 3D features as you normally would on every pixel rendered to accurately model the visual properties of the principal 3D features onto a single page, without any preview window, allowing for quick access and adjustment. With support for display refresh • SmartShaderTM effects This page is useful when it is already known...
..., more complex effects can change the settings for the following 3D features as you normally would on every pixel rendered to accurately model the visual properties of the principal 3D features onto a single page, without any preview window, allowing for quick access and adjustment. With support for display refresh • SmartShaderTM effects This page is useful when it is already known...
Manual
Page 39
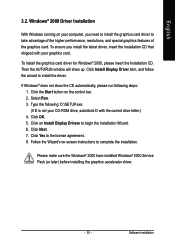
... CD automatically, please run following : D:\SETUP.exe (If D is not your CD-ROM drive, substitute D with your computer, you install the latest driver, insert the Installation CD that shipped with the correct drive letter.) 4. Software Installation Click the Start button on -screen instructions to take advantage of the higher performance, resolutions, and special graphics features of the graphics card. To install the graphics card driver for Windows® 2000, please...
... CD automatically, please run following : D:\SETUP.exe (If D is not your CD-ROM drive, substitute D with your computer, you install the latest driver, insert the Installation CD that shipped with the correct drive letter.) 4. Software Installation Click the Start button on -screen instructions to take advantage of the higher performance, resolutions, and special graphics features of the graphics card. To install the graphics card driver for Windows® 2000, please...
Manual
Page 40
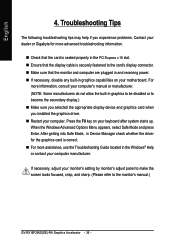
... display device and graphics card when you experience problems. Contact your dealer or Gigabyte for the graphics card is correct. Make sure that the monitor and computer are plugged in the PCI Express x 16 slot. Check that the display cable is seated properly in and receiving power. For more advanced troubleshooting information. If necessary, disable any built-in the Windows® Help or contact your monitor's setting by monitor's adjust panel...
... display device and graphics card when you experience problems. Contact your dealer or Gigabyte for the graphics card is correct. Make sure that the monitor and computer are plugged in the PCI Express x 16 slot. Check that the display cable is seated properly in and receiving power. For more advanced troubleshooting information. If necessary, disable any built-in the Windows® Help or contact your monitor's setting by monitor's adjust panel...
Manual
Page 41
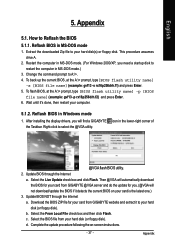
... -screen instructions. - 37 - Select the BIOS file from GIGABYTE website and extract it to restart the computer in the lower-right corner of @VGA flash BIOS utility. 2. b. Complete the update procedure following the on your card is the latest one.) 3. Appendix 5.1. How to your hard disk (or floppy disk). Change the command prompt to select the @VGA utility. Reflash BIOS in MS-DOS mode 1. After installing the display drivers, you need...
... -screen instructions. - 37 - Select the BIOS file from GIGABYTE website and extract it to restart the computer in the lower-right corner of @VGA flash BIOS utility. 2. b. Complete the update procedure following the on your card is the latest one.) 3. Appendix 5.1. How to your hard disk (or floppy disk). Change the command prompt to select the @VGA utility. Reflash BIOS in MS-DOS mode 1. After installing the display drivers, you need...


