
Manual
Page 4
Hardware Installation 6 2.1. Hardware Installation ...9 3. Appendix ...33 5.1. Regulatory Statements 34 - 4 - Minimum System Requirements 5 2. Driver and Utility Installation 11 3.1.1. Driver Installation ...11 3.1.2. GIGABYTE Gamer HUD Lite on Driver Disk 13 3.2.Taskbar Icon ...15 3.3.Display Properties Pages 17 4. Resolutions and Color Depth Tables 33 5.2. Features ...5 1.2. Board Layout ...6 2.2. Troubleshooting Tips 32 5. Introduction ...5 1.1. Table of Contents 1. Software Installation 11 3.1.
Hardware Installation 6 2.1. Hardware Installation ...9 3. Appendix ...33 5.1. Regulatory Statements 34 - 4 - Minimum System Requirements 5 2. Driver and Utility Installation 11 3.1.1. Driver Installation ...11 3.1.2. GIGABYTE Gamer HUD Lite on Driver Disk 13 3.2.Taskbar Icon ...15 3.3.Display Properties Pages 17 4. Resolutions and Color Depth Tables 33 5.2. Features ...5 1.2. Board Layout ...6 2.2. Troubleshooting Tips 32 5. Introduction ...5 1.1. Table of Contents 1. Software Installation 11 3.1.
Manual
Page 5
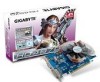
...HD 4670 Graphics Processing Unit (GPU) (For GV-R467ZL-1GI/ GV-R467D3-512I only) Powered by ATI RadeonTM HD 4650 Graphics Processing Unit (GPU)(For GV-R465OC-1GI) Supports PCI Express 2.0 Integrated with 1GB DDR3 memory (For GV-R467ZL-1GI only) Integrated with 1 GB GDDR2 memory (For GV-R465OC-1GI only) Integrated with Service Pack 2 (SP2)... Introduction 1.1. Minimum System Requirements Hardware - The power supply should be with two PCI Express x16 slots and correct chipset driver - Windows® Vista - A power supply that provides at least 450-watt is required. Introduction
...HD 4670 Graphics Processing Unit (GPU) (For GV-R467ZL-1GI/ GV-R467D3-512I only) Powered by ATI RadeonTM HD 4650 Graphics Processing Unit (GPU)(For GV-R465OC-1GI) Supports PCI Express 2.0 Integrated with 1GB DDR3 memory (For GV-R467ZL-1GI only) Integrated with 1 GB GDDR2 memory (For GV-R465OC-1GI only) Integrated with Service Pack 2 (SP2)... Introduction 1.1. Minimum System Requirements Hardware - The power supply should be with two PCI Express x16 slots and correct chipset driver - Windows® Vista - A power supply that provides at least 450-watt is required. Introduction
Manual
Page 9
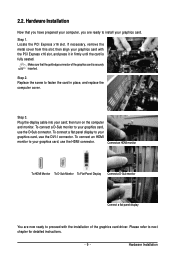
Hardware Installation Now that the gold edge connector of the graphics card driver. Step 1. Make sure that you have prepared your computer, you are now ready to proceed with the PCI Express x16 slot, and press it in ...
Hardware Installation Now that the gold edge connector of the graphics card driver. Step 1. Make sure that you have prepared your computer, you are now ready to proceed with the PCI Express x16 slot, and press it in ...

Manual
Page 10
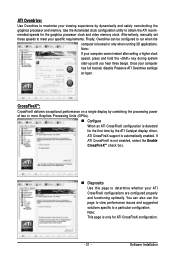
...bridge interconnect cables (Figure 1). Step 1: Install two CrossFireX graphics cards of the same type. (Example: GV-RX195P256D-RH) Figure 1 Step 2: After installing graphics card driver in operating system, when an ATI CrossFireX configuration is detected for the first time by the ATI Catalyst ...please refer to select the Enable CrossFireXTM check box (Figure 2). Then users can enable the CrossFireX technology through the graphics card driver. Two CrossFire graphics cards of the same chipset on the hardware configuration. From the ATI Catalyst Control Center, enter the CrossFireX...
...bridge interconnect cables (Figure 1). Step 1: Install two CrossFireX graphics cards of the same type. (Example: GV-RX195P256D-RH) Figure 1 Step 2: After installing graphics card driver in operating system, when an ATI CrossFireX configuration is detected for the first time by the ATI Catalyst ...please refer to select the Enable CrossFireXTM check box (Figure 2). Then users can enable the CrossFireX technology through the graphics card driver. Two CrossFire graphics cards of the same chipset on the hardware configuration. From the ATI Catalyst Control Center, enter the CrossFireX...
Manual
Page 11
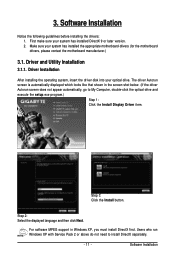
...or later version. 2. Software Installation Notice the following guidelines before installing the drivers: 1. First make sure your optical drive. Make sure your system has installed the appropriate motherboard drivers (for the motherboard drivers, please contact the motherboard manufacturer.) 3.1. 3. Step 2: Select the displayed... language and then click Next. Step 3: Click the Install button. Software Installation The driver Autorun screen is automatically displayed which looks like that shown in Windows XP, you must install DirectX first. Users...
...or later version. 2. Software Installation Notice the following guidelines before installing the drivers: 1. First make sure your optical drive. Make sure your system has installed the appropriate motherboard drivers (for the motherboard drivers, please contact the motherboard manufacturer.) 3.1. 3. Step 2: Select the displayed... language and then click Next. Step 3: Click the Install button. Software Installation The driver Autorun screen is automatically displayed which looks like that shown in Windows XP, you must install DirectX first. Users...
Manual
Page 12
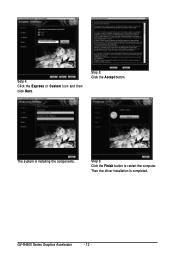
Then the driver installation is installing the components. Step 6: Click the Finish button to restart the computer. GV-R4600 Series Graphics Accelerator - 12 - The system is completed. Step 5: Click the Accept button. Setp 4: Click the Express or Custom icon and then click Next.
Then the driver installation is installing the components. Step 6: Click the Finish button to restart the computer. GV-R4600 Series Graphics Accelerator - 12 - The system is completed. Step 5: Click the Accept button. Setp 4: Click the Express or Custom icon and then click Next.
Manual
Page 13
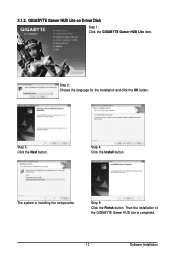
Step 3: Click the Next button. The system is completed. - 13 - Then the installation of the GIGABYTE Gamer HUD Lite is installing the components. Software Installation Step 5: Click the Finish button. GIGABYTE Gamer HUD Lite on Driver Disk Step 1: Click the GIGABYTE Gamer HUD Lite item. Step 4: Click the Install button. Step 2: Choose the language for the installation and click the OK button. 3.1.2.
Step 3: Click the Next button. The system is completed. - 13 - Then the installation of the GIGABYTE Gamer HUD Lite is installing the components. Software Installation Step 5: Click the Finish button. GIGABYTE Gamer HUD Lite on Driver Disk Step 1: Click the GIGABYTE Gamer HUD Lite item. Step 4: Click the Install button. Step 2: Choose the language for the installation and click the OK button. 3.1.2.
Manual
Page 15
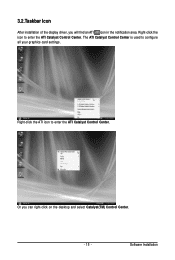
Right-click the ATI icon to enter the ATI Catalyst Control Center. Or you will find an ATI icon in the notification area. Software Installation Right-click the icon to enter the ATI Catalyst Control Center. 3.2.Taskbar Icon After installation of the display driver, you can right-click on the desktop and select Catalyst(TM) Control Center. - 15 - The ATI Catalyst Control Center is used to configure all your graphics card settings.
Right-click the ATI icon to enter the ATI Catalyst Control Center. Or you will find an ATI icon in the notification area. Software Installation Right-click the icon to enter the ATI Catalyst Control Center. 3.2.Taskbar Icon After installation of the display driver, you can right-click on the desktop and select Catalyst(TM) Control Center. - 15 - The ATI Catalyst Control Center is used to configure all your graphics card settings.
Manual
Page 20
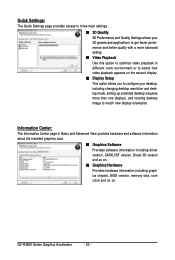
...Basic and Advanced View provides hardware and software information about the installed graphics card. Graphics Software Provides software information including driver version, CATALYST version, Direct 3D version and so on. Graphics Hardware Provides hardware information including graphics chipset, BIOS ...mode, setting up extended desktop (requires more than one display), and rotating desktop image to match new display orientation. GV-R4600 Series Graphics Accelerator - 20 - Information Center: The Information Center page in different room environment or to select how video ...
...Basic and Advanced View provides hardware and software information about the installed graphics card. Graphics Software Provides software information including driver version, CATALYST version, Direct 3D version and so on. Graphics Hardware Provides hardware information including graphics chipset, BIOS ...mode, setting up extended desktop (requires more than one display), and rotating desktop image to match new display orientation. GV-R4600 Series Graphics Accelerator - 20 - Information Center: The Information Center page in different room environment or to select how video ...
Manual
Page 31
... memory clock. Use the Automated clock configuration utility to a particular configuration. You can be configured to meet your viewing experience by the ATI Catalyst display driver, ATI CrossFireX support is booted or only when running 3D applications.
... memory clock. Use the Automated clock configuration utility to a particular configuration. You can be configured to meet your viewing experience by the ATI Catalyst display driver, ATI CrossFireX support is booted or only when running 3D applications.
Manual
Page 32
... on your computer manufacturer. If necessary, adjust your computer. Troubleshooting Tips The following troubleshooting tips may help if you install the graphics driver. Restart your monitor's setting using monitor's adjust panel to make the screen look focused, crisp, and sharp. (Please refer...Make sure you selected the appropriate display device and graphics card when you experience problems. Contact your dealer or GIGABYTE for the graphics card is securely fastened to the monitor's manual.) GV-R4600 Series Graphics Accelerator - 32 - Press on your motherboard.
... on your computer manufacturer. If necessary, adjust your computer. Troubleshooting Tips The following troubleshooting tips may help if you install the graphics driver. Restart your monitor's setting using monitor's adjust panel to make the screen look focused, crisp, and sharp. (Please refer...Make sure you selected the appropriate display device and graphics card when you experience problems. Contact your dealer or GIGABYTE for the graphics card is securely fastened to the monitor's manual.) GV-R4600 Series Graphics Accelerator - 32 - Press on your motherboard.

