Manual
Page 4
Board Layout ...6 2.2. Software Installation 10 3.1. Resolutions and Color Depth Tables 32 5.2. Taskbar Icon ...14 3.3. Introduction ...5 1.1. Driver and Utility Installation 10 3.1.1. Appendix ...32 5.1. Table of Contents 1. Features ...5 1.2. Hardware Installation ...8 3. Driver Installation ...10 3.1.2. Display Properties Pages 16 4. Regulatory Statements 33 - 4 - GIGABYTE Gamer HUD Lite on Driver Disk 12 3.2. Minimum System Requirements 5 2. Hardware Installation 6 2.1. Troubleshooting Tips 31 5.
Board Layout ...6 2.2. Software Installation 10 3.1. Resolutions and Color Depth Tables 32 5.2. Taskbar Icon ...14 3.3. Introduction ...5 1.1. Driver and Utility Installation 10 3.1.1. Appendix ...32 5.1. Table of Contents 1. Features ...5 1.2. Hardware Installation ...8 3. Driver Installation ...10 3.1.2. Display Properties Pages 16 4. Regulatory Statements 33 - 4 - GIGABYTE Gamer HUD Lite on Driver Disk 12 3.2. Minimum System Requirements 5 2. Hardware Installation 6 2.1. Troubleshooting Tips 31 5.
Manual
Page 5
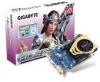
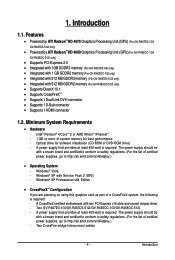
... memory for software installation (CD-ROM or DVD-ROM drive) - Intel® Pentium® 4/CoreTM 2 or AMD AthlonTM /PhenomTM - 1 GB or more of a CrossFireX system, the following is required. A CrossFireX certified motherboard with Service Pack 2 (SP2) - Introduction 1.1. Features • Powered by ATI RadeonTMHD 4670 Graphics Processing Unit (GPU) (For GV-R467D3-1GI/ GV-R467D3-512I only...
... memory for software installation (CD-ROM or DVD-ROM drive) - Intel® Pentium® 4/CoreTM 2 or AMD AthlonTM /PhenomTM - 1 GB or more of a CrossFireX system, the following is required. A CrossFireX certified motherboard with Service Pack 2 (SP2) - Introduction 1.1. Features • Powered by ATI RadeonTMHD 4670 Graphics Processing Unit (GPU) (For GV-R467D3-1GI/ GV-R467D3-512I only...

Manual
Page 6
2. Board Layout CrossFire Connector HDMI Connector D-Sub Monitor Connector (15-pin) DVI-I Connector HDMI TV HDMI TV or Analog LCD Monitor Analog CRT Monitor D-Sub Output Digital LCD Monitor DVI Output or Analog LCD Monitor Analog Monitor D-Sub Output DVI-I to D-Sub Adapter HDMI Connector D-Sub Monitor Connector (15-pin) DVI-I Connector GV-R4600 Series Graphics Accelerator - 6 - Hardware Installation 2.1.
2. Board Layout CrossFire Connector HDMI Connector D-Sub Monitor Connector (15-pin) DVI-I Connector HDMI TV HDMI TV or Analog LCD Monitor Analog CRT Monitor D-Sub Output Digital LCD Monitor DVI Output or Analog LCD Monitor Analog Monitor D-Sub Output DVI-I to D-Sub Adapter HDMI Connector D-Sub Monitor Connector (15-pin) DVI-I Connector GV-R4600 Series Graphics Accelerator - 6 - Hardware Installation 2.1.
Manual
Page 7
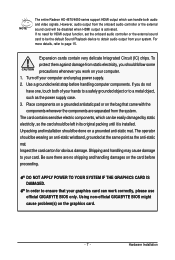
...a metal object, such as the anti-static mat. Be sure there are separated from static electricity, you work correctly, please use official GIGABYTE BIOS only. If no shipping and handling damages on the card before handling computer components. For more details, refer to your computer and ...pad or on the graphics card. - 7 - DO NOT APPLY POWER TO YOUR SYSTEM IF THE GRAPHICS CARD IS DAMAGED. Unpacking and installation should be left in its original packing until it is activated. In order to ensure that came with the components whenever the components are no...
...a metal object, such as the anti-static mat. Be sure there are separated from static electricity, you work correctly, please use official GIGABYTE BIOS only. If no shipping and handling damages on the card before handling computer components. For more details, refer to your computer and ...pad or on the graphics card. - 7 - DO NOT APPLY POWER TO YOUR SYSTEM IF THE GRAPHICS CARD IS DAMAGED. Unpacking and installation should be left in its original packing until it is activated. In order to ensure that came with the components whenever the components are no...

Manual
Page 8
Hardware Installation Now that the gold edge connector of the graphics card driver. Locate the PCI Express x16 slot. then align your graphics card. Plug the display cable into your graphics card, use the D-Sub connector. GV-R4600 Series Graphics Accelerator - 8 - Step 2. To connect a D-Sub monitor to...have prepared your computer, you are now ready to your graphics card, use the HDMI connector. Replace the screw to install your graphics card with the installation of the graphics card is fully seated. Step 3. Connect an HDMI monitor To HDMI Monitor To D-Sub Monitor To...
Hardware Installation Now that the gold edge connector of the graphics card driver. Locate the PCI Express x16 slot. then align your graphics card. Plug the display cable into your graphics card, use the D-Sub connector. GV-R4600 Series Graphics Accelerator - 8 - Step 2. To connect a D-Sub monitor to...have prepared your computer, you are now ready to your graphics card, use the HDMI connector. Replace the screw to install your graphics card with the installation of the graphics card is fully seated. Step 3. Connect an HDMI monitor To HDMI Monitor To D-Sub Monitor To...
Manual
Page 9
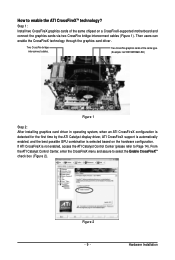
... the graphics cards via two CrossFire bridge interconnect cables (Figure 1). Step 1: Install two CrossFireX graphics cards of the same type. (Example: GV-RX195P256D-RH) Figure 1 Step 2: After installing graphics card driver in operating system, when an ATI CrossFireX configuration is detected ...Catalyst Control Center (please refer to Page 14). Two CrossFire graphics cards of the same chipset on the hardware configuration. Hardware Installation Figure 2 - 9 - Then users can enable the CrossFireX technology through the graphics card driver. From the ATI Catalyst Control...
... the graphics cards via two CrossFire bridge interconnect cables (Figure 1). Step 1: Install two CrossFireX graphics cards of the same type. (Example: GV-RX195P256D-RH) Figure 1 Step 2: After installing graphics card driver in operating system, when an ATI CrossFireX configuration is detected ...Catalyst Control Center (please refer to Page 14). Two CrossFire graphics cards of the same chipset on the hardware configuration. Hardware Installation Figure 2 - 9 - Then users can enable the CrossFireX technology through the graphics card driver. From the ATI Catalyst Control...
Manual
Page 10
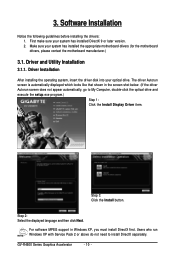
... in the screen shot below. (If the driver Autorun screen does not appear automatically, go to install DirectX separately. Driver and Utility Installation 3.1.1. Step 2: Select the displayed language and then click Next. Users who run Windows XP with Service... execute the setup.exe program.) Step 1: Click the Install Display Driver item. Software Installation Notice the following guidelines before installing the drivers: 1. 3. GV-R4600 Series Graphics Accelerator - 10 - Make sure your system has installed the appropriate motherboard drivers (for the motherboard drivers, please...
... in the screen shot below. (If the driver Autorun screen does not appear automatically, go to install DirectX separately. Driver and Utility Installation 3.1.1. Step 2: Select the displayed language and then click Next. Users who run Windows XP with Service... execute the setup.exe program.) Step 1: Click the Install Display Driver item. Software Installation Notice the following guidelines before installing the drivers: 1. 3. GV-R4600 Series Graphics Accelerator - 10 - Make sure your system has installed the appropriate motherboard drivers (for the motherboard drivers, please...

Manual
Page 11
Setp 4: Click the Express or Custom icon and then click Next. Software Installation Step 6: Click the Finish button to restart the computer. Step 5: Click the Accept button. The system is completed. - 11 - Then the driver installation is installing the components.
Setp 4: Click the Express or Custom icon and then click Next. Software Installation Step 6: Click the Finish button to restart the computer. Step 5: Click the Accept button. The system is completed. - 11 - Then the driver installation is installing the components.

Manual
Page 12
Step 4: Click the Install button. GV-R4600 Series Graphics Accelerator - 12 - The system is completed. Step 5: Click the Finish button. Step 2: Choose the language for the installation and click the OK button. Step 3: Click the Next button. Then the installation of the GIGABYTE Gamer HUD Lite is installing the components. 3.1.2. GIGABYTE Gamer HUD Lite on Driver Disk Step 1: Click the GIGABYTE Gamer HUD Lite item.
Step 4: Click the Install button. GV-R4600 Series Graphics Accelerator - 12 - The system is completed. Step 5: Click the Finish button. Step 2: Choose the language for the installation and click the OK button. Step 3: Click the Next button. Then the installation of the GIGABYTE Gamer HUD Lite is installing the components. 3.1.2. GIGABYTE Gamer HUD Lite on Driver Disk Step 1: Click the GIGABYTE Gamer HUD Lite item.

Manual
Page 13
... Lite The GIGABYTE Gamer HUD Lite allows you to manually configure the GPU/Memory frequency settings Displays the GPU usage and temperature, the GPU usage/thermal curve, and ... default settings Allows you to save the values you adjust Lets the utility optimize the GPU/memory frequency settings Allows you to Disable. - 13 - Software Installation Help page Displays the current operating frequency Automatically optimizes the frequency Hardware Monitor Enables manual adjustment Clock adjustment(Note) of the GPU and video memory.
... Lite The GIGABYTE Gamer HUD Lite allows you to manually configure the GPU/Memory frequency settings Displays the GPU usage and temperature, the GPU usage/thermal curve, and ... default settings Allows you to save the values you adjust Lets the utility optimize the GPU/memory frequency settings Allows you to Disable. - 13 - Software Installation Help page Displays the current operating frequency Automatically optimizes the frequency Hardware Monitor Enables manual adjustment Clock adjustment(Note) of the GPU and video memory.

Manual
Page 14
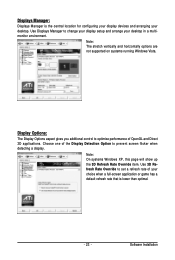
GV-R4600 Series Graphics Accelerator - 14 - The ATI Catalyst Control Center is used to enter the ATI Catalyst Control Center. Right-click the ATI icon to configure all your graphics card settings. 3.2. Taskbar Icon After installation of the display driver, you can right-click on the desktop and select Catalyst(TM) Control Center. Or you will find an ATI icon in the notification area. Right-click the icon to enter the ATI Catalyst Control Center.
GV-R4600 Series Graphics Accelerator - 14 - The ATI Catalyst Control Center is used to enter the ATI Catalyst Control Center. Right-click the ATI icon to configure all your graphics card settings. 3.2. Taskbar Icon After installation of the display driver, you can right-click on the desktop and select Catalyst(TM) Control Center. Or you will find an ATI icon in the notification area. Right-click the icon to enter the ATI Catalyst Control Center.

Manual
Page 15
Configuring Audio Output Configure the default audio output device based upon your needs. Using the picture to the left as the example, to set HDMI audio to Start > Control Panel > Hardware and Sound > Manage audio devices. Step 1: Go to be the default Sound Playback device, select Digital Output Device (HDMI). Figure 1 Figure 2 Figure 3 Step 2: In the Manage audio devices dialog box, click the Playback tab. Otherwise, select Digital Output Device (SPDIF), which is the onboard audio controller. - 15 - Software Installation
Configuring Audio Output Configure the default audio output device based upon your needs. Using the picture to the left as the example, to set HDMI audio to Start > Control Panel > Hardware and Sound > Manage audio devices. Step 1: Go to be the default Sound Playback device, select Digital Output Device (HDMI). Figure 1 Figure 2 Figure 3 Step 2: In the Manage audio devices dialog box, click the Playback tab. Otherwise, select Digital Output Device (SPDIF), which is the onboard audio controller. - 15 - Software Installation

Manual
Page 17
Click Next. - 17 - Step 2: Select the video file to be located. Software Installation ATI Catalyst® Control Center Basic View : The Basic View is the default view when ATI Catalyst Control Center is launched for step-by-step ...
Click Next. - 17 - Step 2: Select the video file to be located. Software Installation ATI Catalyst® Control Center Basic View : The Basic View is the default view when ATI Catalyst Control Center is launched for step-by-step ...

Manual
Page 19
... a more balanced setting. „ Video Playback Use this option to optimize video playback in Basic and Advanced View provides hardware and software information about the installed graphics card. „ Graphics Software Provides software information including driver version, CATALYST version, Direct 3D version and so on. „ Graphics Hardware Provides hardware information... changing desktop resolution and desktop mode, setting up extended desktop (requires more than one display), and rotating desktop image to match new display orientation. Software Installation
... a more balanced setting. „ Video Playback Use this option to optimize video playback in Basic and Advanced View provides hardware and software information about the installed graphics card. „ Graphics Software Provides software information including driver version, CATALYST version, Direct 3D version and so on. „ Graphics Hardware Provides hardware information... changing desktop resolution and desktop mode, setting up extended desktop (requires more than one display), and rotating desktop image to match new display orientation. Software Installation

Manual
Page 21
... there is more than one graphics card installed in your computer, you need to restore defaults, change skins, and update the Catalyst Control Center. Preferences Properties: The Preferences page helps to select the ...
... there is more than one graphics card installed in your computer, you need to restore defaults, change skins, and update the Catalyst Control Center. Preferences Properties: The Preferences page helps to select the ...
Manual
Page 23
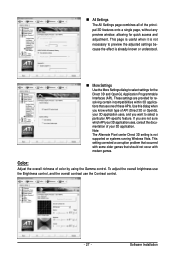
... Option to prevent screen flicker when detecting a display. Note: On systems Windows XP, this page will show up the 3D Refresh Rate Override item. Software Installation Use Displays Manager to set a refresh rate of your desktop in a multimonitor environment. Use 3D Refresh Rate Override to change your display setup and arrange...
... Option to prevent screen flicker when detecting a display. Note: On systems Windows XP, this page will show up the 3D Refresh Rate Override item. Software Installation Use Displays Manager to set a refresh rate of your desktop in a multimonitor environment. Use 3D Refresh Rate Override to change your display setup and arrange...

Manual
Page 25
... rapidly configures your application. „ Anti-Aliasing Anti-Aliasing (AA) is a rendering technique designed to configure anti-aliasing, use the Use application settings option. Software Installation Rather than determining the color to display for each pixel by sampling a single location at the pixel's center, anti-aliasing samples multiple locations within each...
... rapidly configures your application. „ Anti-Aliasing Anti-Aliasing (AA) is a rendering technique designed to configure anti-aliasing, use the Use application settings option. Software Installation Rather than determining the color to display for each pixel by sampling a single location at the pixel's center, anti-aliasing samples multiple locations within each...
Manual
Page 27
... and adjustment. This setting corrected a corruption problem that occurred with modern games. Color: Adjust the overall richness of color by using the Gamma control. Software Installation This page is useful when it is not necessary to preview the adjusted settings because the effect is not supported on systems running Windows Vista...
... and adjustment. This setting corrected a corruption problem that occurred with modern games. Color: Adjust the overall richness of color by using the Gamma control. Software Installation This page is useful when it is not necessary to preview the adjusted settings because the effect is not supported on systems running Windows Vista...

Manual
Page 29
... page, without any preview window, allowing quick access and adjustment. The bar determines how the two interlaced video fields are converted into a noninterlaced form. Software Installation „ Basic Quality You can control the deinterlacing settings by checking the Use automatic deinterlacing item. Extended Desktop Mode is already known or understood.
... page, without any preview window, allowing quick access and adjustment. The bar determines how the two interlaced video fields are converted into a noninterlaced form. Software Installation „ Basic Quality You can control the deinterlacing settings by checking the Use automatic deinterlacing item. Extended Desktop Mode is already known or understood.
Manual
Page 31
... display.) „ Make sure you selected the appropriate display device and graphics card when you experience problems. Contact your dealer or GIGABYTE for more advanced troubleshooting information. „ Check that the card is seated properly in the PCI Express x16 slot. „ ... on your keyboard after system starts up. 4. If necessary, adjust your computer. Troubleshooting Tips The following troubleshooting tips may help if you install the graphics driver. „ Restart your monitor's setting using monitor's adjust panel to make the screen look focused, crisp, and sharp....
... display.) „ Make sure you selected the appropriate display device and graphics card when you experience problems. Contact your dealer or GIGABYTE for more advanced troubleshooting information. „ Check that the card is seated properly in the PCI Express x16 slot. „ ... on your keyboard after system starts up. 4. If necessary, adjust your computer. Troubleshooting Tips The following troubleshooting tips may help if you install the graphics driver. „ Restart your monitor's setting using monitor's adjust panel to make the screen look focused, crisp, and sharp....