
Manual
Page 1
...author assumes no responsibility for any errors or omissions that is protected by Macrovision, and is prohibited. Use of this graphics card. No part of this document nor does the author make a commitment to rapid change in any labels on this manual...not remove any form without the expressed, written permission of this manual. GV-NX84S256HP/ GV-NX84S256HE/ GV-NX84S512HP/ GV-NX84S512H GeForceTM 8400 GS Graphics Accelerator User's Manual Rev. 106 12MM-NX84S2HP-106R Copyright © 2009 GIGABYTE TECHNOLOGY CO., LTD Copyright by Macrovision. patents and other limited viewing ...
...author assumes no responsibility for any errors or omissions that is protected by Macrovision, and is prohibited. Use of this graphics card. No part of this document nor does the author make a commitment to rapid change in any labels on this manual...not remove any form without the expressed, written permission of this manual. GV-NX84S256HP/ GV-NX84S256HE/ GV-NX84S512HP/ GV-NX84S512H GeForceTM 8400 GS Graphics Accelerator User's Manual Rev. 106 12MM-NX84S2HP-106R Copyright © 2009 GIGABYTE TECHNOLOGY CO., LTD Copyright by Macrovision. patents and other limited viewing ...
Manual
Page 6
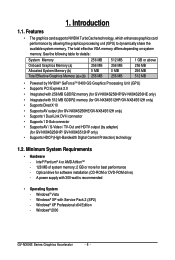
... only) • Supports HDCP (High-Bandwidth Digital Content Protection) technology 1.2. A power supply with Service Pack 2 (SP2) - Features • The graphics card supports NVIDIA TurboCache technology, which enhances graphics card performance by adapter) (for GV-NX84S256HE/GV-NX84S512H only) • Supports 1 Dual-Link DVI-I connector • Supports 1 D-Sub connector • Supports AV / S-Video / TV-Out and HDTV output...
... only) • Supports HDCP (High-Bandwidth Digital Content Protection) technology 1.2. A power supply with Service Pack 2 (SP2) - Features • The graphics card supports NVIDIA TurboCache technology, which enhances graphics card performance by adapter) (for GV-NX84S256HE/GV-NX84S512H only) • Supports 1 Dual-Link DVI-I connector • Supports 1 D-Sub connector • Supports AV / S-Video / TV-Out and HDTV output...

Manual
Page 9
... obvious damage. DO NOT APPLY POWER TO YOUR SYSTEM IF THE GRAPHICS CARD IS DAMAGED. Unpacking and installation should be left in its original packing until it is installed. The operator should follow some precautions whenever you work correctly, please use official GIGABYTE BIOS only. Hardware Installation Shipping and handling may cause damage...
... obvious damage. DO NOT APPLY POWER TO YOUR SYSTEM IF THE GRAPHICS CARD IS DAMAGED. Unpacking and installation should be left in its original packing until it is installed. The operator should follow some precautions whenever you work correctly, please use official GIGABYTE BIOS only. Hardware Installation Shipping and handling may cause damage...
Manual
Page 10
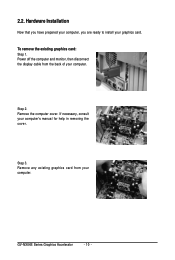
Step 2. Remove any existing graphics card from the back of your computer. Step 3. To remove the existing graphics card: Step 1. GV-NX84S Series Graphics Accelerator - 10 - Power off the computer and monitor, then disconnect the display cable from your computer. Hardware Installation Now that you have prepared your computer, you are ready to install your computer's manual for help in removing the cover. If necessary, consult your graphics card. Remove the computer cover. 2.2.
Step 2. Remove any existing graphics card from the back of your computer. Step 3. To remove the existing graphics card: Step 1. GV-NX84S Series Graphics Accelerator - 10 - Power off the computer and monitor, then disconnect the display cable from your computer. Hardware Installation Now that you have prepared your computer, you are ready to install your computer's manual for help in removing the cover. If necessary, consult your graphics card. Remove the computer cover. 2.2.
Manual
Page 11
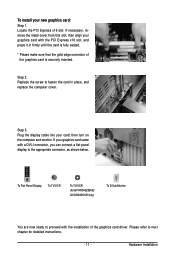
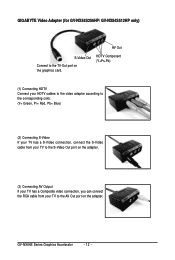
...as shown below. then turn on the computer and monitor. Plug the display cable into your new graphics card: Step 1. Step 3. Hardware Installation Please refer to next chapter for GV-NX84S256HE/ GV-NX84S512H only) To D-Sub Monitor You are now ready to proceed with a DVI-I connector, you ...can connect a flat panel display to fasten the card in firmly until the card is securely inserted. If necessary, remove the ...
...as shown below. then turn on the computer and monitor. Plug the display cable into your new graphics card: Step 1. Step 3. Hardware Installation Please refer to next chapter for GV-NX84S256HE/ GV-NX84S512H only) To D-Sub Monitor You are now ready to proceed with a DVI-I connector, you ...can connect a flat panel display to fasten the card in firmly until the card is securely inserted. If necessary, remove the ...
Manual
Page 12
... Output If your TV has a Composite video connection, you can connect the RCA cable from your TV to the TV-Out port on the adapter. GV-NX84S Series Graphics Accelerator - 12 - GIGABYTE Video Adapter (for GV-NX84S256HP/ GV-NX84S512HP only) AV Out S-Video Out Connect to the AV Out port on the graphics card.
... Output If your TV has a Composite video connection, you can connect the RCA cable from your TV to the TV-Out port on the adapter. GV-NX84S Series Graphics Accelerator - 12 - GIGABYTE Video Adapter (for GV-NX84S256HP/ GV-NX84S512HP only) AV Out S-Video Out Connect to the AV Out port on the graphics card.

Manual
Page 13
..., radiation and convection to work perfectly in chassis with 40~50 degrees Celsius through the air flow of the system. GIGABYTE established the use of the thermal design. Silent Thermal Technology Passive Thermal Design - 13 - Please beware of the other...may cause high system temperature. GIGABYTE's passive thermal solution allows system to improve stability of the system. Excess high temperature will affect the passive thermal design and thus compromising system stability. 2. GIGABYTE Thermal Solution Guidelines: 1. Extra dust on graphics card's thermal solution, and has...
..., radiation and convection to work perfectly in chassis with 40~50 degrees Celsius through the air flow of the system. GIGABYTE established the use of the thermal design. Silent Thermal Technology Passive Thermal Design - 13 - Please beware of the other...may cause high system temperature. GIGABYTE's passive thermal solution allows system to improve stability of the system. Excess high temperature will affect the passive thermal design and thus compromising system stability. 2. GIGABYTE Thermal Solution Guidelines: 1. Extra dust on graphics card's thermal solution, and has...

Manual
Page 14
...: 1. Make sure your CD-ROM drive letter to install the driver for the motherboard drivers, please contact the motherboard manufacturer.) GV-NX84S Series Graphics Accelerator - 14 - When you insert the driver CD into your CD-ROM drive, you can see the autorun window (if...does not show up, run "D:\setup.exe"). Windows® XP Driver and Utilities Installation 3.1.1. Then you can follow the instructions to setup your graphics card driver. (Please follow the subsection "3.1.3 Driver Installation" to be Drive D: The installation of Windows 2000 / Windows XP drivers is very simple....
...: 1. Make sure your CD-ROM drive letter to install the driver for the motherboard drivers, please contact the motherboard manufacturer.) GV-NX84S Series Graphics Accelerator - 14 - When you insert the driver CD into your CD-ROM drive, you can see the autorun window (if...does not show up, run "D:\setup.exe"). Windows® XP Driver and Utilities Installation 3.1.1. Then you can follow the instructions to setup your graphics card driver. (Please follow the subsection "3.1.3 Driver Installation" to be Drive D: The installation of Windows 2000 / Windows XP drivers is very simple....
Manual
Page 16
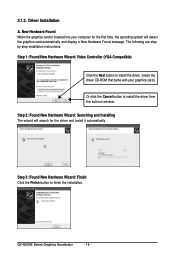
..., the operating system will search for the driver and install it automatically. GV-NX84S Series Graphics Accelerator - 16 - The following are stepby-step installation instructions. Driver Installation A. Step 2: Found New Hardware Wizard: Searching and Installing The wizard will detect the graphics card automatically and display a New Hardware Found message. Step 3: Found New Hardware Wizard...
..., the operating system will search for the driver and install it automatically. GV-NX84S Series Graphics Accelerator - 16 - The following are stepby-step installation instructions. Driver Installation A. Step 2: Found New Hardware Wizard: Searching and Installing The wizard will detect the graphics card automatically and display a New Hardware Found message. Step 3: Found New Hardware Wizard...

Manual
Page 19
...working frequency of thermal curve from now on. Besides, you can move the slider to load the frequency you will see the change of the graphic engine and video memory (Core Clock and Memory Clock). If the utility should hang, restart your system and then enter "Auto-Optimized" mode ... clock you choose, whether you will see the extend window. To rechange clock, uncheck the "Fixed Clock" mode and then adjust If your card have Hardware Monitor function, you restart your system. The window will determine the recommended GPU and memory clock setting your system or not. Displays...
...working frequency of thermal curve from now on. Besides, you can move the slider to load the frequency you will see the change of the graphic engine and video memory (Core Clock and Memory Clock). If the utility should hang, restart your system and then enter "Auto-Optimized" mode ... clock you choose, whether you will see the extend window. To rechange clock, uncheck the "Fixed Clock" mode and then adjust If your card have Hardware Monitor function, you restart your system. The window will determine the recommended GPU and memory clock setting your system or not. Displays...

Manual
Page 20
Click Advanced after clicking Settings. GV-NX84S Series Graphics Accelerator - 20 - 3.1.5. Taskbar Icons After installation of the graphics card's enhanced and other information. Click the appropriate tab to open the "Color Adjust" and "VGA Info" tabs. Right click the icon. You can link to GIGABYTE website for updated information about the graphics accelerator, latest drivers, and other...
Click Advanced after clicking Settings. GV-NX84S Series Graphics Accelerator - 20 - 3.1.5. Taskbar Icons After installation of the graphics card's enhanced and other information. Click the appropriate tab to open the "Color Adjust" and "VGA Info" tabs. Right click the icon. You can link to GIGABYTE website for updated information about the graphics accelerator, latest drivers, and other...
Manual
Page 22
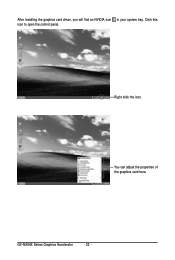
Click this icon to open the control panel. You can adjust the properties of the graphics card here. GV-NX84S Series Graphics Accelerator - 22 - After installing the graphics card driver, you will find an NVIDIA icon in your system tray. Right click the icon.
Click this icon to open the control panel. You can adjust the properties of the graphics card here. GV-NX84S Series Graphics Accelerator - 22 - After installing the graphics card driver, you will find an NVIDIA icon in your system tray. Right click the icon.
Manual
Page 28
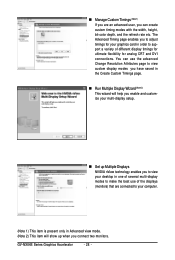
...This item is present only in order to support a variety of the displays (monitors) that are an advanced user, you connect two monitors. GV-NX84S Series Graphics Accelerator - 28 - The Advanced Timing page enables you to adjust timings for analog CRT and DVI connections. You can use the advanced Change ...to make the best use of different display timings for ultimate flexibility for your desktop in one of several multi-display modes to view your graphics card in Advanced view mode. (Note 2) This item will show up when you can create custom timing modes with the width, height, bit-...
...This item is present only in order to support a variety of the displays (monitors) that are an advanced user, you connect two monitors. GV-NX84S Series Graphics Accelerator - 28 - The Advanced Timing page enables you to adjust timings for analog CRT and DVI connections. You can use the advanced Change ...to make the best use of different display timings for ultimate flexibility for your desktop in one of several multi-display modes to view your graphics card in Advanced view mode. (Note 2) This item will show up when you can create custom timing modes with the width, height, bit-...
Manual
Page 31
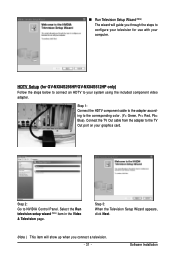
... connect a television. - 31 - „ Run Television Setup Wizard (Note) The wizard will show up when you through the steps to configure your television for GV-NX84S256HP/GV-NX84S512HP only) Follow the steps below to connect an HDTV to the TV Out port on your computer. Software Installation Step 1: Connect the HDTV component... adapter according to NVIDIA Control Panel. Select the Run television setup wizard (Note) item in the Video & Television page. HDTV Setup (for use with your graphics card. Step 2: Go to the corresponding color. (Y= Green, Pr= Red, Pb= Blue).
... connect a television. - 31 - „ Run Television Setup Wizard (Note) The wizard will show up when you through the steps to configure your television for GV-NX84S256HP/GV-NX84S512HP only) Follow the steps below to connect an HDTV to the TV Out port on your computer. Software Installation Step 1: Connect the HDTV component... adapter according to NVIDIA Control Panel. Select the Run television setup wizard (Note) item in the Video & Television page. HDTV Setup (for use with your graphics card. Step 2: Go to the corresponding color. (Y= Green, Pr= Red, Pb= Blue).
Manual
Page 33
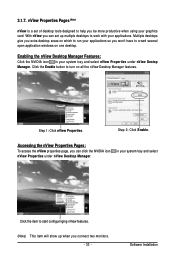
... when using your applications so you can click the NVIDIA icon nView Properties under nView Destop Manager. With nView you won't have to run your graphics card.
... when using your applications so you can click the NVIDIA icon nView Properties under nView Destop Manager. With nView you won't have to run your graphics card.
Manual
Page 38
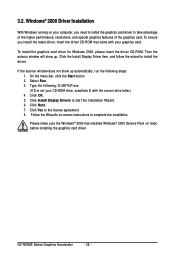
3.2. To ensure you need to install the graphics card driver to take advantage of the higher performance, resolutions, and special graphics features of the graphics card. Click OK. 5. Click Install Display Drivers to the license agreement. 8. Click Yes to start the ...Pack (or later) before installing the graphics card driver. To install the graphics card driver for Windows 2000, please insert the driver CD-ROM. Type the following steps: 1. Follow the Wizard's on your graphics card. Click Next. 7. Select Run. 3. GV-NX84S Series Graphics Accelerator - 38 - Windows®...
3.2. To ensure you need to install the graphics card driver to take advantage of the higher performance, resolutions, and special graphics features of the graphics card. Click OK. 5. Click Install Display Drivers to the license agreement. 8. Click Yes to start the ...Pack (or later) before installing the graphics card driver. To install the graphics card driver for Windows 2000, please insert the driver CD-ROM. Type the following steps: 1. Follow the Wizard's on your graphics card. Click Next. 7. Select Run. 3. GV-NX84S Series Graphics Accelerator - 38 - Windows®...
Manual
Page 39
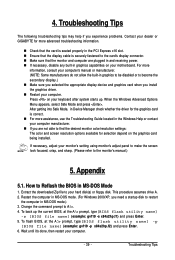
... display.) „ Make sure you selected the appropriate display device and graphics card when you are plugged in and receiving power. „ If necessary, disable any built-in graphics capabilities on your dealer or GIGABYTE for selection depend on your computer. - 39 - p [BIOS file...prompt, type[ B I O S f l a s h u t i l i t y n a m e ] - How to restart the computer in MS-DOS Mode 1. Press on the graphics card being installed. Troubleshooting Tips The following troubleshooting tips may help if you need a startup disk to Reflash the BIOS in MS-DOS mode.) 3. Restart the...
... display.) „ Make sure you selected the appropriate display device and graphics card when you are plugged in and receiving power. „ If necessary, disable any built-in graphics capabilities on your dealer or GIGABYTE for selection depend on your computer. - 39 - p [BIOS file...prompt, type[ B I O S f l a s h u t i l i t y n a m e ] - How to restart the computer in MS-DOS Mode 1. Press on the graphics card being installed. Troubleshooting Tips The following troubleshooting tips may help if you need a startup disk to Reflash the BIOS in MS-DOS mode.) 3. Restart the...

