Manual
Page 3
... on VGA card, this document nor does the author make a commitment to rapid change in technology, some of the specifications might be reproduced or transmitted in this may be out of date before publication of GBT. GV-NX66128DP / GV-NX66256DP GeForce™ 6600 Graphics Accelerator User's Manual Rev. 101 12MD-NX66128DP-101 Copyright © 2004 GIGABYTE TECHNOLOGY CO., LTD Copyright by GIGA-BYTE TECHNOLOGY CO., LTD. ("GBT"). No part of this manual may...
... on VGA card, this document nor does the author make a commitment to rapid change in technology, some of the specifications might be reproduced or transmitted in this may be out of date before publication of GBT. GV-NX66128DP / GV-NX66256DP GeForce™ 6600 Graphics Accelerator User's Manual Rev. 101 12MD-NX66128DP-101 Copyright © 2004 GIGABYTE TECHNOLOGY CO., LTD Copyright by GIGA-BYTE TECHNOLOGY CO., LTD. ("GBT"). No part of this manual may...
Manual
Page 4
... 4 2.1. Utilities on driver CD ...13 3.1.5. Troubleshooting Tips 28 5. Reflash BIOS in MS-DOS mode 29 5.1.2. Minimum system requirement 3 2. Software Installation 8 3.1. Windows® XP Driver and Utilities Installation 8 3.1.1. Appendix 29 5.1. Taskbar icon ...15 3.1.6. nView Properties pages 22 3.2. Introduction 3 1.1. Operating System Requirement 8 3.1.2. Display Properties pages 18 3.1.7. Resolutions and Color Depth Table (In Windows® XP 30 GV-NX66128DP/GV-NX66256DP Graphics Accelerator - 2 - Reflash BIOS in Windows mode 29 5.2. Board Layout...
... 4 2.1. Utilities on driver CD ...13 3.1.5. Troubleshooting Tips 28 5. Reflash BIOS in MS-DOS mode 29 5.1.2. Minimum system requirement 3 2. Software Installation 8 3.1. Windows® XP Driver and Utilities Installation 8 3.1.1. Appendix 29 5.1. Taskbar icon ...15 3.1.6. nView Properties pages 22 3.2. Introduction 3 1.1. Operating System Requirement 8 3.1.2. Display Properties pages 18 3.1.7. Resolutions and Color Depth Table (In Windows® XP 30 GV-NX66128DP/GV-NX66256DP Graphics Accelerator - 2 - Reflash BIOS in Windows mode 29 5.2. Board Layout...
Manual
Page 5
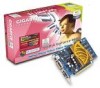
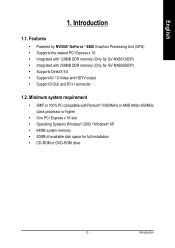
Minimum system requirement • IBM® or 100% PC compatible with 256MB DDR memory (Only for full installation • CD-ROM or DVD-ROM drive - 3 - Features • Powered by NVIDIA® GeForce™ 6600 Graphics Processing Unit (GPU) • Supports the newest PCI Express x 16 • Integrated with 128MB DDR memory (Only for GV-NX66128DP) • Integrated with Pentium® III 650MHz or AMD Athlon 650MHz class processor or higher...
Minimum system requirement • IBM® or 100% PC compatible with 256MB DDR memory (Only for full installation • CD-ROM or DVD-ROM drive - 3 - Features • Powered by NVIDIA® GeForce™ 6600 Graphics Processing Unit (GPU) • Supports the newest PCI Express x 16 • Integrated with 128MB DDR memory (Only for GV-NX66128DP) • Integrated with Pentium® III 650MHz or AMD Athlon 650MHz class processor or higher...
Manual
Page 6
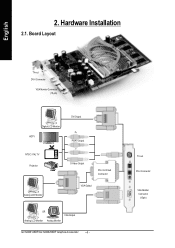
Board Layout TV-out DVI-I Connector VGA Monitor Connector (15-pin) Digital LCD Monitor HDTV NTSC / PAL TV Projector Analog LCD Monitor DVI Output Pr Pb/AV Output Y S-Video Output DVI-I Connector VGA Monitor Connector (15pin) English 2. TV-out DVI-I to D-Sub Connector VGA Output OR VGA Output Analog LCD Monitor Analog Monitor GV-NX66128DP/GV-NX66256DP Graphics Accelerator - 4 - Hardware Installation 2.1.
Board Layout TV-out DVI-I Connector VGA Monitor Connector (15-pin) Digital LCD Monitor HDTV NTSC / PAL TV Projector Analog LCD Monitor DVI Output Pr Pb/AV Output Y S-Video Output DVI-I Connector VGA Monitor Connector (15pin) English 2. TV-out DVI-I to D-Sub Connector VGA Output OR VGA Output Analog LCD Monitor Analog Monitor GV-NX66128DP/GV-NX66256DP Graphics Accelerator - 4 - Hardware Installation 2.1.
Manual
Page 8
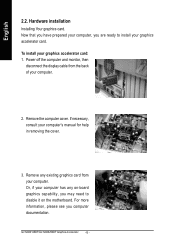
... the display cable from your graphics accelerator card. If necessary, consult your graphics accelerator card: 1. For more information, please see you may need to install your computer. English 2.2. To install your computer's manual for help in removing the cover. 3. Or, if your computer has any existing graphics card from the back of your computer, you are ready to disable it on -board graphics capability, you computer documentation. GV-NX66128DP/GV-NX66256DP Graphics Accelerator - 6 - Now...
... the display cable from your graphics accelerator card. If necessary, consult your graphics accelerator card: 1. For more information, please see you may need to install your computer. English 2.2. To install your computer's manual for help in removing the cover. 3. Or, if your computer has any existing graphics card from the back of your computer, you are ready to disable it on -board graphics capability, you computer documentation. GV-NX66128DP/GV-NX66256DP Graphics Accelerator - 6 - Now...

Manual
Page 9
... with a DVI-I connector, you can connect a flat panel display to next chapter for detailed instructions. - 7 - English 4. Locate the PCI Express x 16 slot. Please refer to the appropriate connector, as shown below... then align your card; Plug the display cable into your graphics card with the PCI Express x 16 slot, and press it in place, and replace the computer cover. 6. If your graphics card came with the installation of the graphics card driver. Hardware Installation If...
... with a DVI-I connector, you can connect a flat panel display to next chapter for detailed instructions. - 7 - English 4. Locate the PCI Express x 16 slot. Please refer to the appropriate connector, as shown below... then align your card; Plug the display cable into your graphics card with the PCI Express x 16 slot, and press it in place, and replace the computer cover. 6. If your graphics card came with the installation of the graphics card driver. Hardware Installation If...
Manual
Page 10
... installed DirectX 9 or later version. • If you can see the AUTORUN window (if it does not show up, run "D:\setup.exe"). When you can follow the guides to setup your graphics card driver. (Please follow the subsection 3.1.3 "Driver installation" to be Drive D: The installation of SIS or VIA chipsets, please install the appropriate driver program for your CD-ROM Drive letter to install the driver for that your graphics accelerator.) 3.1. GV-NX66128DP/GV-NX66256DP Graphics Accelerator...
... installed DirectX 9 or later version. • If you can see the AUTORUN window (if it does not show up, run "D:\setup.exe"). When you can follow the guides to setup your graphics card driver. (Please follow the subsection 3.1.3 "Driver installation" to be Drive D: The installation of SIS or VIA chipsets, please install the appropriate driver program for your CD-ROM Drive letter to install the driver for that your graphics accelerator.) 3.1. GV-NX66128DP/GV-NX66256DP Graphics Accelerator...

Manual
Page 13
... button to install the driver from AUTORUN window. Step 2: Found new hardware wizard: Searching and installing The wizard will automatically detect a new hardware in the system and pop out a "New Hardware Found" message. Driver installation A. New hardware found After the graphics card is inserted into your graphics accelerator, please insert it automatically. Step 1: Found new hardware wizard: Video controller (VGA Compatible) Click the Next button to finish the installation. - 11 - English 3.1.3. Software Installation Step 3: Found new hardware wizard: Finish...
... button to install the driver from AUTORUN window. Step 2: Found new hardware wizard: Searching and installing The wizard will automatically detect a new hardware in the system and pop out a "New Hardware Found" message. Driver installation A. New hardware found After the graphics card is inserted into your graphics accelerator, please insert it automatically. Step 1: Found new hardware wizard: Video controller (VGA Compatible) Click the Next button to finish the installation. - 11 - English 3.1.3. Software Installation Step 3: Found new hardware wizard: Finish...
Manual
Page 16
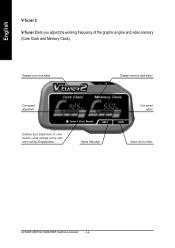
English V-Tuner 2 V-Tuner 2 lets you adjust the working frequency of core/ memory clock settings set by user when running 3D applications. Displays core clock status Displays memory clock status Core speed adjustment Enables auto adjustment of the graphic engine and video memory (Core Clock and Memory Clock). Opens Help page Core speed adjust Select choice of skin GV-NX66128DP/GV-NX66256DP Graphics Accelerator - 14 -
English V-Tuner 2 V-Tuner 2 lets you adjust the working frequency of core/ memory clock settings set by user when running 3D applications. Displays core clock status Displays memory clock status Core speed adjustment Enables auto adjustment of the graphic engine and video memory (Core Clock and Memory Clock). Opens Help page Core speed adjust Select choice of skin GV-NX66128DP/GV-NX66256DP Graphics Accelerator - 14 -
Manual
Page 17
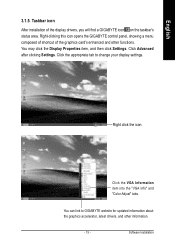
... of the display drivers, you will find a GIGABYTE icon on the taskbar's status area. Click the VGA Information item into the "VGA Info" and "Color Adjust" tabs. You may click the Display Properties item, and then click Settings. Taskbar icon After installation of the graphics card's enhanced and other information. - 15 - Click the appropriate tab to GIGABYTE website for updated information about the graphics accelerator, latest drivers, and...
... of the display drivers, you will find a GIGABYTE icon on the taskbar's status area. Click the VGA Information item into the "VGA Info" and "Color Adjust" tabs. You may click the Display Properties item, and then click Settings. Taskbar icon After installation of the graphics card's enhanced and other information. - 15 - Click the appropriate tab to GIGABYTE website for updated information about the graphics accelerator, latest drivers, and...
Manual
Page 20
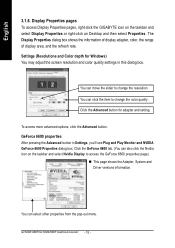
... 3.1.6. Settings (Resolutions and Color depth for adapter and setting. GV-NX66128DP/GV-NX66256DP Graphics Accelerator - 18 - Display Properties pages To access Display Properties pages, right-click the GIGABYTE icon on the taskbar and select Display Properties or right-click on the taskbar and select Nvidia Display to change the color quality. Click the Advanced button for Windows) You may adjust the screen resolution and color quality settings in Settings, you'll see Plug and Play Monitor and NVIDIA GeForce...
... 3.1.6. Settings (Resolutions and Color depth for adapter and setting. GV-NX66128DP/GV-NX66256DP Graphics Accelerator - 18 - Display Properties pages To access Display Properties pages, right-click the GIGABYTE icon on the taskbar and select Display Properties or right-click on the taskbar and select Nvidia Display to change the color quality. Click the Advanced button for Windows) You may adjust the screen resolution and color quality settings in Settings, you'll see Plug and Play Monitor and NVIDIA GeForce...
Manual
Page 21
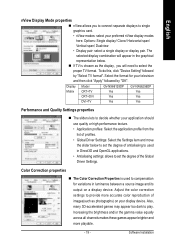
... games appear brighter and more accurate color reproduction of images(such as the display, you to connect separate displays to single graphics card. • nView modes: select your display device. The selected display combination will need to select the proper TV format. Display Model GV-NX66128DP GV-NX66256DP Matrix CRT+TV Yes Yes CRT+DVI Yes Yes DVI+TV Yes Yes Performance and Quality Settings properties „ The sliders lets to decide...
... games appear brighter and more accurate color reproduction of images(such as the display, you to connect separate displays to single graphics card. • nView modes: select your display device. The selected display combination will need to select the proper TV format. Display Model GV-NX66128DP GV-NX66256DP Matrix CRT+TV Yes Yes CRT+DVI Yes Yes DVI+TV Yes Yes Performance and Quality Settings properties „ The sliders lets to decide...
Manual
Page 22
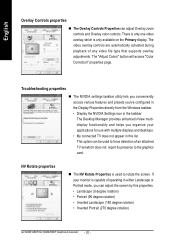
... degree rotation) • Inverted Portrait (270 degree rotation) GV-NX66128DP/GV-NX66256DP Graphics Accelerator - 20 - If your applications for use with multiple displays and desktops. • My connected TV does not appear in the taskbar The Desktop Manager provides enhanced nView multidisplay functionality and helps you can adjust Overlay zoom controls and Overlay color controls. The video overlay controls are automatically activated during playback of an attached TV...
... degree rotation) • Inverted Portrait (270 degree rotation) GV-NX66128DP/GV-NX66256DP Graphics Accelerator - 20 - If your applications for use with multiple displays and desktops. • My connected TV does not appear in the taskbar The Desktop Manager provides enhanced nView multidisplay functionality and helps you can adjust Overlay zoom controls and Overlay color controls. The video overlay controls are automatically activated during playback of an attached TV...
Manual
Page 24
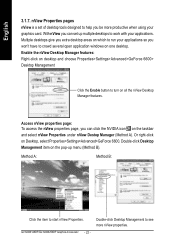
... the nView Desktop Manager features. GV-NX66128DP/GV-NX66256DP Graphics Accelerator - 22 - Double-click Desktop Management to turn on desktop and choose Properties>Settings>Advanced>GeForce 6600> Desktop Management Click the Enable button to see more productive when using your applications so you can click the NVIDIA icon on one desktop. Access nView properties page: To access the nView properties page, you extra desktop areas on which to crowd several open application windows...
... the nView Desktop Manager features. GV-NX66128DP/GV-NX66256DP Graphics Accelerator - 22 - Double-click Desktop Management to turn on desktop and choose Properties>Settings>Advanced>GeForce 6600> Desktop Management Click the Enable button to see more productive when using your applications so you can click the NVIDIA icon on one desktop. Access nView properties page: To access the nView properties page, you extra desktop areas on which to crowd several open application windows...
Manual
Page 25
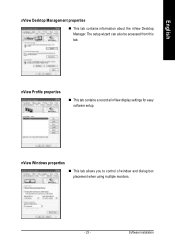
The setup wizard can also be accessed from this tab. Software Installation nView Profile properties „ This tab contains a record all nView display settings for easy software setup. nView Windows properties „ This tab allows you to control of window and dialog box placement when using multiple monitors. - 23 - English nView Desktop Management properties „ This tab contains information about the nView Desktop Manager.
The setup wizard can also be accessed from this tab. Software Installation nView Profile properties „ This tab contains a record all nView display settings for easy software setup. nView Windows properties „ This tab allows you to control of window and dialog box placement when using multiple monitors. - 23 - English nView Desktop Management properties „ This tab contains information about the nView Desktop Manager.
Manual
Page 26
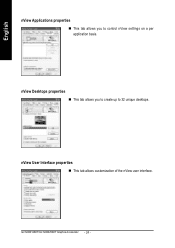
GV-NX66128DP/GV-NX66256DP Graphics Accelerator - 24 - nView Desktops properties „ This tab allows you to 32 unique desktops. nView User Interface properties „ This tab allows customization of the nView user interface. English nView Applications properties „ This tab allows you to create up to control nView settings on a per application basis.
GV-NX66128DP/GV-NX66256DP Graphics Accelerator - 24 - nView Desktops properties „ This tab allows you to 32 unique desktops. nView User Interface properties „ This tab allows customization of the nView user interface. English nView Applications properties „ This tab allows you to create up to control nView settings on a per application basis.
Manual
Page 27
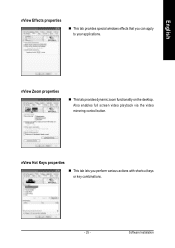
Software Installation Also enables full screen video playback via the video mirroring control button. nView Hot Keys properties „ This tab lets you can apply to your applications. nView Zoom properties „ This tab provides dynamic zoom functionality on the desktop. English nView Effects properties „ This tab provides special windows effects that you perform various actions with shortcut keys or key combinations. - 25 -
Software Installation Also enables full screen video playback via the video mirroring control button. nView Hot Keys properties „ This tab lets you can apply to your applications. nView Zoom properties „ This tab provides dynamic zoom functionality on the desktop. English nView Effects properties „ This tab provides special windows effects that you perform various actions with shortcut keys or key combinations. - 25 -
Manual
Page 29
... the following steps: 1. Click on -screen instructions to complete the installation. Click Yes to install the driver. Click Install Display Driver item, and follow the wizard to the license agreement. 8. Click OK. 5. Software Installation Follow the Wizard's on Install Display Drivers to take advantage of the higher performance, resolutions, and special graphics features of the graphics card. Windows® 2000 Driver Installation With Windows running on the control bar. 2. Click the Start button...
... the following steps: 1. Click on -screen instructions to complete the installation. Click Yes to install the driver. Click Install Display Driver item, and follow the wizard to the license agreement. 8. Click OK. 5. Software Installation Follow the Wizard's on Install Display Drivers to take advantage of the higher performance, resolutions, and special graphics features of the graphics card. Windows® 2000 Driver Installation With Windows running on the control bar. 2. Click the Start button...
Manual
Page 30
... Windows Advanced Options Menu appears, select Safe Mode and press Enter. Press the F8 key on your computer. English 4. Troubleshooting Tips The following troubleshooting tips may help if you installed the graphics driver. „ Restart your motherboard. If necessary, adjust your monitor's setting by monitor's adjust panel to make the screen looks focused, crisp, and sharp. (Please refer to the card's display connector. „ Make sure that the display cable...
... Windows Advanced Options Menu appears, select Safe Mode and press Enter. Press the F8 key on your computer. English 4. Troubleshooting Tips The following troubleshooting tips may help if you installed the graphics driver. „ Restart your motherboard. If necessary, adjust your monitor's setting by monitor's adjust panel to make the screen looks focused, crisp, and sharp. (Please refer to the card's display connector. „ Make sure that the display cable...
Manual
Page 31
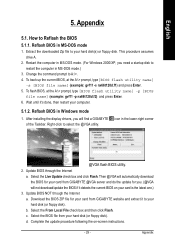
... BIOS, at the A:\> prompt, type [BIOS flash utility name] -p [BIOS file name] (example: gvf11 -p nx66t128d.f2) and press Enter. 6. icon in Windows mode 1. Appendix English 5. Appendix 5.1. Then @VGA will automatically download the BIOS for you will not download/update the BIOS if it detects the current BIOS on -screen instructions. - 29 - b. Select the BIOS file from GIGABYTE @VGA server and do the update for your card from your hard disk(s) or floppy disk...
... BIOS, at the A:\> prompt, type [BIOS flash utility name] -p [BIOS file name] (example: gvf11 -p nx66t128d.f2) and press Enter. 6. icon in Windows mode 1. Appendix English 5. Appendix 5.1. Then @VGA will automatically download the BIOS for you will not download/update the BIOS if it detects the current BIOS on -screen instructions. - 29 - b. Select the BIOS file from GIGABYTE @VGA server and do the update for your card from your hard disk(s) or floppy disk...


