
Manual
Page 4
... ...14 3.1.4. Resolutions and Color Depth Tables (In Windows XP 35 5.3. GIGABYTE Gamer HUD Lite on Driver CD 16 3.1.5. Taskbar Icon ...18 3.1.6. Regulatory Statements 37 (Note) This item will show up when you connect two monitors. - 4 - Minimum System Requirements 5 2. Windows XP Driver and Utilities Installation 12 3.1.1. DirectX Installation ...13 3.1.3. Display Properties Pages 19 3.1.7. How...
... ...14 3.1.4. Resolutions and Color Depth Tables (In Windows XP 35 5.3. GIGABYTE Gamer HUD Lite on Driver CD 16 3.1.5. Taskbar Icon ...18 3.1.6. Regulatory Statements 37 (Note) This item will show up when you connect two monitors. - 4 - Minimum System Requirements 5 2. Windows XP Driver and Utilities Installation 12 3.1.1. DirectX Installation ...13 3.1.3. Display Properties Pages 19 3.1.7. How...
Manual
Page 5
...Graphics cards working in an SLI configuration must be with two PCI Express x16 slots and correct chipset driver - Windows® XP with 512 MB GDDR2 memory (For GV-N95TOC-512I only) • Supports DirectX 10 • Supports NVIDIA® SLI TM (Scalable Link ...graphics card as part of system memory; 2 GB or more for software installation (CD-ROM or DVD-ROM drive) - Two GV-N95TD3-1GI/GV-N95TD3-512I/GV-N95TOC-1GI/GV-N95TOC-512I - GIGABYTE TECHNOLOGY). - 5 - Introduction Features • Powered by NVIDIA® GeForceTM 9500 GT Graphics Processing Unit (GPU) • ...
...Graphics cards working in an SLI configuration must be with two PCI Express x16 slots and correct chipset driver - Windows® XP with 512 MB GDDR2 memory (For GV-N95TOC-512I only) • Supports DirectX 10 • Supports NVIDIA® SLI TM (Scalable Link ...graphics card as part of system memory; 2 GB or more for software installation (CD-ROM or DVD-ROM drive) - Two GV-N95TD3-1GI/GV-N95TD3-512I/GV-N95TOC-1GI/GV-N95TOC-512I - GIGABYTE TECHNOLOGY). - 5 - Introduction Features • Powered by NVIDIA® GeForceTM 9500 GT Graphics Processing Unit (GPU) • ...
Manual
Page 11
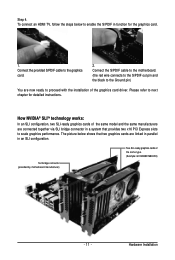
SLI bridge connector (provided by motherboard manufacturer) Two SLI-ready graphics cards of the graphics card driver. To connect an HDMI TV, follow the steps below shows that provides two x16 PCI Express slots to next chapter for the graphics card. 1. How ... the same manufacturers are now ready to the graphics card. 2. Connect the provided S/PDIF cable to proceed with the installation of the same type. (Example: GV-NX88X768H-RH) - 11 - The picture below to enable the S/PDIF in a system that two graphics cards are linked in parallel in an SLI configuration. Connect...
SLI bridge connector (provided by motherboard manufacturer) Two SLI-ready graphics cards of the graphics card driver. To connect an HDMI TV, follow the steps below shows that provides two x16 PCI Express slots to next chapter for the graphics card. 1. How ... the same manufacturers are now ready to the graphics card. 2. Connect the provided S/PDIF cable to proceed with the installation of the same type. (Example: GV-NX88X768H-RH) - 11 - The picture below to enable the S/PDIF in a system that two graphics cards are linked in parallel in an SLI configuration. Connect...
Manual
Page 12
... very simple. Operating System Requirements Notice the following guidelines before installing the drivers: 1. First make sure your CD-ROM drive letter to install the driver for the motherboard drivers, please contact the motherboard manufacturer.) GV-N95 Series Graphics Accelerator - 12 - Software Installation In this manual, we assume that your system has installed DirectX 9.0c...
... very simple. Operating System Requirements Notice the following guidelines before installing the drivers: 1. First make sure your CD-ROM drive letter to install the driver for the motherboard drivers, please contact the motherboard manufacturer.) GV-N95 Series Graphics Accelerator - 12 - Software Installation In this manual, we assume that your system has installed DirectX 9.0c...
Manual
Page 14
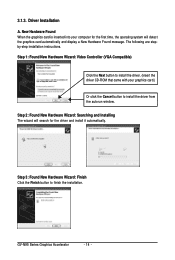
3.1.3. Step 3: Found New Hardware Wizard: Finish Click the Finish button to install the driver from the autorun window. GV-N95 Series Graphics Accelerator - 14 - Step 2: Found New Hardware Wizard: Searching and Installing The wizard will detect the... graphics card automatically and display a New Hardware Found message. The following are stepby-step installation instructions. Driver Installation A. Step 1: Found New Hardware ...
3.1.3. Step 3: Found New Hardware Wizard: Finish Click the Finish button to install the driver from the autorun window. GV-N95 Series Graphics Accelerator - 14 - Step 2: Found New Hardware Wizard: Searching and Installing The wizard will detect the... graphics card automatically and display a New Hardware Found message. The following are stepby-step installation instructions. Driver Installation A. Step 1: Found New Hardware ...
Manual
Page 15
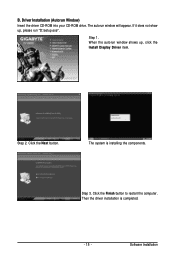
Step 2. Click the Next button. Click the Finish button to restart the computer. If it does not show up , click the Install Display Driver item. Step 1. Then the driver installation is installing the components. The system is completed. - 15 - Driver Installation (Autorun Window) Insert the driver CD-ROM into your CD-ROM drive. B. Step 3. Software Installation The autorun window will appear. When the autorun window shows up , please run "D:\setup.exe".
Step 2. Click the Next button. Click the Finish button to restart the computer. If it does not show up , click the Install Display Driver item. Step 1. Then the driver installation is installing the components. The system is completed. - 15 - Driver Installation (Autorun Window) Insert the driver CD-ROM into your CD-ROM drive. B. Step 3. Software Installation The autorun window will appear. When the autorun window shows up , please run "D:\setup.exe".
Manual
Page 16
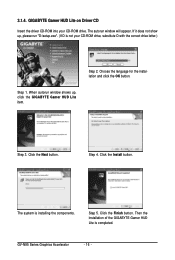
If it does not show up , click the GIGABYTE Gamer HUD Lite item. Step 3. Then the installation of the GIGABYTE Gamer HUD Lite is installing the components. GIGABYTE Gamer HUD Lite on Driver CD Insert the driver CD-ROM into your CD-ROM drive, substitute D with the correct drive letter.) Step 2. Choose the language for the.... Click the Finish button. Step 5. When autorun window shows up , please run "D:\setup.exe". (If D is not your CD-ROM drive. The system is completed. GV-N95 Series Graphics Accelerator - 16 - 3.1.4. Step 4.
If it does not show up , click the GIGABYTE Gamer HUD Lite item. Step 3. Then the installation of the GIGABYTE Gamer HUD Lite is installing the components. GIGABYTE Gamer HUD Lite on Driver CD Insert the driver CD-ROM into your CD-ROM drive, substitute D with the correct drive letter.) Step 2. Choose the language for the.... Click the Finish button. Step 5. When autorun window shows up , please run "D:\setup.exe". (If D is not your CD-ROM drive. The system is completed. GV-N95 Series Graphics Accelerator - 16 - 3.1.4. Step 4.
Manual
Page 18
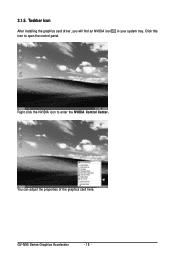
Right click the NVIDIA icon to open the control panel. Click this icon to enter the NVIDIA Control Center. You can adjust the properties of the graphics card here. 3.1.5. GV-N95 Series Graphics Accelerator - 18 - Taskbar Icon After installing the graphics card driver, you will find an NVIDIA icon in your system tray.
Right click the NVIDIA icon to open the control panel. Click this icon to enter the NVIDIA Control Center. You can adjust the properties of the graphics card here. 3.1.5. GV-N95 Series Graphics Accelerator - 18 - Taskbar Icon After installing the graphics card driver, you will find an NVIDIA icon in your system tray.
Manual
Page 33
... any built-in graphics capabilities on your motherboard. If necessary, adjust your dealer or GIGABYTE for more assistance, use the Troubleshooting Guide located in Device Manager check whether the driver for selection depend on your computer. After getting into Safe Mode, in the Windows ...Help or contact your computer manufacturer. „ If you install the graphics driver. „ Restart your keyboard after system starts up...
... any built-in graphics capabilities on your motherboard. If necessary, adjust your dealer or GIGABYTE for more assistance, use the Troubleshooting Guide located in Device Manager check whether the driver for selection depend on your computer. After getting into Safe Mode, in the Windows ...Help or contact your computer manufacturer. „ If you install the graphics driver. „ Restart your keyboard after system starts up...


