Manual
Page 1
..., all original data on the hard disk will see shall depend on your motherboard. Enabling RAID mode in BIOS Setup 3. Installing the operating system and drivers to enter BIOS Setup during the POST (Power-On Self-Test). Set PCH SATA Control Mode under the Integrated Peripherals menu to enable the Intel...
..., all original data on the hard disk will see shall depend on your motherboard. Enabling RAID mode in BIOS Setup 3. Installing the operating system and drivers to enter BIOS Setup during the POST (Power-On Self-Test). Set PCH SATA Control Mode under the Integrated Peripherals menu to enable the Intel...
Manual
Page 2
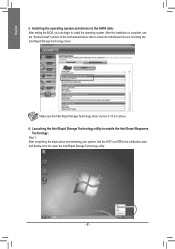
... the BIOS, you can begin to open the Intel Rapid Storage Technology utility. - 2 - Make sure the Intel Rapid Storage Technology driver version is complete, use the "Xpress Install" function of the motherboard driver disk to enable the Intel Smart Response Technology: Step 1: After completing the steps above . 4. English 3. After the installation is...
... the BIOS, you can begin to open the Intel Rapid Storage Technology utility. - 2 - Make sure the Intel Rapid Storage Technology driver version is complete, use the "Xpress Install" function of the motherboard driver disk to enable the Intel Smart Response Technology: Step 1: After completing the steps above . 4. English 3. After the installation is...

Manual
Page 3
For product-related information, check on our website at: http://www.gigabyte.com Identifying Your Motherboard Revision The revision number on your motherboard revision before updating motherboard BIOS, drivers, or when looking for technical information. Copyright © 2011 GIGA-BYTE TECHNOLOGY CO., LTD. Changes to the specifications and features in this manual may...
For product-related information, check on our website at: http://www.gigabyte.com Identifying Your Motherboard Revision The revision number on your motherboard revision before updating motherboard BIOS, drivers, or when looking for technical information. Copyright © 2011 GIGA-BYTE TECHNOLOGY CO., LTD. Changes to the specifications and features in this manual may...

Manual
Page 5
... 59 3-1 Installing Chipset Drivers 59 3-2 Application Software 60 3-3 Technical Manuals 60 3-4 Contact...61 3-5 System...61 3-6 Download Center 62 3-7 New Utilities...62 Chapter 4 Unique Features 63 4-1 ...Appendix...81 5-1 Configuring SATA Hard Drive(s 81 5-1-1 Configuring Intel Z68 SATA Controllers 81 5-1-2 Configuring Marvell 88SE9172 SATA Controller 89 5-1-3 Installing the SATA RAID/AHCI Driver and Operating System 95 5-2 Configuring Audio Input and Output 104 5-2-1 Configuring 2/4/5.1/7.1-Channel Audio 104 5-2-2 Configuring S/PDIF Out 106 5-2-3 Enabling the Dolby Home Theater...
... 59 3-1 Installing Chipset Drivers 59 3-2 Application Software 60 3-3 Technical Manuals 60 3-4 Contact...61 3-5 System...61 3-6 Download Center 62 3-7 New Utilities...62 Chapter 4 Unique Features 63 4-1 ...Appendix...81 5-1 Configuring SATA Hard Drive(s 81 5-1-1 Configuring Intel Z68 SATA Controllers 81 5-1-2 Configuring Marvell 88SE9172 SATA Controller 89 5-1-3 Installing the SATA RAID/AHCI Driver and Operating System 95 5-2 Configuring Audio Input and Output 104 5-2-1 Configuring 2/4/5.1/7.1-Channel Audio 104 5-2-2 Configuring S/PDIF Out 106 5-2-3 Enabling the Dolby Home Theater...
Manual
Page 6
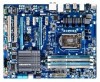
Box Contents GA-Z68X-UD3-B3 motherboard Motherboard driver disk User's Manual Quick Installation Guide Four SATA cables I/O Shield One 2-Way SLI bridge connector • The box contents above are subject to change without ...
Box Contents GA-Z68X-UD3-B3 motherboard Motherboard driver disk User's Manual Quick Installation Guide Four SATA cables I/O Shield One 2-Way SLI bridge connector • The box contents above are subject to change without ...

Manual
Page 18
... x1 Slot PCI Express x16 Slot PCI Slot Follow the steps below to make any required BIOS changes for your expansion card(s). 777 Install the driver provided with the expansion card in the expansion slot. 111 Locate an expansion slot that came with your computer. If necessary, go to BIOS Setup...
... x1 Slot PCI Express x16 Slot PCI Slot Follow the steps below to make any required BIOS changes for your expansion card(s). 777 Install the driver provided with the expansion card in the expansion slot. 111 Locate an expansion slot that came with your computer. If necessary, go to BIOS Setup...

Manual
Page 19
.../SLI technology. - 19 - Refer to the manual that came with your graphics cards. Hardware Installation C-2. Configuring the Graphics Card Driver C-1. Browse to the CrossFireX menu and ensure the Enable CrossFireX™ check box is recommended (Refer to the Set SLI and ... Plug the display cable into the graphics card on the PCI Express x16 slots. A power supply with two PCI Express x16 slots and correct driver - Windows 7, Windows Vista or Windows XP operating system - System Requirements - One CrossFire (Note)/SLI bridge connector - 1-6 Setting up ATI ...
.../SLI technology. - 19 - Refer to the manual that came with your graphics cards. Hardware Installation C-2. Configuring the Graphics Card Driver C-1. Browse to the CrossFireX menu and ensure the Enable CrossFireX™ check box is recommended (Refer to the Set SLI and ... Plug the display cable into the graphics card on the PCI Express x16 slots. A power supply with two PCI Express x16 slots and correct driver - Windows 7, Windows Vista or Windows XP operating system - System Requirements - One CrossFire (Note)/SLI bridge connector - 1-6 Setting up ATI ...

Manual
Page 34
... Menu. Motherboard Model BIOS Version Z68X-UD3-B3 D5x . . . . : BIOS Setup : XpressRecovery2 : Boot Menu : Qflash 04/12/2011-Z68-7A89WG06C-00 Function Keys Function Keys Function Keys: : POST SCREEN Press the key to enter BIOS Setup first. In Boot Menu, use the up hard drive data using the driver disk, the key can access...
... Menu. Motherboard Model BIOS Version Z68X-UD3-B3 D5x . . . . : BIOS Setup : XpressRecovery2 : Boot Menu : Qflash 04/12/2011-Z68-7A89WG06C-00 Function Keys Function Keys Function Keys: : POST SCREEN Press the key to enter BIOS Setup first. In Boot Menu, use the up hard drive data using the driver disk, the key can access...

Manual
Page 49
...SATA controllers integrated in Legacy IDE mode. In Legacy mode the SATA controllers use dedicated IRQs that allows the storage driver to enable advanced Serial ATA features such as Native Command Queuing and hot plug. When set to IDE mode. ...(X.H.D)." (Default: Disabled) PCH SATA Control Mode (Intel Z68 Chipset) Enables or disables RAID for the SATA controllers. For details on using the GIGABYTE X.H.D utility, refer to install operating systems that support Native mode. (Default) - 49 - Advanced Host Controller Interface (AHCI) is enabled....
...SATA controllers integrated in Legacy IDE mode. In Legacy mode the SATA controllers use dedicated IRQs that allows the storage driver to enable advanced Serial ATA features such as Native Command Queuing and hot plug. When set to IDE mode. ...(X.H.D)." (Default: Disabled) PCH SATA Control Mode (Intel Z68 Chipset) Enables or disables RAID for the SATA controllers. For details on using the GIGABYTE X.H.D utility, refer to install operating systems that support Native mode. (Default) - 49 - Advanced Host Controller Interface (AHCI) is enabled....

Manual
Page 51
..., the Status field will show Short and then length shown will show Open, and the length shown is an interface specification that allows the storage driver to activate the boot ROM integrated with the onboard LAN chip. (Default: Disabled) R_USB30 Controller (Etron EJ168 USB Controller, USB 3.0/2.0 ports on the back panel...
..., the Status field will show Short and then length shown will show Open, and the length shown is an interface specification that allows the storage driver to activate the boot ROM integrated with the onboard LAN chip. (Default: Disabled) R_USB30 Controller (Etron EJ168 USB Controller, USB 3.0/2.0 ports on the back panel...

Manual
Page 59
... Install" will then autodetect and install the USB 2.0 driver.) - 59 - Drivers Installation Or click Install Single Items to manually select the drivers you want to manually select the utilities to install new GIGABYTE utilities. The driver Autorun screen is installing the drivers. Chapter 3 Drivers Installation • Before installing the drivers, first install the operating system. • After installing...
... Install" will then autodetect and install the USB 2.0 driver.) - 59 - Drivers Installation Or click Install Single Items to manually select the drivers you want to manually select the utilities to install new GIGABYTE utilities. The driver Autorun screen is installing the drivers. Chapter 3 Drivers Installation • Before installing the drivers, first install the operating system. • After installing...

Manual
Page 60
Drivers Installation - 60 - You can click the Install button on the right of an item to install it. 3-3 Technical Manuals This page provides GIGABYTE's application guides, content descriptions for this driver disk, and the motherboard manuals. 3-2 Application Software This page displays all the utilities and applications that GIGABYTE develops and some free software.
Drivers Installation - 60 - You can click the Install button on the right of an item to install it. 3-3 Technical Manuals This page provides GIGABYTE's application guides, content descriptions for this driver disk, and the motherboard manuals. 3-2 Application Software This page displays all the utilities and applications that GIGABYTE develops and some free software.

Manual
Page 61
3-4 Contact For the detailed contact information of the GIGABYTE Taiwan headquarter or worldwide branch offices, click the URL on this page to link to the GIGABYTE website. 3-5 System This page provides the basic system information. - 61 - Drivers Installation
3-4 Contact For the detailed contact information of the GIGABYTE Taiwan headquarter or worldwide branch offices, click the URL on this page to link to the GIGABYTE website. 3-5 System This page provides the basic system information. - 61 - Drivers Installation

Manual
Page 62
You can click the Install button on the right of the BIOS, drivers, or applications will be displayed. 3-7 New Utilities This page provides a quick link to GIGABYTE's lately developed utilities for users to install. 3-6 Download Center To update the BIOS, drivers, or applications, click the Download Center button to link to install it. The latest version of an item to the GIGABYTE website. Drivers Installation - 62 -
You can click the Install button on the right of the BIOS, drivers, or applications will be displayed. 3-7 New Utilities This page provides a quick link to GIGABYTE's lately developed utilities for users to install. 3-6 Download Center To update the BIOS, drivers, or applications, click the Download Center button to link to install it. The latest version of an item to the GIGABYTE website. Drivers Installation - 62 -

Manual
Page 63
... Recovery2 can back up data on the amount of data). • It is recommended to back up your system soon after the operating system and drivers are installed. • The amount of data and hard drive access speed may affect the speed at the end of the hard drive, make sure...
... Recovery2 can back up data on the amount of data). • It is recommended to back up your system soon after the operating system and drivers are installed. • The amount of data and hard drive access speed may affect the speed at the end of the hard drive, make sure...

Manual
Page 64
... your hard drive. Accessing Xpress Recovery2 1. Step 2: When finished, go to Disk Management to start backing up your hard drive data. Boot from the motherboard driver disk to access Xpress Recovery2 for the first time, Xpress Recovery2 will stay permanent in Xpress Recovery2 Xpress Recovery2 will save the backup file. Step...
... your hard drive. Accessing Xpress Recovery2 1. Step 2: When finished, go to Disk Management to start backing up your hard drive data. Boot from the motherboard driver disk to access Xpress Recovery2 for the first time, Xpress Recovery2 will stay permanent in Xpress Recovery2 Xpress Recovery2 will save the backup file. Step...

Manual
Page 73
... Sharing Enabled Options Descriptions Option Connect ... Exit... Directions for using Q-Share After installing Q-Share from the motherboard driver disk, go to configure the data sharing settings. Find the Q-Share icon to Start>All Programs>GIGABYTE>Q-Share. Disable Incoming Folder ... exe to be shared (Note) Updates Q-Share online Displays the current Q-Share version...
... Sharing Enabled Options Descriptions Option Connect ... Exit... Directions for using Q-Share After installing Q-Share from the motherboard driver disk, go to configure the data sharing settings. Find the Q-Share icon to Start>All Programs>GIGABYTE>Q-Share. Disable Incoming Folder ... exe to be shared (Note) Updates Q-Share online Displays the current Q-Share version...

Manual
Page 79
...set eXtreme Hard Drive (X.H.D) under the Integrated Peripherals menu to Enabled to enhance your needs and hardware components. 3. Using GIGABYTE eXtreme Hard Drive (X.H.D) Instructions: (Note 2) Before launching X.H.D, make sure the new drive is greater than the RAID-ready... array to Chapter 5, "Installing the SATA RAID/AHCI Driver and Operating System." ) Step 3: Install the motherboard drivers and the X.H.D utiltiy After installing the operating system, insert the motherboard driver disk. 4-8 eXtreme Hard Drive (X.H.D) With GIGABYTE eXtreme Hard Drive (X.H.D) (Note 1), users can quickly...
...set eXtreme Hard Drive (X.H.D) under the Integrated Peripherals menu to Enabled to enhance your needs and hardware components. 3. Using GIGABYTE eXtreme Hard Drive (X.H.D) Instructions: (Note 2) Before launching X.H.D, make sure the new drive is greater than the RAID-ready... array to Chapter 5, "Installing the SATA RAID/AHCI Driver and Operating System." ) Step 3: Install the motherboard drivers and the X.H.D utiltiy After installing the operating system, insert the motherboard driver disk. 4-8 eXtreme Hard Drive (X.H.D) With GIGABYTE eXtreme Hard Drive (X.H.D) (Note 1), users can quickly...

Manual
Page 81
C. Configure SATA controller mode in your computer Attach one hard drive. • Windows 7/Vista/XP setup disk. • Motherboard driver disk. • A USB floppy disk drive (needed during Windows XP installation) • An empty formatted floppy disk (needed during Windows XP installation)... (to available SATA port on the devices being connected. - 81 - Installing SATA hard drive(s) in BIOS Setup. Install the SATA RAID/AHCI driver (Note 2) and operating system. mance of the SATA hard drive and the other end to ensure optimal performance, it is recommended that you may...
C. Configure SATA controller mode in your computer Attach one hard drive. • Windows 7/Vista/XP setup disk. • Motherboard driver disk. • A USB floppy disk drive (needed during Windows XP installation) • An empty formatted floppy disk (needed during Windows XP installation)... (to available SATA port on the devices being connected. - 81 - Installing SATA hard drive(s) in BIOS Setup. Install the SATA RAID/AHCI driver (Note 2) and operating system. mance of the SATA hard drive and the other end to ensure optimal performance, it is recommended that you may...

Manual
Page 85
... Copyright(C) 2003-10 Intel Corporation. All Rights Reserved. [ MAIN MENU ] 1. Exit 3. Now, you can proceed to create the SATA RAID/AHCI driver diskette and install the SATA RAID/AHCI driver and operating system. - 85 - Appendix Step 5: Enter the array capacity and press . Delete RAID Volume 5. Exit in the DISK/VOLUME INFORMATION section...
... Copyright(C) 2003-10 Intel Corporation. All Rights Reserved. [ MAIN MENU ] 1. Exit 3. Now, you can proceed to create the SATA RAID/AHCI driver diskette and install the SATA RAID/AHCI driver and operating system. - 85 - Appendix Step 5: Enter the array capacity and press . Delete RAID Volume 5. Exit in the DISK/VOLUME INFORMATION section...


