Manual
Page 1
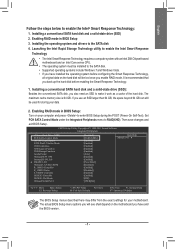
... to the SATA disk 4. Enabling RAID mode in BIOS Setup: Turn on the motherboard you have and the BIOS version. - 1 - Installing the operating system and drivers to RAID(XHD). The maximum cache memory size is recommended that you back up the hard disk before configuring the Smart Response Technology...
... to the SATA disk 4. Enabling RAID mode in BIOS Setup: Turn on the motherboard you have and the BIOS version. - 1 - Installing the operating system and drivers to RAID(XHD). The maximum cache memory size is recommended that you back up the hard disk before configuring the Smart Response Technology...
Manual
Page 2
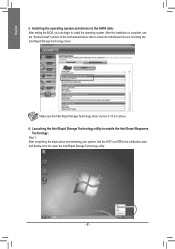
... the SATA disk: After setting the BIOS, you can begin to install all motherboard drivers, including the Intel Rapid Storage Technology driver. Launching the Intel Rapid Storage Technology utility to open the Intel Rapid Storage Technology utility. - 2 - After the installation is 10.5 or above and restarting your ...
... the SATA disk: After setting the BIOS, you can begin to install all motherboard drivers, including the Intel Rapid Storage Technology driver. Launching the Intel Rapid Storage Technology utility to open the Intel Rapid Storage Technology utility. - 2 - After the installation is 10.5 or above and restarting your ...

Manual
Page 3
...detailed product information, carefully read the User's Manual. The trademarks mentioned in the use of this manual may be made by GIGABYTE without GIGABYTE's prior written permission. No part of this manual may be reproduced, copied, translated, transmitted, or published in this :...: X.X." For product-related information, check on our website at: http://www.gigabyte.com Identifying Your Motherboard Revision The revision number on your motherboard revision before updating motherboard BIOS, drivers, or when looking for technical information. Copyright © 2011 GIGA-BYTE TECHNOLOGY...
...detailed product information, carefully read the User's Manual. The trademarks mentioned in the use of this manual may be made by GIGABYTE without GIGABYTE's prior written permission. No part of this manual may be reproduced, copied, translated, transmitted, or published in this :...: X.X." For product-related information, check on our website at: http://www.gigabyte.com Identifying Your Motherboard Revision The revision number on your motherboard revision before updating motherboard BIOS, drivers, or when looking for technical information. Copyright © 2011 GIGA-BYTE TECHNOLOGY...

Manual
Page 5
... 59 3-1 Installing Chipset Drivers 59 3-2 Application Software 60 3-3 Technical Manuals 60 3-4 Contact...61 3-5 System...61 3-6 Download Center 62 3-7 New Utilities...62 Chapter 4 Unique Features 63 4-1 ...Appendix...81 5-1 Configuring SATA Hard Drive(s 81 5-1-1 Configuring Intel Z68 SATA Controllers 81 5-1-2 Configuring Marvell 88SE9172 SATA Controller 89 5-1-3 Installing the SATA RAID/AHCI Driver and Operating System 95 5-2 Configuring Audio Input and Output 104 5-2-1 Configuring 2/4/5.1/7.1-Channel Audio 104 5-2-2 Configuring S/PDIF Out 106 5-2-3 Enabling the Dolby Home Theater...
... 59 3-1 Installing Chipset Drivers 59 3-2 Application Software 60 3-3 Technical Manuals 60 3-4 Contact...61 3-5 System...61 3-6 Download Center 62 3-7 New Utilities...62 Chapter 4 Unique Features 63 4-1 ...Appendix...81 5-1 Configuring SATA Hard Drive(s 81 5-1-1 Configuring Intel Z68 SATA Controllers 81 5-1-2 Configuring Marvell 88SE9172 SATA Controller 89 5-1-3 Installing the SATA RAID/AHCI Driver and Operating System 95 5-2 Configuring Audio Input and Output 104 5-2-1 Configuring 2/4/5.1/7.1-Channel Audio 104 5-2-2 Configuring S/PDIF Out 106 5-2-3 Enabling the Dolby Home Theater...
Manual
Page 6
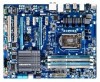
Box Contents GA-Z68X-UD3-B3 motherboard Motherboard driver disk User's Manual Quick Installation Guide Four SATA cables I/O Shield One 2-Way SLI bridge connector • The box contents above are subject to change without ...
Box Contents GA-Z68X-UD3-B3 motherboard Motherboard driver disk User's Manual Quick Installation Guide Four SATA cables I/O Shield One 2-Way SLI bridge connector • The box contents above are subject to change without ...

Manual
Page 18
Carefully read the manual that supports your expansion card(s). 777 Install the driver provided with your computer. PCI Express x1 Slot PCI Express x16 Slot PCI Slot Follow the steps below to correctly install your expansion card in ...
Carefully read the manual that supports your expansion card(s). 777 Install the driver provided with your computer. PCI Express x1 Slot PCI Express x16 Slot PCI Slot Follow the steps below to correctly install your expansion card in ...

Manual
Page 19
...graphics cards for more information about enabling CrossFireX/SLI technology. - 19 - To Enable CrossFireX Function After installing the graphics card driver in the operating system, go to the NVIDIA Control Panel. Connecting the Graphics Cards Step 1: Observe the steps in the...SLI Configuration A. A CrossFireX/SLI-supported motherboard with your graphics cards. C. Browse to the manual of identical brand and chip and correct driver - A power supply with sufficient power is recommended (Refer to the CrossFireX menu and ensure the Enable CrossFireX™ check box is...
...graphics cards for more information about enabling CrossFireX/SLI technology. - 19 - To Enable CrossFireX Function After installing the graphics card driver in the operating system, go to the NVIDIA Control Panel. Connecting the Graphics Cards Step 1: Observe the steps in the...SLI Configuration A. A CrossFireX/SLI-supported motherboard with your graphics cards. C. Browse to the manual of identical brand and chip and correct driver - A power supply with sufficient power is recommended (Refer to the CrossFireX menu and ensure the Enable CrossFireX™ check box is...

Manual
Page 34
... drive data using the driver disk, the key can access Boot Menu again to change the first boot device setting as needed. : Q-FLASH Press the key to access the Q-Flash utility directly without having to set the first boot device without entering BIOS Setup. Motherboard Model BIOS Version Z68X-UD3-B3 D5x . . . . : BIOS Setup...
... drive data using the driver disk, the key can access Boot Menu again to change the first boot device setting as needed. : Q-FLASH Press the key to access the Q-Flash utility directly without having to set the first boot device without entering BIOS Setup. Motherboard Model BIOS Version Z68X-UD3-B3 D5x . . . . : BIOS Setup...

Manual
Page 49
... advanced Serial ATA features such as Native Command Queuing and hot plug. In Legacy mode the SATA controllers use dedicated IRQs that allows the storage driver to display Intel RAID ROM messages during the POST when the Intel SATA RAID function is an interface specification that cannot be set to operate... disables RAID for the SATA controllers integrated in the Intel Z68 Chipset. Disabled Allows the SATA controllers to AHCI mode. For details on using the GIGABYTE X.H.D utility, refer to AHCI mode.
... advanced Serial ATA features such as Native Command Queuing and hot plug. In Legacy mode the SATA controllers use dedicated IRQs that allows the storage driver to display Intel RAID ROM messages during the POST when the Intel SATA RAID function is an interface specification that cannot be set to operate... disables RAID for the SATA controllers integrated in the Intel Z68 Chipset. Disabled Allows the SATA controllers to AHCI mode. For details on using the GIGABYTE X.H.D utility, refer to AHCI mode.

Manual
Page 51
... approximate distance to the on Part 1-2. Note: The Gigabit hub will show Open, and the length shown is an interface specification that allows the storage driver to AHCI mode. Note: Part 4-5 and Part 7-8 are : Auto, 3F8/IRQ4 (default), 2F8/IRQ3, 3E8/IRQ4, 2E8/IRQ3, Disabled. - 51 - Onboard Serial Port 1 Enables or...
... approximate distance to the on Part 1-2. Note: The Gigabit hub will show Open, and the length shown is an interface specification that allows the storage driver to AHCI mode. Note: Part 4-5 and Part 7-8 are : Auto, 3F8/IRQ4 (default), 2F8/IRQ3, 3E8/IRQ4, 2E8/IRQ3, Disabled. - 51 - Onboard Serial Port 1 Enables or...

Manual
Page 59
... that shown in Device Manager, please remove the question mark (by right-clicking your system and then list all the recommended drivers. Or click No if you wish to install new GIGABYTE utilities. Failure to automatically install the utilities. You can click the Install All button and "Xpress Install" will restart your...
... that shown in Device Manager, please remove the question mark (by right-clicking your system and then list all the recommended drivers. Or click No if you wish to install new GIGABYTE utilities. Failure to automatically install the utilities. You can click the Install All button and "Xpress Install" will restart your...

Manual
Page 60
3-2 Application Software This page displays all the utilities and applications that GIGABYTE develops and some free software. Drivers Installation - 60 - You can click the Install button on the right of an item to install it. 3-3 Technical Manuals This page provides GIGABYTE's application guides, content descriptions for this driver disk, and the motherboard manuals.
3-2 Application Software This page displays all the utilities and applications that GIGABYTE develops and some free software. Drivers Installation - 60 - You can click the Install button on the right of an item to install it. 3-3 Technical Manuals This page provides GIGABYTE's application guides, content descriptions for this driver disk, and the motherboard manuals.

Manual
Page 61
Drivers Installation 3-4 Contact For the detailed contact information of the GIGABYTE Taiwan headquarter or worldwide branch offices, click the URL on this page to link to the GIGABYTE website. 3-5 System This page provides the basic system information. - 61 -
Drivers Installation 3-4 Contact For the detailed contact information of the GIGABYTE Taiwan headquarter or worldwide branch offices, click the URL on this page to link to the GIGABYTE website. 3-5 System This page provides the basic system information. - 61 -

Manual
Page 62
The latest version of an item to install it. 3-6 Download Center To update the BIOS, drivers, or applications, click the Download Center button to link to install. You can click the Install button on the right of the BIOS, drivers, or applications will be displayed. 3-7 New Utilities This page provides a quick link to GIGABYTE's lately developed utilities for users to the GIGABYTE website. Drivers Installation - 62 -
The latest version of an item to install it. 3-6 Download Center To update the BIOS, drivers, or applications, click the Download Center button to link to install. You can click the Install button on the right of the BIOS, drivers, or applications will be displayed. 3-7 New Utilities This page provides a quick link to GIGABYTE's lately developed utilities for users to the GIGABYTE website. Drivers Installation - 62 -

Manual
Page 63
... supported. • Hard drives larger than to the first and third SATA connectors, the hard drive on your system soon after the operating system and drivers are not supported. Installing Windows Vista and Partitioning the Hard Drive Step 1: Step 2: Click Drive options. System Requirements: • At least 512 MB of the...
... supported. • Hard drives larger than to the first and third SATA connectors, the hard drive on your system soon after the operating system and drivers are not supported. Installing Windows Vista and Partitioning the Hard Drive Step 1: Step 2: Click Drive options. System Requirements: • At least 512 MB of the...

Manual
Page 64
... that if there is recommended; Step 4: After the operating system is installed, click Start, right-click the Computer and select Manage. Boot from the motherboard driver disk to start backing up your hard drive. Step 1: Select BACKUP to access Xpress Recovery2 for the first time, Xpress Recovery2 will save the backup...
... that if there is recommended; Step 4: After the operating system is installed, click Start, right-click the Computer and select Manage. Boot from the motherboard driver disk to start backing up your hard drive. Step 1: Select BACKUP to access Xpress Recovery2 for the first time, Xpress Recovery2 will save the backup...

Manual
Page 73
... ... Data Sharing Disabled Figure 2. After configuring your LAN connection settings and Q-Share, you are able to Start>All Programs>GIGABYTE>Q-Share. Directions for using Q-Share After installing Q-Share from the motherboard driver disk, go to share your data with data sharing enabled Enables data sharing Disables data sharing Accesses the shared data...
... ... Data Sharing Disabled Figure 2. After configuring your LAN connection settings and Q-Share, you are able to Start>All Programs>GIGABYTE>Q-Share. Directions for using Q-Share After installing Q-Share from the motherboard driver disk, go to share your data with data sharing enabled Enables data sharing Disables data sharing Accesses the shared data...

Manual
Page 79
... equal to Chapter 5, "Installing the SATA RAID/AHCI Driver and Operating System." ) Step 3: Install the motherboard drivers and the X.H.D utiltiy After installing the operating system, insert the motherboard driver disk. Without the driver, the hard drive may not be able to individually install the X.H.D utility later. A. Using GIGABYTE eXtreme Hard Drive (X.H.D) Instructions: (Note 2) Before launching...
... equal to Chapter 5, "Installing the SATA RAID/AHCI Driver and Operating System." ) Step 3: Install the motherboard drivers and the X.H.D utiltiy After installing the operating system, insert the motherboard driver disk. Without the driver, the hard drive may not be able to individually install the X.H.D utility later. A. Using GIGABYTE eXtreme Hard Drive (X.H.D) Instructions: (Note 2) Before launching...

Manual
Page 81
.... - 81 - C. Installing SATA hard drive(s) in your computer Attach one hard drive. • Windows 7/Vista/XP setup disk. • Motherboard driver disk. • A USB floppy disk drive (needed during Windows XP installation) • An empty formatted floppy disk (needed during Windows XP installation) ... 5 Appendix 5-1 Configuring SATA Hard Drive(s) To configure SATA hard drive(s), follow the steps below: A. Appendix Install the SATA RAID/AHCI driver (Note 2) and operating system. mance of the SATA hard drive and the other end to ensure optimal performance, it is built across ...
.... - 81 - C. Installing SATA hard drive(s) in your computer Attach one hard drive. • Windows 7/Vista/XP setup disk. • Motherboard driver disk. • A USB floppy disk drive (needed during Windows XP installation) • An empty formatted floppy disk (needed during Windows XP installation) ... 5 Appendix 5-1 Configuring SATA Hard Drive(s) To configure SATA hard drive(s), follow the steps below: A. Appendix Install the SATA RAID/AHCI driver (Note 2) and operating system. mance of the SATA hard drive and the other end to ensure optimal performance, it is built across ...

Manual
Page 85
... Rights Reserved. [ MAIN MENU ] 1. Option ROM - 10.1.0.1008 Copyright(C) 2003-10 Intel Corporation. Reset Disks to create the SATA RAID/AHCI driver diskette and install the SATA RAID/AHCI driver and operating system. - 85 - Now, you can see detailed information about the RAID array in MAIN MENU. Finally press on the Create...
... Rights Reserved. [ MAIN MENU ] 1. Option ROM - 10.1.0.1008 Copyright(C) 2003-10 Intel Corporation. Reset Disks to create the SATA RAID/AHCI driver diskette and install the SATA RAID/AHCI driver and operating system. - 85 - Now, you can see detailed information about the RAID array in MAIN MENU. Finally press on the Create...


