
Manual
Page 1
... may not be able to automatically set up a RAID-ready system and configure it for RAID 0 when a new SATA drive is added. B. Before installing the operating system, you can quickly configure a RAIDready system for RAID 0. Using GIGABYTE eXtreme Hard Drive (X.H.D) Instructions:(Note 2) Before launching ...the array to expand its capacity. All with which you 'll not be recognized during the Windows setup process. (For more details, refer to Chapter 5, "Installing the SATA RAID/AHCI Driver and Operating System." ) Step 3: Install the motherboard drivers and the X.H.D utiltiy After ...
... may not be able to automatically set up a RAID-ready system and configure it for RAID 0 when a new SATA drive is added. B. Before installing the operating system, you can quickly configure a RAIDready system for RAID 0. Using GIGABYTE eXtreme Hard Drive (X.H.D) Instructions:(Note 2) Before launching ...the array to expand its capacity. All with which you 'll not be recognized during the Windows setup process. (For more details, refer to Chapter 5, "Installing the SATA RAID/AHCI Driver and Operating System." ) Step 3: Install the motherboard drivers and the X.H.D utiltiy After ...

Manual
Page 55
...-Copyright (C) 1984-2009 Award Software Integrated Peripherals eSATA Ctrl Mode GSATA 6_7/IDE Controller GSATA 6_7/IDE Ctrl Mode GSATA RAID Configuration GSATA 8_9/IDE Controller GSATA 8_9/IDE Ctrl Mode [IDE] [Enabled] [IDE] [Press Enter] [Enabled] [IDE] Item Help Menu Level &#.... When set to Enabled, the ICH SATA Control Mode item below will be set to IDE mode. (Default) - 55 - BIOS Setup For details on using the GIGABYTE X.H.D utility, refer to Chaper 4, "eXtreme Hard Drive (X.H.D)." (Default: Disabled) ICH SATA Control Mode (Intel ICH10R Chipset) Enables or disables...
...-Copyright (C) 1984-2009 Award Software Integrated Peripherals eSATA Ctrl Mode GSATA 6_7/IDE Controller GSATA 6_7/IDE Ctrl Mode GSATA RAID Configuration GSATA 8_9/IDE Controller GSATA 8_9/IDE Ctrl Mode [IDE] [Enabled] [IDE] [Press Enter] [Enabled] [IDE] Item Help Menu Level &#.... When set to Enabled, the ICH SATA Control Mode item below will be set to IDE mode. (Default) - 55 - BIOS Setup For details on using the GIGABYTE X.H.D utility, refer to Chaper 4, "eXtreme Hard Drive (X.H.D)." (Default: Disabled) ICH SATA Control Mode (Intel ICH10R Chipset) Enables or disables...

Manual
Page 56
...Enables or disables the onboard LAN function. (Default: Enabled) If you wish to install a 3rd party add-in Native IDE mode. RAID(XHD) Enables RAID for the SATA controllers. In Legacy mode the SATA controllers use dedicated IRQs that support Native mode. Green LAN When the onboard LAN function... to be used in MS-DOS. (Default: Disabled) USB Mouse Function Allows USB mouse to be disabled automatically. (Default: Disabled) BIOS Setup - 56 - Set this item to enable advanced Serial ATA features such as Native Command Queuing and hot plug. Enable Native IDE mode if...
...Enables or disables the onboard LAN function. (Default: Enabled) If you wish to install a 3rd party add-in Native IDE mode. RAID(XHD) Enables RAID for the SATA controllers. In Legacy mode the SATA controllers use dedicated IRQs that support Native mode. Green LAN When the onboard LAN function... to be used in MS-DOS. (Default: Disabled) USB Mouse Function Allows USB mouse to be disabled automatically. (Default: Disabled) BIOS Setup - 56 - Set this item to enable advanced Serial ATA features such as Native Command Queuing and hot plug. Enable Native IDE mode if...

Manual
Page 58
...Connectors) Enables or disables the IDE and SATA controller integrated in the GIGABYTE SATA2 chip. (Default: Enabled) GSATA 8_9/IDE Ctrl Mode (GIGABYTE SATA2 Chip, IDE and GSATA2_8/9 Connectors) Enables or disables RAID for the SATA controller integrated in the Marvell 9128 chip. (Default...the Marvell 9128 chip to enable advanced Serial ATA features such as Native Command Queuing and hot plug. RAID Enables RAID for the SATA controller; BIOS Setup - 58 - Advanced Host Controller Interface (AHCI) is an interface specification that allows the storage driver ...
...Connectors) Enables or disables the IDE and SATA controller integrated in the GIGABYTE SATA2 chip. (Default: Enabled) GSATA 8_9/IDE Ctrl Mode (GIGABYTE SATA2 Chip, IDE and GSATA2_8/9 Connectors) Enables or disables RAID for the SATA controller integrated in the Marvell 9128 chip. (Default...the Marvell 9128 chip to enable advanced Serial ATA features such as Native Command Queuing and hot plug. RAID Enables RAID for the SATA controller; BIOS Setup - 58 - Advanced Host Controller Interface (AHCI) is an interface specification that allows the storage driver ...

Manual
Page 71
... back up/restore the first physical hard drive that allows you to quickly compress and back up your system to boot from the Windows Vista setup disk. Before You Begin: • Xpress Recovery2 will save the backup file at which the data is recommended; For example, a backup file created ... on the first IDE connector is the first physical drive. - 71 - Step 2: Click New. (Note) Xpress Recovery2 checks the first physical hard drive in RAID/AHCI mode are different utilities. When hard drives are attached to the first IDE and the first SATA connectors, the hard drive on your system...
... back up/restore the first physical hard drive that allows you to quickly compress and back up your system to boot from the Windows Vista setup disk. Before You Begin: • Xpress Recovery2 will save the backup file at which the data is recommended; For example, a backup file created ... on the first IDE connector is the first physical drive. - 71 - Step 2: Click New. (Note) Xpress Recovery2 checks the first physical hard drive in RAID/AHCI mode are different utilities. When hard drives are attached to the first IDE and the first SATA connectors, the hard drive on your system...
Manual
Page 74
...process. Note: You can update the system BIOS without the need to access Q-Flash. From GIGABYTE's website, download the latest compressed BIOS update file that support DualBIOS have two BIOS onboard,... chip. Inadequate BIOS flashing may result in RAID/AHCI mode or a hard drive attached to update the system BIOS while in BIOS Setup. Embedded in the BIOS, the Q-Flash... the BIOS update file is potentially risky, please do it with the Q-Flash Utility A. X58A-UD7 D33 . . . . : BIOS Setup : XpressRecovery2 : Boot Menu : Qflash 10/27/2009-X58-ICH10-7A89QC0IC-00 Because BIOS ...
...process. Note: You can update the system BIOS without the need to access Q-Flash. From GIGABYTE's website, download the latest compressed BIOS update file that support DualBIOS have two BIOS onboard,... chip. Inadequate BIOS flashing may result in RAID/AHCI mode or a hard drive attached to update the system BIOS while in BIOS Setup. Embedded in the BIOS, the Q-Flash... the BIOS update file is potentially risky, please do it with the Q-Flash Utility A. X58A-UD7 D33 . . . . : BIOS Setup : XpressRecovery2 : Boot Menu : Qflash 10/27/2009-X58-ICH10-7A89QC0IC-00 Because BIOS ...

Manual
Page 86
...Windows setup process. (For more details, refer to Chapter 5, "Installing the SATA RAID/AHCI Driver and Operating System." ) Step 3: Install the motherboard drivers and the X.H.D utiltiy After installing the operating system, insert the motherboard driver disk. 4-8 eXtreme Hard Drive (X.H.D) With GIGABYTE ... with a simple click of data. (Note 3) If you manually build a non-RAID 0 array, you run the X.H.D utility, back up all motherboard drivers, including the X.H.D utility. Using GIGABYTE eXtreme Hard Drive (X.H.D) Instructions:(Note 2) Before launching X.H.D, make sure the new drive...
...Windows setup process. (For more details, refer to Chapter 5, "Installing the SATA RAID/AHCI Driver and Operating System." ) Step 3: Install the motherboard drivers and the X.H.D utiltiy After installing the operating system, insert the motherboard driver disk. 4-8 eXtreme Hard Drive (X.H.D) With GIGABYTE ... with a simple click of data. (Note 3) If you manually build a non-RAID 0 array, you run the X.H.D utility, back up all motherboard drivers, including the X.H.D utility. Using GIGABYTE eXtreme Hard Drive (X.H.D) Instructions:(Note 2) Before launching X.H.D, make sure the new drive...

Manual
Page 89
... from your computer Attach one hard drive. • An empty formatted floppy disk. • Windows Vista/XP setup disk. • Motherboard driver disk. 5-1-1 Configuring Intel ICH10R SATA Controllers A. Make a floppy disk containing the SATA RAID/AHCI driver for the SATA port. (For example, on this step if you do not want to...
... from your computer Attach one hard drive. • An empty formatted floppy disk. • Windows Vista/XP setup disk. • Motherboard driver disk. 5-1-1 Configuring Intel ICH10R SATA Controllers A. Make a floppy disk containing the SATA RAID/AHCI driver for the SATA port. (For example, on this step if you do not want to...
Manual
Page 90
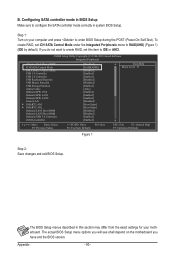
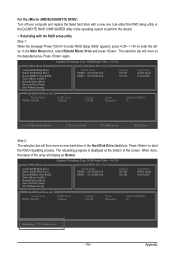
... F6: Fail-Safe Defaults ESC: Exit F1: General Help F7: Optimized Defaults Figure 1 Step 2: Save changes and exit BIOS Setup. If you do not want to create RAID, set ICH SATA Control Mode under the Integrated Peripherals menu to configure the SATA controller mode correctly in system BIOS...will see shall depend on your motherboard. To create RAID, set this section may differ from the exact settings for your computer and press to IDE or AHCI. Appendix - 90 - The BIOS Setup menus described in BIOS Setup Make sure to RAID(XHD) (Figure 1) (IDE by default). Configuring SATA...
... F6: Fail-Safe Defaults ESC: Exit F1: General Help F7: Optimized Defaults Figure 1 Step 2: Save changes and exit BIOS Setup. If you do not want to create RAID, set ICH SATA Control Mode under the Integrated Peripherals menu to configure the SATA controller mode correctly in system BIOS...will see shall depend on your motherboard. To create RAID, set this section may differ from the exact settings for your computer and press to IDE or AHCI. Appendix - 90 - The BIOS Setup menus described in BIOS Setup Make sure to RAID(XHD) (Figure 1) (IDE by default). Configuring SATA...

Manual
Page 91
....7GB 111.7GB Type/Status(Vol ID) Non-RAID Disk Non-RAID Disk Press to enter the ICH10R RAID Configuration Utility. Create RAID Volume 2. Appendix All Rights Reserved. Figure 2 Step 2: After you want to create a RAID array, select Create RAID Volume in RAID BIOS Enter the RAID BIOS setup utility to configure a RAID array. Intel(R) Matrix Storage Manager option ROM...
....7GB 111.7GB Type/Status(Vol ID) Non-RAID Disk Non-RAID Disk Press to enter the ICH10R RAID Configuration Utility. Create RAID Volume 2. Appendix All Rights Reserved. Figure 2 Step 2: After you want to create a RAID array, select Create RAID Volume in RAID BIOS Enter the RAID BIOS setup utility to configure a RAID array. Intel(R) Matrix Storage Manager option ROM...

Manual
Page 97
... configure the SATA controller mode correctly in system BIOS Setup. B. The actual BIOS Setup menu options you have and the BIOS version. - 97 - Controller Connectors JMicron eSATA ports JMB362 GIGABYTE GSATA2_8/9 SATA2 BIOS Settings Set eSATA Controller to Enabled Set eSATA Ctrl Mode to RAID Set GSATA 8_9/IDE Controller to Enabled Set GSATA...
... configure the SATA controller mode correctly in system BIOS Setup. B. The actual BIOS Setup menu options you have and the BIOS version. - 97 - Controller Connectors JMicron eSATA ports JMB362 GIGABYTE GSATA2_8/9 SATA2 BIOS Settings Set eSATA Controller to Enabled Set eSATA Ctrl Mode to RAID Set GSATA 8_9/IDE Controller to Enabled Set GSATA...

Manual
Page 98
... Express to SATAII HOST Controller ROM v1.07.06 Copyright (C) 2005-2009 Gigabyte Technology Corp. (http://www.gigabyte.com) HDD0 : HDD1 : ST3120026AS ST3120026AS 120 GB 120 GB Non-RAID Non-RAID Press to enter RAID Setup Utility" (Figure 2). Highlight the item that you can select a hard ...drive in the Hard Disk Drive List block and press to execute and press . Gigabyte Technology Corp. C. After the POST memory...
... Express to SATAII HOST Controller ROM v1.07.06 Copyright (C) 2005-2009 Gigabyte Technology Corp. (http://www.gigabyte.com) HDD0 : HDD1 : ST3120026AS ST3120026AS 120 GB 120 GB Non-RAID Non-RAID Press to enter RAID Setup Utility" (Figure 2). Highlight the item that you can select a hard ...drive in the Hard Disk Drive List block and press to execute and press . Gigabyte Technology Corp. C. After the POST memory...
Manual
Page 99
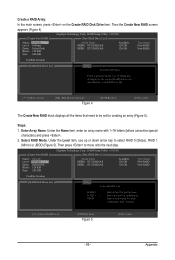
...Gigabyte Technology Corp. Create a RAID Array: In the main screen, press on the Create RAID Disk Drive item. RAID Setup Utility v1.07.06 [ Hard Disk Drive List ] Model Name HDD0: ST3120026AS HDD1: ST3120026AS Available 120 GB 120 GB Type/Status Non-RAID Non-RAID Confirm Creation [ RAID Disk Drive List ] [ Help ] Select RAID Level RAID 0 RAID...concatenated for creating an array (Figure 5). Then the Create New RAID screen appears (Figure 4). Steps: 1. Appendix RAID Setup Utility v1.07.06 [ Create New RAID ] Name: Level: Disks: Block: Size: GRAID_ 0-Stripe...
...Gigabyte Technology Corp. Create a RAID Array: In the main screen, press on the Create RAID Disk Drive item. RAID Setup Utility v1.07.06 [ Hard Disk Drive List ] Model Name HDD0: ST3120026AS HDD1: ST3120026AS Available 120 GB 120 GB Type/Status Non-RAID Non-RAID Confirm Creation [ RAID Disk Drive List ] [ Help ] Select RAID Level RAID 0 RAID...concatenated for creating an array (Figure 5). Then the Create New RAID screen appears (Figure 4). Steps: 1. Appendix RAID Setup Utility v1.07.06 [ Create New RAID ] Name: Level: Disks: Block: Size: GRAID_ 0-Stripe...

Manual
Page 100
...] Setting Stripe Block Select a stripe size which will be used to divide data from 4 KB to the Confirm Creation item. RAID Setup Utility v1.07.06 [ Create New RAID ] Name: Level: Disks: Block: Size: GRAID 0-Stripe Select Disk 128 KB 240 GB [ Hard Disk Drive List ] ... 120 GB 120 GB Type/Status Non-RAID Non-RAID Confirm Creation [ RAID Disk Drive List ] Create RAID on[ tHheelspel]ect HDD (Y/N) ? Press . 3. Press . [ Create New RAID ] Name: Level: Disks: Block: Size: GRAID 0-Stripe Select Disk 128 KB 240 GB Gigabyte Technology Corp. When prompted to confirm your...
...] Setting Stripe Block Select a stripe size which will be used to divide data from 4 KB to the Confirm Creation item. RAID Setup Utility v1.07.06 [ Create New RAID ] Name: Level: Disks: Block: Size: GRAID 0-Stripe Select Disk 128 KB 240 GB [ Hard Disk Drive List ] ... 120 GB 120 GB Type/Status Non-RAID Non-RAID Confirm Creation [ RAID Disk Drive List ] Create RAID on[ tHheelspel]ect HDD (Y/N) ? Press . 3. Press . [ Create New RAID ] Name: Level: Disks: Block: Size: GRAID 0-Stripe Select Disk 128 KB 240 GB Gigabyte Technology Corp. When prompted to confirm your...

Manual
Page 101
... [fgTAB]-Switch Window [hi]-Select RAID Figure 9 [ENTER]-Detail [ESC]-Exit - 101 - RAID Setup Utility v1.07.06 [ Main Menu ] Create RAID Disk Drive Delete RAID Disk Drive Revert HDD to the RAID Disk Drive List block. Gigabyte Technology Corp. Gigabyte Technology Corp. When finished, the new RAID array will appear in the RAID Disk Drive List block (Figure 8). Appendix...
... [fgTAB]-Switch Window [hi]-Select RAID Figure 9 [ENTER]-Detail [ESC]-Exit - 101 - RAID Setup Utility v1.07.06 [ Main Menu ] Create RAID Disk Drive Delete RAID Disk Drive Revert HDD to the RAID Disk Drive List block. Gigabyte Technology Corp. Gigabyte Technology Corp. When finished, the new RAID array will appear in the RAID Disk Drive List block (Figure 8). Appendix...

Manual
Page 102
.... a small triangle will move to Non-RAID Solve Mirror Conflict Rebuild Mirror Drive Save And Exit Setup Exit Without Saving Gigabyte Technology Corp. 7. ARE YOU SURE TO DELETE (Y/N) ? Save and Exit Setup: After configuring the RAID array, select the Save And Exit Setup item in the main menu and press . RAID Setup Utility v1.07.06 [ Hard Disk...
.... a small triangle will move to Non-RAID Solve Mirror Conflict Rebuild Mirror Drive Save And Exit Setup Exit Without Saving Gigabyte Technology Corp. 7. ARE YOU SURE TO DELETE (Y/N) ? Save and Exit Setup: After configuring the RAID array, select the Save And Exit Setup item in the main menu and press . RAID Setup Utility v1.07.06 [ Hard Disk...

Manual
Page 103
Then connect the power connector from the exact settings for more information.) Step 2: To create a RAID array, press on the motherboard. Configuring SATA controller and RAID mode in BIOS Setup Make sure to the rear of the SATA AHCI driver is enabled. Step 1: Turn on your motherboard. Make sure...-On Self-Test). Then set GSATA 6_7/IDE Ctrl Mode to IDE or AHCI, depending on your power supply to create RAID. CMOS Setup Utility-Copyright (C) 1984-2009 Award Software Integrated Peripherals eSATA Controller eSATA Ctrl Mode GSATA 6_7/IDE Controller GSATA 6_7/IDE Ctrl Mode ...
Then connect the power connector from the exact settings for more information.) Step 2: To create a RAID array, press on the motherboard. Configuring SATA controller and RAID mode in BIOS Setup Make sure to the rear of the SATA AHCI driver is enabled. Step 1: Turn on your motherboard. Make sure...-On Self-Test). Then set GSATA 6_7/IDE Ctrl Mode to IDE or AHCI, depending on your power supply to create RAID. CMOS Setup Utility-Copyright (C) 1984-2009 Award Software Integrated Peripherals eSATA Controller eSATA Ctrl Mode GSATA 6_7/IDE Controller GSATA 6_7/IDE Ctrl Mode ...

Manual
Page 104
...drive will be included in the array. After selecting the hard drives, press to HBA 0: Marvell 0 and press . Marvell BIOS Setup (c) 2009 Marvell Technology Group Ltd. ENTER: Operation F10: Exit/Save ESC: Return Figure 2 Under Free Physical Disks, use the...Version : Firmware Version : PCIe Speed rate : Configure SATA as : 1B4B 91A3 B1 1.0.0.1006 2.1.0.1314 2.56Gbps IDE Mode Help Marvell RAID on chip controller. Configuring a RAID array Create a RAID Array: Move the selection bar to proceed (Figure 3). Topology HBA 0 : Marvell 0 Virtual Disks Free Physical Disks PD 0: WDC WD800JD...
...drive will be included in the array. After selecting the hard drives, press to HBA 0: Marvell 0 and press . Marvell BIOS Setup (c) 2009 Marvell Technology Group Ltd. ENTER: Operation F10: Exit/Save ESC: Return Figure 2 Under Free Physical Disks, use the...Version : Firmware Version : PCIe Speed rate : Configure SATA as : 1B4B 91A3 B1 1.0.0.1006 2.1.0.1314 2.56Gbps IDE Mode Help Marvell RAID on chip controller. Configuring a RAID array Create a RAID Array: Move the selection bar to proceed (Figure 3). Topology HBA 0 : Marvell 0 Virtual Disks Free Physical Disks PD 0: WDC WD800JD...

Manual
Page 105
...Setup (c) 2009 Marvell Technology Group Ltd. When prompted to confirm whether to create this array, press to confirm or to create this virtual disk? Configure -> Select free disksCreate Virtual Disk HBA 0 : Marvell 0 Virtual Disks Free Physical Disks * PD 0: WDC WD800JD-22L * PD 8: WDC WD800JD-22L RAID Level : Max Size (MB) : Stripe Size : Gigabyte... Rounding : Quick Init : VD Name : Disks ID : Next RAID 0 152378 64KB 1G Yes Default 0 8 Help Virtual disk ...
...Setup (c) 2009 Marvell Technology Group Ltd. When prompted to confirm whether to create this array, press to confirm or to create this virtual disk? Configure -> Select free disksCreate Virtual Disk HBA 0 : Marvell 0 Virtual Disks Free Physical Disks * PD 0: WDC WD800JD-22L * PD 8: WDC WD800JD-22L RAID Level : Max Size (MB) : Stripe Size : Gigabyte... Rounding : Quick Init : VD Name : Disks ID : Next RAID 0 152378 64KB 1G Yes Default 0 8 Help Virtual disk ...
Manual
Page 119
..., select Rebuild Mirror Drive and press . RAID Setup Utility v1.07.06 [ Main Menu ] Create RAID Disk Drive Delete RAID Disk Drive Revert HDD to Non-RAID Solve Mirror Conflict Rebuild Mirror Drive Save And Exit Setup Exit Without Saving Gigabyte Technology Corp. Gigabyte Technology Corp. Use either the RAID setup utility or the GIGABYTE RAID CONFIGURER utility in the Hard Disk...
..., select Rebuild Mirror Drive and press . RAID Setup Utility v1.07.06 [ Main Menu ] Create RAID Disk Drive Delete RAID Disk Drive Revert HDD to Non-RAID Solve Mirror Conflict Rebuild Mirror Drive Save And Exit Setup Exit Without Saving Gigabyte Technology Corp. Gigabyte Technology Corp. Use either the RAID setup utility or the GIGABYTE RAID CONFIGURER utility in the Hard Disk...


