Manual
Page 11
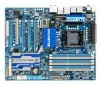
... w 1 x CD In connector w 1 x S/PDIF In header w 1 x S/PDIF Out header w 2 x USB 2.0/1.1 headers w 1 x IEEE 1394a header w 1 x power button w 1 x reset button w 1 x PS/2 keyboard port Connectors w 1 x PS/2 mouse port w w w w w w w w w 1 x coaxial S/PDIF Out connector 1 x optical S/PDIF Out connector 1 x clearing CMOS button 2 x IEEE 1394a ports 4 x USB 2.0/1.1 ports 2 x USB 3.0 ports 2 x eSATA/USB Combo connectors 2 x RJ-45 port 6 x audio jacks...
... w 1 x CD In connector w 1 x S/PDIF In header w 1 x S/PDIF Out header w 2 x USB 2.0/1.1 headers w 1 x IEEE 1394a header w 1 x power button w 1 x reset button w 1 x PS/2 keyboard port Connectors w 1 x PS/2 mouse port w w w w w w w w w 1 x coaxial S/PDIF Out connector 1 x optical S/PDIF Out connector 1 x clearing CMOS button 2 x IEEE 1394a ports 4 x USB 2.0/1.1 ports 2 x USB 3.0 ports 2 x eSATA/USB Combo connectors 2 x RJ-45 port 6 x audio jacks...
Manual
Page 37
...press + in the main menu of the BIOS Setup program. Refer to Chapter 5, "Troubleshooting," for how to clear the CMOS values.) - 37 - To upgrade the BIOS, use either the GIGABYTE Q-Flash or @BIOS utility. • Q-Flash allows the user to quickly and easily upgrade or back up BIOS without ...For instructions on . To see more advanced BIOS Setup menu options, you not flash the BIOS. If this occurs, try to clear the CMOS values and reset the board to default values. (Refer to the "Load Optimized Defaults" section in this chapter or introductions of BIOS from the Internet and ...
...press + in the main menu of the BIOS Setup program. Refer to Chapter 5, "Troubleshooting," for how to clear the CMOS values.) - 37 - To upgrade the BIOS, use either the GIGABYTE Q-Flash or @BIOS utility. • Q-Flash allows the user to quickly and easily upgrade or back up BIOS without ...For instructions on . To see more advanced BIOS Setup menu options, you not flash the BIOS. If this occurs, try to clear the CMOS values and reset the board to default values. (Refer to the "Load Optimized Defaults" section in this chapter or introductions of BIOS from the Internet and ...

Manual
Page 41
...; Move Enter: Select F5: Previous Values +/-/PU/PD: Value F10: Save F6: Fail-Safe Defaults ESC: Exit F1: General Help F7: Optimized Defaults CMOS Setup Utility-Copyright (C) 1984-2009 Award Software MB Intelligent Tweaker(M.I.T.) x tRP 7 Auto x tRAS 20 Auto x Command Rate(CMD) 1 Auto >>>>> Channel ...default values.) (Note 1) This item appears only if you install a CPU that supports this occurs, clear the CMOS values and reset the board to boot. If this feature. - 41 - Auto x tRP - Auto x Command Rate(CMD) - Auto x tRP - BIOS...
...; Move Enter: Select F5: Previous Values +/-/PU/PD: Value F10: Save F6: Fail-Safe Defaults ESC: Exit F1: General Help F7: Optimized Defaults CMOS Setup Utility-Copyright (C) 1984-2009 Award Software MB Intelligent Tweaker(M.I.T.) x tRP 7 Auto x tRAS 20 Auto x Command Rate(CMD) 1 Auto >>>>> Channel ...default values.) (Note 1) This item appears only if you install a CPU that supports this occurs, clear the CMOS values and reset the board to boot. If this feature. - 41 - Auto x tRP - Auto x Command Rate(CMD) - Auto x tRP - BIOS...
Manual
Page 45
... Skew Allows you to 1200 MHz. Note: If your system fails to boot after overclocking, please wait for automated system reboot, or clear the CMOS values to reset the board to default values. (Default: Disabled) BCLK Frequency(Mhz) Allows you to manually set the PCIe clock frequency. >>>>> Standard Clock Control Base Clock...
... Skew Allows you to 1200 MHz. Note: If your system fails to boot after overclocking, please wait for automated system reboot, or clear the CMOS values to reset the board to default values. (Default: Disabled) BCLK Frequency(Mhz) Allows you to manually set the PCIe clock frequency. >>>>> Standard Clock Control Base Clock...
Manual
Page 61
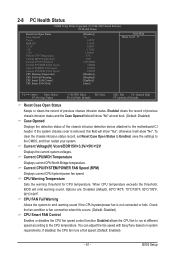
...when this field will show "Yes", otherwise it will emit warning sound. 2-8 PC Health Status CMOS Setup Utility-Copyright (C) 1984-2009 Award Software PC Health Status Reset Case Open Status Case Opened Vcore DDR15V +3.3V +5V +12V Current CPU Temperature Current MCH Temperature...connected or fails. Current CPU/MCH Temperature Displays current CPU/North Bridge temperature. To clear the chassis intrusion status record, set Reset Case Open Status to Enabled, save the settings to the CPU temperature. Current CPU/SYSTEM/POWER FAN Speed (RPM) Displays...
...when this field will show "Yes", otherwise it will emit warning sound. 2-8 PC Health Status CMOS Setup Utility-Copyright (C) 1984-2009 Award Software PC Health Status Reset Case Open Status Case Opened Vcore DDR15V +3.3V +5V +12V Current CPU Temperature Current MCH Temperature...connected or fails. Current CPU/MCH Temperature Displays current CPU/North Bridge temperature. To clear the chassis intrusion status record, set Reset Case Open Status to Enabled, save the settings to the CPU temperature. Current CPU/SYSTEM/POWER FAN Speed (RPM) Displays...

Manual
Page 75
... the BIOS update file and press . Step 2: The process of Q-Flash, use the key during the POST to Drive Enter : Run hi:Move ESC:Reset F10:Power Off Total size : 0 Free size : 0 3. Select Floppy A and press . Update BIOS from the floppy disk is saved. Step 3:...file is updat- CoaodpyCMBIOOSS DcoemfapuletteEdn-aPbaless !! Q-Flash Utility v2.15 Flash Type/Size MXIC 25L1605A 1M Keep0 DfilMe(Is)DfaotuandEnable Floppy A Loa d CMO S Default Enable HDD 1-0 Upda te BIOS from Drive and press . • The Save Main BIOS to Drive option allows you to save...
... the BIOS update file and press . Step 2: The process of Q-Flash, use the key during the POST to Drive Enter : Run hi:Move ESC:Reset F10:Power Off Total size : 0 Free size : 0 3. Select Floppy A and press . Update BIOS from the floppy disk is saved. Step 3:...file is updat- CoaodpyCMBIOOSS DcoemfapuletteEdn-aPbaless !! Q-Flash Utility v2.15 Flash Type/Size MXIC 25L1605A 1M Keep0 DfilMe(Is)DfaotuandEnable Floppy A Loa d CMO S Default Enable HDD 1-0 Upda te BIOS from Drive and press . • The Save Main BIOS to Drive option allows you to save...

Manual
Page 134
...SPURIOUS_INT_HDLR & S/W interrupts to check out interface in physical address 1000:0 DualBIOS init (optional) Initial Superio_Early_Init switch 1. Reset keyboard Super I /O chips 2. Program basic chipset registers Detect memory - Enable keyboard interface 1. Check validity of...C5h 01h 02h 03h 05h 07h 08h 0Ah 0Eh 10h 12h 14h 16h 18h 1Bh 1Dh 23h Description Test CMOS R/W functionality Early chipset initialization: -Disable shadow RAM - Auto-detection of RTC value: e.g. Blank out ...
...SPURIOUS_INT_HDLR & S/W interrupts to check out interface in physical address 1000:0 DualBIOS init (optional) Initial Superio_Early_Init switch 1. Reset keyboard Super I /O chips 2. Program basic chipset registers Detect memory - Enable keyboard interface 1. Check validity of...C5h 01h 02h 03h 05h 07h 08h 0Ah 0Eh 10h 12h 14h 16h 18h 1Bh 1Dh 23h Description Test CMOS R/W functionality Early chipset initialization: -Disable shadow RAM - Auto-detection of RTC value: e.g. Blank out ...

Manual
Page 135
Search for Pentium class CPU 3. Disable respective clock resource to CMOS setup Example: onboard IDE controller 4. Initialize the APIC for a valid VGA device & VGA BIOS, and put it into consideration of processors (multi-processor...EISA slot 1. Initialize double-byte language font (optional) 2. Put information on screen display, including Award title, CPU type, CPU speed, full screen logo Reset keyboard if Early_Reset_KB is defined e.g. Display PnP logo 2. Early ISA PnP initialization - POST (hex) 24h 25h 26h 27h 29h 2Bh 2Dh 33h 35h 37h...
Search for Pentium class CPU 3. Disable respective clock resource to CMOS setup Example: onboard IDE controller 4. Initialize the APIC for a valid VGA device & VGA BIOS, and put it into consideration of processors (multi-processor...EISA slot 1. Initialize double-byte language font (optional) 2. Put information on screen display, including Award title, CPU type, CPU speed, full screen logo Reset keyboard if Early_Reset_KB is defined e.g. Display PnP logo 2. Early ISA PnP initialization - POST (hex) 24h 25h 26h 27h 29h 2Bh 2Dh 33h 35h 37h...
Manual
Page 136
not until this POST stage can users enter the CMOS setup utility Reset keyboard is Early_Reset_KB is not defined Initialize PS/2 Mouse Prepare memory size information for keys - Detect serial ports & parallel ports Detect & install co-processor Init... errors occur or F1 key is supported - Call chipset power management hook 2. Enable/Disable Parity Check according to enter Setup utility; Initialize Init_Onbaord_AUDIO Okay to CMOS setup 2. i.e. Assign resources to all PCI ROMs (except VGA) 1. Initialize floppy controller 2. Switch back to text mode if full screen logo is pressed to...
not until this POST stage can users enter the CMOS setup utility Reset keyboard is Early_Reset_KB is not defined Initialize PS/2 Mouse Prepare memory size information for keys - Detect serial ports & parallel ports Detect & install co-processor Init... errors occur or F1 key is supported - Call chipset power management hook 2. Enable/Disable Parity Check according to enter Setup utility; Initialize Init_Onbaord_AUDIO Okay to CMOS setup 2. i.e. Assign resources to all PCI ROMs (except VGA) 1. Initialize floppy controller 2. Switch back to text mode if full screen logo is pressed to...


