Manual
Page 3
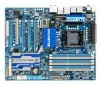
... specifications and features in this manual may be reproduced, copied, translated, transmitted, or published in the use GIGABYTE's unique features, read or download the information on/from the Support&Downloads\Motherboard\Technology Guide page on our ...GIGABYTE without GIGABYTE's prior written permission. For product-related information, check on our website at: http://www.gigabyte.com.tw Identifying Your Motherboard Revision The revision number on how to their respective owners. Example: For instructions on your motherboard revision before updating motherboard BIOS...
... specifications and features in this manual may be reproduced, copied, translated, transmitted, or published in the use GIGABYTE's unique features, read or download the information on/from the Support&Downloads\Motherboard\Technology Guide page on our ...GIGABYTE without GIGABYTE's prior written permission. For product-related information, check on our website at: http://www.gigabyte.com.tw Identifying Your Motherboard Revision The revision number on how to their respective owners. Example: For instructions on your motherboard revision before updating motherboard BIOS...
Manual
Page 5
...Xpress Recovery2 71 4-2 BIOS Update Utilities 74 4-2-1 Updating the BIOS with the Q-Flash Utility 74 4-2-2 Updating the BIOS with the @BIOS Utility 77 4-3 EasyTune ...6...78 4-4 Dynamic Energy SaverTM 2 79 4-5 Q-Share...81 4-6 Smart 6™...82 4-7 Auto Green...85 4-8 eXtreme Hard Drive (X.H.D 86 4-9 Teaming 87 Chapter 5 Appendix...89 5-1 Configuring SATA Hard Drive(s 89 5-1-1 Configuring Intel ICH10R SATA Controllers 89 5-1-2 Configuring JMicron JMB362/GIGABYTE...
...Xpress Recovery2 71 4-2 BIOS Update Utilities 74 4-2-1 Updating the BIOS with the Q-Flash Utility 74 4-2-2 Updating the BIOS with the @BIOS Utility 77 4-3 EasyTune ...6...78 4-4 Dynamic Energy SaverTM 2 79 4-5 Q-Share...81 4-6 Smart 6™...82 4-7 Auto Green...85 4-8 eXtreme Hard Drive (X.H.D 86 4-9 Teaming 87 Chapter 5 Appendix...89 5-1 Configuring SATA Hard Drive(s 89 5-1-1 Configuring Intel ICH10R SATA Controllers 89 5-1-2 Configuring JMicron JMB362/GIGABYTE...
Manual
Page 37
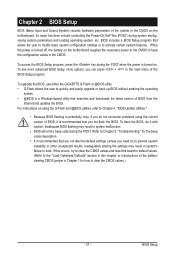
... the BIOS, use either the GIGABYTE Q-Flash or @BIOS utility. • Q-Flash allows the user to keep the configuration values in the CMOS. To flash the BIOS, do not encounter problems using the current version of BIOS, it with caution. Inadequate BIOS flashing may.... Chapter 2 BIOS Setup BIOS (Basic Input and Output System) records hardware parameters of BIOS from the Internet and updates the BIOS. BIOS includes a BIOS Setup program that allows the user to modify basic system configuration settings or to Chapter 4, "BIOS Update Utilities." • Because BIOS flashing is a...
... the BIOS, use either the GIGABYTE Q-Flash or @BIOS utility. • Q-Flash allows the user to keep the configuration values in the CMOS. To flash the BIOS, do not encounter problems using the current version of BIOS, it with caution. Inadequate BIOS flashing may.... Chapter 2 BIOS Setup BIOS (Basic Input and Output System) records hardware parameters of BIOS from the Internet and updates the BIOS. BIOS includes a BIOS Setup program that allows the user to modify basic system configuration settings or to Chapter 4, "BIOS Update Utilities." • Because BIOS flashing is a...
Manual
Page 63
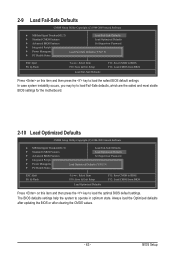
...& Exit Setup Load Fail-Safe Defaults F11: Save CMOS to BIOS F12: Load CMOS from BIOS Press on this item and then press the key to load the optimal BIOS default settings. BIOS Setup Always load the Optimized defaults after updating the BIOS or after clearing the CMOS values. - 63 - In case... system instability occurs, you may try to load Fail-Safe defaults, which are the safest and most stable BIOS settings for the motherboard....
...& Exit Setup Load Fail-Safe Defaults F11: Save CMOS to BIOS F12: Load CMOS from BIOS Press on this item and then press the key to load the optimal BIOS default settings. BIOS Setup Always load the Optimized defaults after updating the BIOS or after clearing the CMOS values. - 63 - In case... system instability occurs, you may try to load Fail-Safe defaults, which are the safest and most stable BIOS settings for the motherboard....
Manual
Page 70
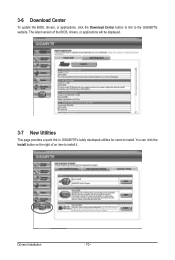
Drivers Installation - 70 - 3-6 Download Center To update the BIOS, drivers, or applications, click the Download Center button to link to install. The latest version of an item to install it. You can click the Install button on the right of the BIOS, drivers, or applications will be displayed. 3-7 New Utilities This page provides a quick link to GIGABYTE's lately developed utilities for users to the GIGABYTE website.
Drivers Installation - 70 - 3-6 Download Center To update the BIOS, drivers, or applications, click the Download Center button to link to install. The latest version of an item to install it. You can click the Install button on the right of the BIOS, drivers, or applications will be displayed. 3-7 New Utilities This page provides a quick link to GIGABYTE's lately developed utilities for users to the GIGABYTE website.
Manual
Page 74
... file and save the new BIOS file (e.g. X58A-UD5 E4c . . . . : BIOS Setup : XpressRecovery2 : Boot Menu : Qflash 12/08/2009-X58-ICH10-7A89QG0JC-00 Because BIOS flashing is corrupted or damaged, the backup BIOS will download the latest BIOS file from the hassles of system safety, users cannot update the backup BIOS manually. Award Modular BIOS v6.00PG, An Energy Star...
... file and save the new BIOS file (e.g. X58A-UD5 E4c . . . . : BIOS Setup : XpressRecovery2 : Boot Menu : Qflash 12/08/2009-X58-ICH10-7A89QG0JC-00 Because BIOS flashing is corrupted or damaged, the backup BIOS will download the latest BIOS file from the hassles of system safety, users cannot update the backup BIOS manually. Award Modular BIOS v6.00PG, An Energy Star...

Manual
Page 75
... MXIC 25L1605A 1M Keep DMI Data Enable !L! Unique Features Select the BIOS update file and press . Make sure the BIOS update file matches your motherboard model. appears, press to a floppy disk. ing the BIOS. Step 3: When the update process is saved to a hard drive in RAID/AHCI mode or ... Loa d CMO S Default Enable HDD 1-0 Upda te BIOS from the floppy disk is displayed on the screen. Update BIOS from Drive and press . • The Save Main BIOS to Drive option allows you to save the BIOS file to begin the BIOS update. B. Step 1: 1. In the main menu of the ...
... MXIC 25L1605A 1M Keep DMI Data Enable !L! Unique Features Select the BIOS update file and press . Make sure the BIOS update file matches your motherboard model. appears, press to a floppy disk. ing the BIOS. Step 3: When the update process is saved to a hard drive in RAID/AHCI mode or ... Loa d CMO S Default Enable HDD 1-0 Upda te BIOS from the floppy disk is displayed on the screen. Update BIOS from Drive and press . • The Save Main BIOS to Drive option allows you to save the BIOS file to begin the BIOS update. B. Step 1: 1. In the main menu of the ...
Manual
Page 76
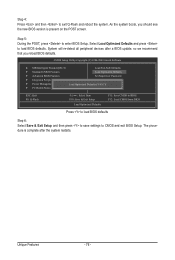
... CMOS and exit BIOS Setup. Step 5: During the POST, press to exit Q-Flash and reboot the system. The procedure is present on the POST screen. As the system boots, you should see the new BIOS version is complete after a BIOS update, so we recommend that you reload BIOS defaults. Unique Features... - 76 - Step 4: Press and then to enter BIOS Setup.
... CMOS and exit BIOS Setup. Step 5: During the POST, press to exit Q-Flash and reboot the system. The procedure is present on the POST screen. As the system boots, you should see the new BIOS version is complete after a BIOS update, so we recommend that you reload BIOS defaults. Unique Features... - 76 - Step 4: Press and then to enter BIOS Setup.
Manual
Page 77
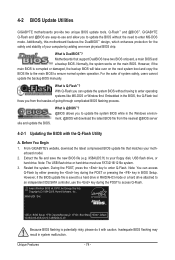
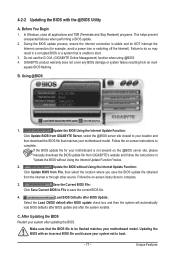
... load BIOS defaults after BIOS update and after updating the BIOS. Make sure that matches your motherboard model. Update the BIOS Using the Internet Update Function: Click Update BIOS from an inadequate BIOS flashing. During the BIOS update process, ensure the Internet connection is unable to be flashed matches your motherboard model. C. Do not use the G.O.M. (GIGABYTE Online Management) function when using @BIOS. 4. Using @BIOS 1. Before...
... load BIOS defaults after BIOS update and after updating the BIOS. Make sure that matches your motherboard model. Update the BIOS Using the Internet Update Function: Click Update BIOS from an inadequate BIOS flashing. During the BIOS update process, ensure the Internet connection is unable to be flashed matches your motherboard model. C. Do not use the G.O.M. (GIGABYTE Online Management) function when using @BIOS. 4. Using @BIOS 1. Before...
Manual
Page 80
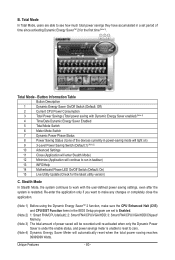
...close the application. (Note 1) Before using the Dynamic Energy SaverTM 2 function, make sure the CPU Enhanced Halt (C1E) and CPU EIST Function items in the BIOS Setup program are able to work with Dynamic Energy Saver enabled) (Note 4) 4 Time/Date Dynamic Energy Saver Enabled 5 Total Mode Switch 6 Meter Mode Switch 7... total power savings they have accumulated in taskbar) 13 INFO/Help 14 Motherboard Phase LED On/Off Switch (Default: On) 15 Live Utility Update (Check for the first time (Note 3). 11 12 13 3 2 4 65 7 1 8 14 10 15 9 Total Mode - Unique Features - 80...
...close the application. (Note 1) Before using the Dynamic Energy SaverTM 2 function, make sure the CPU Enhanced Halt (C1E) and CPU EIST Function items in the BIOS Setup program are able to work with Dynamic Energy Saver enabled) (Note 4) 4 Time/Date Dynamic Energy Saver Enabled 5 Total Mode Switch 6 Meter Mode Switch 7... total power savings they have accumulated in taskbar) 13 INFO/Help 14 Motherboard Phase LED On/Off Switch (Default: On) 15 Live Utility Update (Check for the first time (Note 3). 11 12 13 3 2 4 65 7 1 8 14 10 15 9 Total Mode - Unique Features - 80...
Manual
Page 131
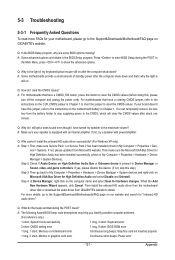
... on after the computer shuts down ? If not, try a speaker with an internal amplifier. eral > System). If not, please update it from GIGABYTE's website to the CMOS, which will clear the CMOS values after about one minute. Step 4: In Device Manager, right-click on ... computer problems. (For reference only.) 1 short: System boots successfully 1 long, 3 short: Keyboard error 2 short: CMOS setting error 1 long, 9 short: BIOS ROM error 1 long, 1 short: Memory or motherboard error Continuous long beeps: Graphics card not inserted properly 1 long, 2 short: Monitor or graphics card error ...
... on after the computer shuts down ? If not, try a speaker with an internal amplifier. eral > System). If not, please update it from GIGABYTE's website to the CMOS, which will clear the CMOS values after about one minute. Step 4: In Device Manager, right-click on ... computer problems. (For reference only.) 1 short: System boots successfully 1 long, 3 short: Keyboard error 2 short: CMOS setting error 1 long, 9 short: BIOS ROM error 1 long, 1 short: Memory or motherboard error Continuous long beeps: Graphics card not inserted properly 1 long, 2 short: Monitor or graphics card error ...
Manual
Page 137
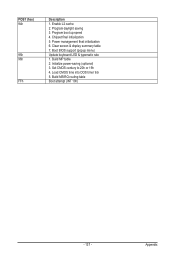
POST (hex) 94h 95h 96h FFh Description 1. Clear screen & display summary table 7. Set CMOS century to 20h or 19h 4. Enable L2 cache 2. Build MSIRQ routing table Boot attempt (INT 19h) - 137 - Boot BIOS support (popup menu) Update keyboard LED & typematic rate 1. Build MP table 2. Load CMOS time into DOS timer tick 5. Power management final initialization 6. Initialize power-saving (optional) 3. Chipset final initialization 5. Appendix Program boot up speed 4. Program daylight saving 3.
POST (hex) 94h 95h 96h FFh Description 1. Clear screen & display summary table 7. Set CMOS century to 20h or 19h 4. Enable L2 cache 2. Build MSIRQ routing table Boot attempt (INT 19h) - 137 - Boot BIOS support (popup menu) Update keyboard LED & typematic rate 1. Build MP table 2. Load CMOS time into DOS timer tick 5. Power management final initialization 6. Initialize power-saving (optional) 3. Chipset final initialization 5. Appendix Program boot up speed 4. Program daylight saving 3.


