
Manual
Page 5
2-14 Exit Without Saving 58 Chapter 3 Drivers Installation 59 3-1 Installing Chipset Drivers 59 3-2 SoftwareApplications 60 3-3 Driver CD Information 60 3-4 Hardware Information 61 3-5 Contact Us ...61 Chapter 4 Unique Features 63 4-1 Xpress ...Appendix ...75 5-1 Configuring SATA Hard Drive(s 75 5-1-1 Configuring Intel® ICH9R SATA Controllers 75 5-1-2 Making a SATA RAID/AHCI Driver Diskette 81 5-1-3 Installing the SATA RAID/AHCI Driver and Operating System 82 5-2 ConfiguringAudio Input and Output 87 5-2-1 Configuring 2/4/5.1/7.1-Channel Audio 87 5-2-2 Installing the S/PDIF In ...
2-14 Exit Without Saving 58 Chapter 3 Drivers Installation 59 3-1 Installing Chipset Drivers 59 3-2 SoftwareApplications 60 3-3 Driver CD Information 60 3-4 Hardware Information 61 3-5 Contact Us ...61 Chapter 4 Unique Features 63 4-1 Xpress ...Appendix ...75 5-1 Configuring SATA Hard Drive(s 75 5-1-1 Configuring Intel® ICH9R SATA Controllers 75 5-1-2 Making a SATA RAID/AHCI Driver Diskette 81 5-1-3 Installing the SATA RAID/AHCI Driver and Operating System 82 5-2 ConfiguringAudio Input and Output 87 5-2-1 Configuring 2/4/5.1/7.1-Channel Audio 87 5-2-2 Installing the S/PDIF In ...

Manual
Page 12
Increase FSB voltage by 0.05V to chipset limitation, Intel ICH9R RAID driver does not support Windows 2000 operating system. Adjust DDR2 frequency - GA-X38-DS4 Motherboard - 12 - Adjust PCI Express frequency from 100 MHz to : - Adjust CPU host frequency from 90 MHz to 150 MHz with 1 MHz increment Š Support ...
Increase FSB voltage by 0.05V to chipset limitation, Intel ICH9R RAID driver does not support Windows 2000 operating system. Adjust DDR2 frequency - GA-X38-DS4 Motherboard - 12 - Adjust PCI Express frequency from 100 MHz to : - Adjust CPU host frequency from 90 MHz to 150 MHz with 1 MHz increment Š Support ...
Manual
Page 43
...Queuing and hot plug. Disabled Disables RAID for the SATA controllers and configures the SATA controllers to PATA...Default) AHCI Configures the SATA controllers to AHCI mode. RAID Enables RAID for the SATA controllers. In Legacy mode the SATA ...Peripherals CMOS Setup Utility-Copyright (C) 1984-2007 Award Software Integrated Peripherals SATA RAID/AHCI Mode SATA Port0-3 Native Mode USB Controller USB 2.0 Controller USB ...F1: General Help F7: Optimized Defaults SATA RAID/AHCI Mode (Intel ICH9R Southbridge) Enables or disables RAID for the SATA controllers integrated in the Intel...
...Queuing and hot plug. Disabled Disables RAID for the SATA controllers and configures the SATA controllers to PATA...Default) AHCI Configures the SATA controllers to AHCI mode. RAID Enables RAID for the SATA controllers. In Legacy mode the SATA ...Peripherals CMOS Setup Utility-Copyright (C) 1984-2007 Award Software Integrated Peripherals SATA RAID/AHCI Mode SATA Port0-3 Native Mode USB Controller USB 2.0 Controller USB ...F1: General Help F7: Optimized Defaults SATA RAID/AHCI Mode (Intel ICH9R Southbridge) Enables or disables RAID for the SATA controllers integrated in the Intel...

Manual
Page 63
...® XP with Xpress Recovery cannot be restored using Xpress Recovery2. • USB hard drives are not supported. • Hard drives in RAID/AHCI mode are attached to leave enough unallocated space in the following sequence: The first PATA IDE connector, the second PATA IDE connector, the ... the first SATA connectors, the hard drive on the first SATA connector is recommended to back up your system soon after the operating system and drivers are installed. • The amount of system memory • VESA compatible graphics card • Windows® 2000 with SP3 or later; For ...
...® XP with Xpress Recovery cannot be restored using Xpress Recovery2. • USB hard drives are not supported. • Hard drives in RAID/AHCI mode are attached to leave enough unallocated space in the following sequence: The first PATA IDE connector, the second PATA IDE connector, the ... the first SATA connectors, the hard drive on the first SATA connector is recommended to back up your system soon after the operating system and drivers are installed. • The amount of system memory • VESA compatible graphics card • Windows® 2000 with SP3 or later; For ...
Manual
Page 75
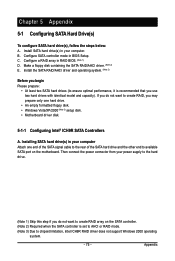
... • At least two SATA hard drives (to ensure optimal performance, it is set to AHCI or RAID mode. (Note 3) Due to chipset limitation, Intel ICH9R RAID driver does not support Windows 2000 operating system. - 75 - Installing SATA hard drive(s) in your computer Attach ...one hard drive. • An empty formatted floppy disk. • Windows Vista/XP/2000 (Note 3) setup disk. • Motherboard driver disk. 5-1-1 Configuring Intel&#...
... • At least two SATA hard drives (to ensure optimal performance, it is set to AHCI or RAID mode. (Note 3) Due to chipset limitation, Intel ICH9R RAID driver does not support Windows 2000 operating system. - 75 - Installing SATA hard drive(s) in your computer Attach ...one hard drive. • An empty formatted floppy disk. • Windows Vista/XP/2000 (Note 3) setup disk. • Motherboard driver disk. 5-1-1 Configuring Intel&#...

Manual
Page 79
...8GB Member Disk(0) [KL]-Select [ESC]-Exit Figure 7 [ENTER]-Select Menu To exit the ICH9R RAID BIOS utility, press or select Exit in the DISK/VOLUME INFORMATION section, including the RAID level, stripe block size, array name, and array capacity, etc. (Figure 7) Intel(R) Matrix ...Select When completed, you may proceed to begin creating the RAID array. All Rights Reversed. [ MAIN MENU ] 1. Finally press on the Create Volume item to create the SATA RAID/AHCI driver diskette and the installation of the SATA RAID/ACHI driver and operating system. - 79 - Intel(R) Matrix Storage ...
...8GB Member Disk(0) [KL]-Select [ESC]-Exit Figure 7 [ENTER]-Select Menu To exit the ICH9R RAID BIOS utility, press or select Exit in the DISK/VOLUME INFORMATION section, including the RAID level, stripe block size, array name, and array capacity, etc. (Figure 7) Intel(R) Matrix ...Select When completed, you may proceed to begin creating the RAID array. All Rights Reversed. [ MAIN MENU ] 1. Finally press on the Create Volume item to create the SATA RAID/AHCI driver diskette and the installation of the SATA RAID/ACHI driver and operating system. - 79 - Intel(R) Matrix Storage ...

Manual
Page 81
...81 - See the instructions below about how to install the SATA controller driver during the Windows setup process. Prepare a startup disk that is/are configured to RAID/AHCI mode, you need to copy the driver in Figure 2: For Intel ICH9R SATA controllers, select 7) Intel Matrix ...will then automatically zip and transfer this driver file to that in the BootDrv folder (Figure 3). Without the driver, the hard drive may not be recognized during the OS installation. 5-1-2 Making a SATA RAID/AHCI Driver Diskette (Required for AHCI and RAID Mode) To successfully install operating system...
...81 - See the instructions below about how to install the SATA controller driver during the Windows setup process. Prepare a startup disk that is/are configured to RAID/AHCI mode, you need to copy the driver in Figure 2: For Intel ICH9R SATA controllers, select 7) Intel Matrix ...will then automatically zip and transfer this driver file to that in the BootDrv folder (Figure 3). Without the driver, the hard drive may not be recognized during the OS installation. 5-1-2 Making a SATA RAID/AHCI Driver Diskette (Required for AHCI and RAID Mode) To successfully install operating system...
Manual
Page 82
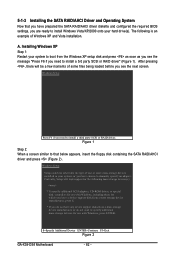
... in your system to install a 3rd party SCSI or RAID driver" (Figure 1). Windows Setup Setup could not determine the type of Windows XP and Vista installation. S=Specify Additional Device ENTER=Continue F3=Exit Figure 2 GA-X38-DS4 Motherboard - 82 - Windows Setup Press F6 if you ...have chosen to install a third party SCSI or RAID driver. A. Installing Windows XP Step 1: Restart your system, or you need to boot...
... in your system to install a 3rd party SCSI or RAID driver" (Figure 1). Windows Setup Setup could not determine the type of Windows XP and Vista installation. S=Specify Additional Device ENTER=Continue F3=Exit Figure 2 GA-X38-DS4 Motherboard - 82 - Windows Setup Press F6 if you ...have chosen to install a third party SCSI or RAID driver. A. Installing Windows XP Step 1: Restart your system, or you need to boot...

Manual
Page 83
... Setup Setup will be finished in about one or some file(s) cannot be found, please check the floppy disk or copy the correct SATA RAID/AHCI driver again from the floppy disk. S=Specify Additional Device ENTER=Continue F3=Exit Figure 4 - 83 - If you want to the previous screen....with Windows, press ENTER. Use the arrow keys to continue the driver installation from the motherboard driver disk. Appendix When the screen as shown below will appear. Step 3: When Setup correctly recognizes the Intel ICH9R SATA RAID/AHCI driver in the floppy disk, a controller menu similar to configure a ...
... Setup Setup will be finished in about one or some file(s) cannot be found, please check the floppy disk or copy the correct SATA RAID/AHCI driver again from the floppy disk. S=Specify Additional Device ENTER=Continue F3=Exit Figure 4 - 83 - If you want to the previous screen....with Windows, press ENTER. Use the arrow keys to continue the driver installation from the motherboard driver disk. Appendix When the screen as shown below will appear. Step 3: When Setup correctly recognizes the Intel ICH9R SATA RAID/AHCI driver in the floppy disk, a controller menu similar to configure a ...

Manual
Page 84
To quit Setup without installing Windows XP, press F3. To set up Windows XP now, press ENTER. Enter= Continue R=Repair F3=Exit Figure 5 GA-X38-DS4 Motherboard - 84 - WindowsXP Professional Setup Welcome to run on your computer. Step 4: After the SATA RAID/AHCI driver installation is completed, you can proceed with the Windows XP installation. This port of the Setup program prepares Microsoft(R) Windows (R) XP to Setup. To repair a Windows XP installation using Recovery Console, press R.
To quit Setup without installing Windows XP, press F3. To set up Windows XP now, press ENTER. Enter= Continue R=Repair F3=Exit Figure 5 GA-X38-DS4 Motherboard - 84 - WindowsXP Professional Setup Welcome to run on your computer. Step 4: After the SATA RAID/AHCI driver installation is completed, you can proceed with the Windows XP installation. This port of the Setup program prepares Microsoft(R) Windows (R) XP to Setup. To repair a Windows XP installation using Recovery Console, press R.

Manual
Page 85
When a screen similar to boot from the Windows Vista setup disk and perform standard OS installation steps. Figure 7 - 85 - Appendix Installing Windows Vista (The procedure below appears, select Load Driver. (Figure 6). Figure 6 Step 2: Specify the location where the driver is saved, such as your system to that below assumes that only one RAID array exists in your system.) Step 1: Restart your floppy disk (Figure 7). B.
When a screen similar to boot from the Windows Vista setup disk and perform standard OS installation steps. Figure 7 - 85 - Appendix Installing Windows Vista (The procedure below appears, select Load Driver. (Figure 6). Figure 6 Step 2: Specify the location where the driver is saved, such as your system to that below assumes that only one RAID array exists in your system.) Step 1: Restart your floppy disk (Figure 7). B.

Manual
Page 86
Step 3: When a screen as Intel(R) ICH9 SATA AHCI Controller when the SATA controllers are set to continue the OS installation (Figure 9). Figure 9 (Note) The item displayed in Figure 8 will be shown as shown in Figure 8 appears, select Intel(R) ICH8R/ICH9R SATA RAID Controller (Note) and press Next. GA-X38-DS4 Motherboard - 86 - Figure 8 Step 4: After the driver is loaded, select the RAID/AHCI drive(s) where you want to install the operating system and then press Next to AHCI mode.
Step 3: When a screen as Intel(R) ICH9 SATA AHCI Controller when the SATA controllers are set to continue the OS installation (Figure 9). Figure 9 (Note) The item displayed in Figure 8 will be shown as shown in Figure 8 appears, select Intel(R) ICH8R/ICH9R SATA RAID Controller (Note) and press Next. GA-X38-DS4 Motherboard - 86 - Figure 8 Step 4: After the driver is loaded, select the RAID/AHCI drive(s) where you want to install the operating system and then press Next to AHCI mode.


