
Manual
Page 5
... ReadyBoost 76 Chapter 5 Appendix ...77 5-1 Configuring SATA Hard Drive(s 77 5-1-1 Configuring Intel® ICH9R SATA Controllers 77 5-1-2 Configuring GIGABYTE SATA2 SATA Controller 83 5-1-3 Making a SATA RAID/AHCI Driver Diskette 89 5-1-4 Installing the SATA RAID/AHCI Driver and Operating System 90 5-2 Configuring Audio Input and Output 98 5-2-1 Configuring 2/4/5.1/7.1-Channel Audio 98 5-2-2 Installing the S/PDIF...
... ReadyBoost 76 Chapter 5 Appendix ...77 5-1 Configuring SATA Hard Drive(s 77 5-1-1 Configuring Intel® ICH9R SATA Controllers 77 5-1-2 Configuring GIGABYTE SATA2 SATA Controller 83 5-1-3 Making a SATA RAID/AHCI Driver Diskette 89 5-1-4 Installing the SATA RAID/AHCI Driver and Operating System 90 5-2 Configuring Audio Input and Output 98 5-2-1 Configuring 2/4/5.1/7.1-Channel Audio 98 5-2-2 Installing the S/PDIF...

Manual
Page 10
...system memory (Note 1) Š Dual channel memory architecture Š Support for DDR2 1066/800/667 MHz memory modules (Go to GIGABYTE's website for the latest memory support list.) Š Realtek ALC889A codec Š High Definition Audio Š 2/4/5.1/7.1-channel Š Support...to 1 floppy disk drive Š T.I. Support for SATA RAID 0, RAID 1, RAID 5 and RAID 10 Š GIGABYTE SATA2 chip: - 1 x IDE connector supporting ATA-133/100/66/33 and up to 2 IDE devices - 2 x SATA 3 Gb/s connectors (GSATAIIA, GSATAIIB) supporting up to the internal IEEE 1394 header) GA-X38-DQ6 Motherboard - 10 -
...system memory (Note 1) Š Dual channel memory architecture Š Support for DDR2 1066/800/667 MHz memory modules (Go to GIGABYTE's website for the latest memory support list.) Š Realtek ALC889A codec Š High Definition Audio Š 2/4/5.1/7.1-channel Š Support...to 1 floppy disk drive Š T.I. Support for SATA RAID 0, RAID 1, RAID 5 and RAID 10 Š GIGABYTE SATA2 chip: - 1 x IDE connector supporting ATA-133/100/66/33 and up to 2 IDE devices - 2 x SATA 3 Gb/s connectors (GSATAIIA, GSATAIIB) supporting up to the internal IEEE 1394 header) GA-X38-DQ6 Motherboard - 10 -
Manual
Page 12
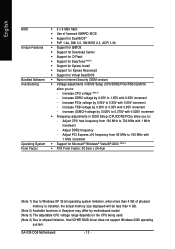
... model. (Note 3) The adjustable CPU voltage range depends on the CPU being used. (Note 4) Due to chipset limitation, Intel ICH9R RAID driver does not support Windows 2000 operating system. Increase FSB voltage by 0.05V to 700 MHz with 0.05V increment - Adjust PCI Express ...for Virtual Dual BIOS Š Norton Internet Security (OEM version) Š Voltage adjustments in BIOS Setup (CPU/DDR2/PCIe) allow you to : - GA-X38-DQ6 Motherboard - 12 - Adjust DDR2 frequency - Adjust CPU host frequency from 90 MHz to 150 MHz with 0.025V increment Š Frequency adjustments in BIOS...
... model. (Note 3) The adjustable CPU voltage range depends on the CPU being used. (Note 4) Due to chipset limitation, Intel ICH9R RAID driver does not support Windows 2000 operating system. Increase FSB voltage by 0.05V to 700 MHz with 0.05V increment - Adjust PCI Express ...for Virtual Dual BIOS Š Norton Internet Security (OEM version) Š Voltage adjustments in BIOS Setup (CPU/DDR2/PCIe) allow you to : - GA-X38-DQ6 Motherboard - 12 - Adjust DDR2 frequency - Adjust CPU host frequency from 90 MHz to 150 MHz with 0.025V increment Š Frequency adjustments in BIOS...

Manual
Page 27
...connector. Each SATA connector supports a single SATA device. The ICH9R controller supports RAID 0, RAID 1, RAID 5 and RAID 10. Hardware Installation Before attaching the IDE cable, locate the foolproof groove on configuring a RAID array. If more than two hard drives are compatible with SATA 1.5Gb/s standard...1 7 SATAII5 1 7 SATAII3 Please connect the L-shaped end of the SATA 3Gb/s cable to your SATA hard drive. • A RAID 0 or RAID 1 configuration requires at least four hard drives and the total number of hard drives does not have to be used, the total number of...
...connector. Each SATA connector supports a single SATA device. The ICH9R controller supports RAID 0, RAID 1, RAID 5 and RAID 10. Hardware Installation Before attaching the IDE cable, locate the foolproof groove on configuring a RAID array. If more than two hard drives are compatible with SATA 1.5Gb/s standard...1 7 SATAII5 1 7 SATAII3 Please connect the L-shaped end of the SATA 3Gb/s cable to your SATA hard drive. • A RAID 0 or RAID 1 configuration requires at least four hard drives and the total number of hard drives does not have to be used, the total number of...

Manual
Page 28
.../S5 Off GA-X38-DQ6 Motherboard - 28 - Refer to Chapter 5, "Configuring SATA Hard Drive(s)," for instructions on the chassis to connect a system power LED on configuring a RAID array. The LED is operating. Definition 1 MPD+ 2 MPD- 1 3 MPD- A RAID 0 or RAID 1 configuration requires... two hard drives. 12) PWR_LED (System Power LED Header) This header can be used to indicate system power status. The GIGABYTE SATA2 controller supports RAID 0 and RAID 1....
.../S5 Off GA-X38-DQ6 Motherboard - 28 - Refer to Chapter 5, "Configuring SATA Hard Drive(s)," for instructions on the chassis to connect a system power LED on configuring a RAID array. The LED is operating. Definition 1 MPD+ 2 MPD- 1 3 MPD- A RAID 0 or RAID 1 configuration requires... two hard drives. 12) PWR_LED (System Power LED Header) This header can be used to indicate system power status. The GIGABYTE SATA2 controller supports RAID 0 and RAID 1....

Manual
Page 45
... driver to AHCI mode. BIOS Setup English 2-5 Integrated Peripherals CMOS Setup Utility-Copyright (C) 1984-2007 Award Software Integrated Peripherals SATA RAID/AHCI Mode SATA Port0-3 Native Mode USB Controller USB 2.0 Controller USB Keyboard Support USB Mouse Support Legacy USB storage detect Azalia ...Value F10: Save F6: Fail-Safe Defaults ESC: Exit F1: General Help F7: Optimized Defaults SATA RAID/AHCI Mode (Intel ICH9R Southbridge) Enables or disables RAID for the SATA controllers integrated in the Intel ICH9R Southbridge or configures the SATA controllers to enable advanced ...
... driver to AHCI mode. BIOS Setup English 2-5 Integrated Peripherals CMOS Setup Utility-Copyright (C) 1984-2007 Award Software Integrated Peripherals SATA RAID/AHCI Mode SATA Port0-3 Native Mode USB Controller USB 2.0 Controller USB Keyboard Support USB Mouse Support Legacy USB storage detect Azalia ...Value F10: Save F6: Fail-Safe Defaults ESC: Exit F1: General Help F7: Optimized Defaults SATA RAID/AHCI Mode (Intel ICH9R Southbridge) Enables or disables RAID for the SATA controllers integrated in the Intel ICH9R Southbridge or configures the SATA controllers to enable advanced ...

Manual
Page 48
... Enabled) Onboard SATA/IDE Ctrl Mode (GIGABYTE SATA2 Chip) Enables or disables RAID for the SATA controller integrated in PATA mode) Onboard Serial Port 1 Enables or disables the first serial port and specifies its base I /O address and corresponding interrupt. GA-X38-DQ6 Motherboard - 48 - Parallel Port Mode ...Port), ECP+EPP. Options are: 378/IRQ7 (default), 278/IRQ5, 3BC/IRQ7, Disabled. RAID/IDE Enables RAID for the SATA controller. (The IDE controller still operates in the GIGABYTE SATA 2 chip or configures the SATA controller to enable advanced Serial ATA features such as ...
... Enabled) Onboard SATA/IDE Ctrl Mode (GIGABYTE SATA2 Chip) Enables or disables RAID for the SATA controller integrated in PATA mode) Onboard Serial Port 1 Enables or disables the first serial port and specifies its base I /O address and corresponding interrupt. GA-X38-DQ6 Motherboard - 48 - Parallel Port Mode ...Port), ECP+EPP. Options are: 378/IRQ7 (default), 278/IRQ5, 3BC/IRQ7, Disabled. RAID/IDE Enables RAID for the SATA controller. (The IDE controller still operates in the GIGABYTE SATA 2 chip or configures the SATA controller to enable advanced Serial ATA features such as ...

Manual
Page 65
... restore it . Windows® XP with Xpress Recovery cannot be restored using Xpress Recovery2. • USB hard drives are not supported. • Hard drives in RAID/AHCI mode are installed. • The amount of data and hard drive access speed may affect the speed at the end of the hard drive...
... restore it . Windows® XP with Xpress Recovery cannot be restored using Xpress Recovery2. • USB hard drives are not supported. • Hard drives in RAID/AHCI mode are installed. • The amount of data and hard drive access speed may affect the speed at the end of the hard drive...

Manual
Page 70
...You Begin: 1. During the POST, press the key to enter MSDOS mode. English 4-2 BIOS Update Utilities GIGABYTE motherboards provide two unique BIOS update tools, Q-FlashTM and @BIOS .TM GIGABYTE Q-Flash and @BIOS are easy-to-use and allow you to update the BIOS without having to your...RAID/AHCI mode or a hard drive attached to an independent IDE/SATA controller, use FAT32/16/12 file system. 3. What is saved to a hard drive in the Windows environment. @BIOS will download the latest BIOS file from the hassles of system safety, users cannot update the backup BIOS manually. GA-X38-DQ6...
...You Begin: 1. During the POST, press the key to enter MSDOS mode. English 4-2 BIOS Update Utilities GIGABYTE motherboards provide two unique BIOS update tools, Q-FlashTM and @BIOS .TM GIGABYTE Q-Flash and @BIOS are easy-to-use and allow you to update the BIOS without having to your...RAID/AHCI mode or a hard drive attached to an independent IDE/SATA controller, use FAT32/16/12 file system. 3. What is saved to a hard drive in the Windows environment. @BIOS will download the latest BIOS file from the hassles of system safety, users cannot update the backup BIOS manually. GA-X38-DQ6...
Manual
Page 71
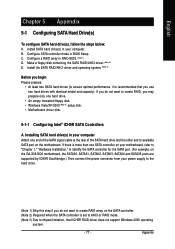
... Enable !! CopUypBdIaOteSBcIoOmSpflerotemd -DPriavses !! Unique Features Updating the BIOS When updating the BIOS, choose the location where the BIOS file is saved to a hard drive in RAID/AHCI mode or a hard drive attached to an independent IDE/SATA controller, use the up or down arrow key to select Update BIOS from Drive...
... Enable !! CopUypBdIaOteSBcIoOmSpflerotemd -DPriavses !! Unique Features Updating the BIOS When updating the BIOS, choose the location where the BIOS file is saved to a hard drive in RAID/AHCI mode or a hard drive attached to an independent IDE/SATA controller, use the up or down arrow key to select Update BIOS from Drive...
Manual
Page 77
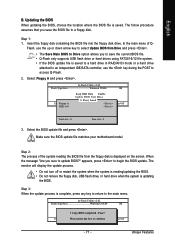
... SATA hard drives (to ensure optimal performance, it is set to AHCI or RAID mode. (Note 3) Due to create RAID, you may prepare only one SATA controller on your motherboard, refer to "Chapter 1," "Hardware Installation," to create RAID array on the GA-X38-DQ6 motherboard, the SATAII0, SATAII1, SATAII2, SATAII3, SATAII4 and SATAII5 ports are supported...
... SATA hard drives (to ensure optimal performance, it is set to AHCI or RAID mode. (Note 3) Due to create RAID, you may prepare only one SATA controller on your motherboard, refer to "Chapter 1," "Hardware Installation," to create RAID array on the GA-X38-DQ6 motherboard, the SATAII0, SATAII1, SATAII2, SATAII3, SATAII4 and SATAII5 ports are supported...

Manual
Page 78
... ` SMART LAN2 Onboard LAN1 Boot ROM Onboard LAN2 Boot ROM Onboard SATA/IDE Device Onboard SATA/IDE Ctrl Mode Onboard Serial Port 1 Onboard Parallel Port [RAID] [Disabled] [Enabled] [Enabled] [Disabled] [Disabled] [Enabled] [Auto] [Enabled] [Enabled] [Enabled] [Press Enter] [Press Enter] [Disabled] [Disabled] [Enabled] [IDE] [3F8/IRQ4] [378/...Setup. If you will see shall depend on your motherboard. The actual BIOS Setup menu options you do not want to create RAID, set SATA RAID/AHCI Mode under the Integrated Peripherals menu to Disabled or AHCI. GA-X38-DQ6 Motherboard - 78 -
... ` SMART LAN2 Onboard LAN1 Boot ROM Onboard LAN2 Boot ROM Onboard SATA/IDE Device Onboard SATA/IDE Ctrl Mode Onboard Serial Port 1 Onboard Parallel Port [RAID] [Disabled] [Enabled] [Enabled] [Disabled] [Disabled] [Enabled] [Auto] [Enabled] [Enabled] [Enabled] [Press Enter] [Press Enter] [Disabled] [Disabled] [Enabled] [IDE] [3F8/IRQ4] [378/...Setup. If you will see shall depend on your motherboard. The actual BIOS Setup menu options you do not want to create RAID, set SATA RAID/AHCI Mode under the Integrated Peripherals menu to Disabled or AHCI. GA-X38-DQ6 Motherboard - 78 -

Manual
Page 79
...Intel Corporation. Figure 2 Step 2: After you want to enter Configuration Utility" (Figure 2). Configuring a RAID array in MAIN MENU and press . RAID Volumes : None defined. Delete RAID Volume 3. Skip this step and proceed to the installation of Windows operating system for a message which ...says "Press to create a RAID array, select Create RAID Volume in RAID BIOS Enter the RAID BIOS setup utility to Non-RAID 4. Intel(R) Matrix Storage Manager option ROM v7.5.0.1017 ICH9R wRAID5 Copyright(C) 2003-07 ...
...Intel Corporation. Figure 2 Step 2: After you want to enter Configuration Utility" (Figure 2). Configuring a RAID array in MAIN MENU and press . RAID Volumes : None defined. Delete RAID Volume 3. Skip this step and proceed to the installation of Windows operating system for a message which ...says "Press to create a RAID array, select Create RAID Volume in RAID BIOS Enter the RAID BIOS setup utility to Non-RAID 4. Intel(R) Matrix Storage Manager option ROM v7.5.0.1017 ICH9R wRAID5 Copyright(C) 2003-07 ...

Manual
Page 80
... Capacity : Volume0 RAID0(Stripe) Select Disks 128KB 223.6 GB Create Volume [ HELP ] The following are four RAID levels supported: RAID 0, RAID 1, RAID 10 and RAID 5 (the selections available depend on the number of the hard drives being installed). English Step 3: After entering the... Choose the RAID level: RAID0: Stripes data (performance). RAID10: Mirrors data and stripes the mirror. RAID1: Mirrors data (redundancy). There are typical values: RAID0 - 128KB RAID10 - 64KB RAID5 - 64KB [K L ]-Change [TAB]-Next [ESC]-Previous Menu Figure 5 [ENTER]-Select GA-X38-DQ6 Motherboard - 80...
... Capacity : Volume0 RAID0(Stripe) Select Disks 128KB 223.6 GB Create Volume [ HELP ] The following are four RAID levels supported: RAID 0, RAID 1, RAID 10 and RAID 5 (the selections available depend on the number of the hard drives being installed). English Step 3: After entering the... Choose the RAID level: RAID0: Stripes data (performance). RAID10: Mirrors data and stripes the mirror. RAID1: Mirrors data (redundancy). There are typical values: RAID0 - 128KB RAID10 - 64KB RAID5 - 64KB [K L ]-Change [TAB]-Next [ESC]-Previous Menu Figure 5 [ENTER]-Select GA-X38-DQ6 Motherboard - 80...

Manual
Page 81
...]ED DISKS WILL BE LOST. Finally press on the Create Volume item to Non-RAID 4. Delete RAID Volume 3. Create RAID Volume 2. Now, you can see detailed information about the RAID array in MAIN MENU. Appendix Exit RAID Volumes : ID Name 0 Volume0 Physical Disks : Port Drive Model 0 ST3120026AS 1...Member Disk(0) [KL]-Select [ESC]-Exit Figure 7 [ENTER]-Select Menu To exit the ICH9R RAID BIOS utility, press or select Exit in the DISK/VOLUME INFORMATION section, including the RAID level, stripe block size, array name, and array capacity, etc. (Figure 7) Intel(R) ...
...]ED DISKS WILL BE LOST. Finally press on the Create Volume item to Non-RAID 4. Delete RAID Volume 3. Create RAID Volume 2. Now, you can see detailed information about the RAID array in MAIN MENU. Appendix Exit RAID Volumes : ID Name 0 Volume0 Physical Disks : Port Drive Model 0 ST3120026AS 1...Member Disk(0) [KL]-Select [ESC]-Exit Figure 7 [ENTER]-Select Menu To exit the ICH9R RAID BIOS utility, press or select Exit in the DISK/VOLUME INFORMATION section, including the RAID level, stripe block size, array name, and array capacity, etc. (Figure 7) Intel(R) ...

Manual
Page 82
...or down arrow key to select the array to abort. WARNING: ALL DISK DATA WILL BE DELETED. [K L ]-Select [ESC]-Previous Menu Figure 8 [DEL]-Delete Volume GA-X38-DQ6 Motherboard - 82 - All Rights Reversed. [ DELETE VOLUME MENU ] Name Volume0 Level RAID0(Stripe) Drives Capacity Status Bootable 2 223.6GB Normal Yes [ DELETE VOLUME ... DATA IN THE[VHOELLUPM] E WILL BE LOST! Are you sure you want to delete "Volume0"? (Y/N) : Deleting a volume will reset the disks to non-RAID. English Delete RAID Volume To delete a RAID array, select Delete RAID Volume in MAIN MENU and press .
...or down arrow key to select the array to abort. WARNING: ALL DISK DATA WILL BE DELETED. [K L ]-Select [ESC]-Previous Menu Figure 8 [DEL]-Delete Volume GA-X38-DQ6 Motherboard - 82 - All Rights Reversed. [ DELETE VOLUME MENU ] Name Volume0 Level RAID0(Stripe) Drives Capacity Status Bootable 2 223.6GB Normal Yes [ DELETE VOLUME ... DATA IN THE[VHOELLUPM] E WILL BE LOST! Are you sure you want to delete "Volume0"? (Y/N) : Deleting a volume will reset the disks to non-RAID. English Delete RAID Volume To delete a RAID array, select Delete RAID Volume in MAIN MENU and press .

Manual
Page 83
... ESC: Exit F1: General Help F7: Optimized Defaults Figure 1 Step 2: Save changes and exit BIOS Setup. Appendix B. English 5-1-2 Configuring GIGABYTE SATA2 SATA Controller A. The BIOS Setup menus described in this item to RAID/IDE (Figure 1). Configuring SATA controller mode and device boot order in BIOS Setup Make sure to configure the SATA...
... ESC: Exit F1: General Help F7: Optimized Defaults Figure 1 Step 2: Save changes and exit BIOS Setup. Appendix B. English 5-1-2 Configuring GIGABYTE SATA2 SATA Controller A. The BIOS Setup menus described in this item to RAID/IDE (Figure 1). Configuring SATA controller mode and device boot order in BIOS Setup Make sure to configure the SATA...

Manual
Page 84
... operating system boot begins, look for a non-RAID configuration. Press + to enter RAID Setup Utility" (Figure 2). PCIE-to enter RAID Setup Utility ... GA-X38-DQ6 Motherboard - 84 - http://www.gigabyte.com.tw HDD0 : HDD1 : ST3120026AS ST3120026AS 120 GB Non-RAID 120 GB Non-RAID ODD0 : DVDROM GO-D1600B Press to -SATAII/IDE RAID Controller BIOSv1.06.59 Copyright (C) 2006-2007...
... operating system boot begins, look for a non-RAID configuration. Press + to enter RAID Setup Utility" (Figure 2). PCIE-to enter RAID Setup Utility ... GA-X38-DQ6 Motherboard - 84 - http://www.gigabyte.com.tw HDD0 : HDD1 : ST3120026AS ST3120026AS 120 GB Non-RAID 120 GB Non-RAID ODD0 : DVDROM GO-D1600B Press to -SATAII/IDE RAID Controller BIOSv1.06.59 Copyright (C) 2006-2007...

Manual
Page 85
...cannot be set for huge temporarily disk required [KL]-Switch RAID Level [ENTER]-Next Figure 5 - 85 - [ESC]-Abort Appendix Data striped for performance Data mirrored for redundancy Data concatenated for creating an array (Figure 5). GIGABYTE Technology Corp. Steps: 1. PCIE-to move onto the ...next step. PCIE-to-SATAII/IDE RAID Controller BIOSv1.06.59 [ Create New RAID ] [ Hard Disk Drive List ] Name: Level: Disks: Block: Size...
...cannot be set for huge temporarily disk required [KL]-Switch RAID Level [ENTER]-Next Figure 5 - 85 - [ESC]-Abort Appendix Data striped for performance Data mirrored for redundancy Data concatenated for creating an array (Figure 5). GIGABYTE Technology Corp. Steps: 1. PCIE-to move onto the ...next step. PCIE-to-SATAII/IDE RAID Controller BIOSv1.06.59 [ Create New RAID ] [ Hard Disk Drive List ] Name: Level: Disks: Block: Size...
Manual
Page 86
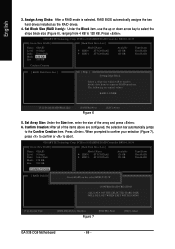
...DISK WILL BE LOST WHEN EXIT WITH SAVING [KL]-Switch Unit [DEL,BS]-Delete Number Figure 7 [ENTER]-Next [ESC]-Abort GA-X38-DQ6 Motherboard - 86 - Set Block Size (RAID 0 only): Under the Block item, use the up or down arrow key to select the stripe block size (Figure 6), ...ENTER]-Next Figure 6 [ESC]-Abort 5. The following are configured, the selection bar automatically jumps to 128 KB. GIGABYTE Technology Corp. Press . PCIE-to-SATAII/IDE RAID Controller BIOSv1.06.59 [ Create New RAID ] [ Hard Disk Drive List ] Name: Level: Disks: Block: Size: GRAID 0-Stripe Select Disk 128 ...
...DISK WILL BE LOST WHEN EXIT WITH SAVING [KL]-Switch Unit [DEL,BS]-Delete Number Figure 7 [ENTER]-Next [ESC]-Abort GA-X38-DQ6 Motherboard - 86 - Set Block Size (RAID 0 only): Under the Block item, use the up or down arrow key to select the stripe block size (Figure 6), ...ENTER]-Next Figure 6 [ESC]-Abort 5. The following are configured, the selection bar automatically jumps to 128 KB. GIGABYTE Technology Corp. Press . PCIE-to-SATAII/IDE RAID Controller BIOSv1.06.59 [ Create New RAID ] [ Hard Disk Drive List ] Name: Level: Disks: Block: Size: GRAID 0-Stripe Select Disk 128 ...


