
Manual
Page 5
2-14 Exit Without Saving 60 Chapter 3 Drivers Installation 61 3-1 Installing Chipset Drivers 61 3-2 SoftwareApplications 62 3-3 Driver CD Information 62 3-4 Hardware Information 63 3-5 Contact Us ...63 Chapter 4 Unique Features 65 4-1 ... Configuring SATA Hard Drive(s 77 5-1-1 Configuring Intel® ICH9R SATA Controllers 77 5-1-2 Configuring GIGABYTE SATA2 SATA Controller 83 5-1-3 Making a SATA RAID/AHCI Driver Diskette 89 5-1-4 Installing the SATA RAID/AHCI Driver and Operating System 90 5-2 Configuring Audio Input and Output 98 5-2-1 Configuring 2/4/5.1/7.1-Channel Audio 98...
2-14 Exit Without Saving 60 Chapter 3 Drivers Installation 61 3-1 Installing Chipset Drivers 61 3-2 SoftwareApplications 62 3-3 Driver CD Information 62 3-4 Hardware Information 63 3-5 Contact Us ...63 Chapter 4 Unique Features 65 4-1 ... Configuring SATA Hard Drive(s 77 5-1-1 Configuring Intel® ICH9R SATA Controllers 77 5-1-2 Configuring GIGABYTE SATA2 SATA Controller 83 5-1-3 Making a SATA RAID/AHCI Driver Diskette 89 5-1-4 Installing the SATA RAID/AHCI Driver and Operating System 90 5-2 Configuring Audio Input and Output 98 5-2-1 Configuring 2/4/5.1/7.1-Channel Audio 98...
Manual
Page 12
...55V with 1 MHz increment - Adjust DDR2 frequency - Adjust PCI Express x16 frequency from 100 MHz to 700 MHz with 0.05V increment - GA-X38-DQ6 Motherboard - 12 - Adjust CPU host frequency from 90 MHz to 150 MHz with 0.05V increment - English BIOS Unique Features Bundled Software ... motherboard model. (Note 3) The adjustable CPU voltage range depends on the CPU being used. (Note 4) Due to chipset limitation, Intel ICH9R RAID driver does not support Windows 2000 operating system. Increase CPU voltage (Note 3) - Increase PCIe voltage by 0.025V to 0.375V with 0.025V increment...
...55V with 1 MHz increment - Adjust DDR2 frequency - Adjust PCI Express x16 frequency from 100 MHz to 700 MHz with 0.05V increment - GA-X38-DQ6 Motherboard - 12 - Adjust CPU host frequency from 90 MHz to 150 MHz with 0.05V increment - English BIOS Unique Features Bundled Software ... motherboard model. (Note 3) The adjustable CPU voltage range depends on the CPU being used. (Note 4) Due to chipset limitation, Intel ICH9R RAID driver does not support Windows 2000 operating system. Increase CPU voltage (Note 3) - Increase PCIe voltage by 0.025V to 0.375V with 0.025V increment...

Manual
Page 45
... is an interface specification that allows the storage driver to AHCI mode. RAID Enables RAID for the SATA controllers integrated in the Intel ICH9R Southbridge or configures the SATA controllers to AHCI mode. Disabled Disables RAID for the SATA controllers and configures the SATA controllers... Command Queuing and hot plug. English 2-5 Integrated Peripherals CMOS Setup Utility-Copyright (C) 1984-2007 Award Software Integrated Peripherals SATA RAID/AHCI Mode SATA Port0-3 Native Mode USB Controller USB 2.0 Controller USB Keyboard Support USB Mouse Support Legacy USB storage detect ...
... is an interface specification that allows the storage driver to AHCI mode. RAID Enables RAID for the SATA controllers integrated in the Intel ICH9R Southbridge or configures the SATA controllers to AHCI mode. Disabled Disables RAID for the SATA controllers and configures the SATA controllers... Command Queuing and hot plug. English 2-5 Integrated Peripherals CMOS Setup Utility-Copyright (C) 1984-2007 Award Software Integrated Peripherals SATA RAID/AHCI Mode SATA Port0-3 Native Mode USB Controller USB 2.0 Controller USB Keyboard Support USB Mouse Support Legacy USB storage detect ...

Manual
Page 48
...GA-X38-DQ6 Motherboard - 48 - Options are: 378/IRQ7 (default), 278/IRQ5, 3BC/IRQ7, Disabled. Advanced Host Controller Interface (AHCI) is an interface specification that allows the storage driver to AHCI mode. Onboard Parallel Port Enables or disables the onboard parallel port (LPT) and specifies its base I /O address and corresponding interrupt. IDE Disables RAID... in the GIGABYTE SATA 2 chip. (Default: Enabled) Onboard SATA/IDE Ctrl Mode (GIGABYTE SATA2 Chip) Enables or disables RAID for the SATA controller. (The IDE controller still operates in the GIGABYTE SATA 2 ...
...GA-X38-DQ6 Motherboard - 48 - Options are: 378/IRQ7 (default), 278/IRQ5, 3BC/IRQ7, Disabled. Advanced Host Controller Interface (AHCI) is an interface specification that allows the storage driver to AHCI mode. Onboard Parallel Port Enables or disables the onboard parallel port (LPT) and specifies its base I /O address and corresponding interrupt. IDE Disables RAID... in the GIGABYTE SATA 2 chip. (Default: Enabled) Onboard SATA/IDE Ctrl Mode (GIGABYTE SATA2 Chip) Enables or disables RAID for the SATA controller. (The IDE controller still operates in the GIGABYTE SATA 2 ...

Manual
Page 65
... • Intel® x86 platform • At least 64 MB of it . Unique Features "*" Xpress Recovery2 checks the first physical hard drive in RAID/AHCI mode are different utilities. Before You Begin: • Xpress Recovery2 will save the backup file at which the data is the first physical drive... back up/restore the first physical hard drive that allows you to quickly compress and back up your system soon after the operating system and drivers are not supported. • Hard drives in the following sequence: The first PATA IDE connector, the second PATA IDE connector, the first ...
... • Intel® x86 platform • At least 64 MB of it . Unique Features "*" Xpress Recovery2 checks the first physical hard drive in RAID/AHCI mode are different utilities. Before You Begin: • Xpress Recovery2 will save the backup file at which the data is the first physical drive... back up/restore the first physical hard drive that allows you to quickly compress and back up your system soon after the operating system and drivers are not supported. • Hard drives in the following sequence: The first PATA IDE connector, the second PATA IDE connector, the first ...
Manual
Page 77
...Please prepare: • At least two SATA hard drives (to ensure optimal performance, it is set to AHCI or RAID mode. (Note 3) Due to available SATA port on the GA-X38-DQ6 motherboard, the SATAII0, SATAII1, SATAII2, SATAII3, SATAII4 and SATAII5 ports are supported by ICH9R Southbridge.) Then connect the power.... (Note 2) Required when the SATA controller is recommended that you use two hard drives with identical model and capacity). Install the SATA RAID/AHCI driver and operating system. (Note 2) Before you may prepare only one end of the SATA signal cable to the rear of the SATA hard...
...Please prepare: • At least two SATA hard drives (to ensure optimal performance, it is set to AHCI or RAID mode. (Note 3) Due to available SATA port on the GA-X38-DQ6 motherboard, the SATAII0, SATAII1, SATAII2, SATAII3, SATAII4 and SATAII5 ports are supported by ICH9R Southbridge.) Then connect the power.... (Note 2) Required when the SATA controller is recommended that you use two hard drives with identical model and capacity). Install the SATA RAID/AHCI driver and operating system. (Note 2) Before you may prepare only one end of the SATA signal cable to the rear of the SATA hard...

Manual
Page 81
... Copyright(C) 2003-07 Intel Corporation. Are you sure you may proceed to cancel (Figure 6). All Rights Reversed. [ CREATE VOLUME MENU ] Name : RAID Level : Disks : Strip Size : Capacity : RAID_Volume0 RAID0(Stripe) Select Disks 128KB 223.6 GB Create Volume WARNING : ALL DATA ON[SHEELLEPCT]ED... WILL BE LOST. Finally press on the Create Volume item to Non-RAID 4. Delete RAID Volume 3. Appendix Now, you want to create this volume, press to confirm or to create the SATA RAID/AHCI driver diskette and the installation of the SATA RAID/ACHI driver and operating system. - 81 -
... Copyright(C) 2003-07 Intel Corporation. Are you sure you may proceed to cancel (Figure 6). All Rights Reversed. [ CREATE VOLUME MENU ] Name : RAID Level : Disks : Strip Size : Capacity : RAID_Volume0 RAID0(Stripe) Select Disks 128KB 223.6 GB Create Volume WARNING : ALL DATA ON[SHEELLEPCT]ED... WILL BE LOST. Finally press on the Create Volume item to Non-RAID 4. Delete RAID Volume 3. Appendix Now, you want to create this volume, press to confirm or to create the SATA RAID/AHCI driver diskette and the installation of the SATA RAID/ACHI driver and operating system. - 81 -

Manual
Page 88
...KL]-Select RAID GA-X38-DQ6 Motherboard [SPACE]-Mark Delete [DEL]-Confirm Figure 11 - 88 - [ESC]-Abort English 7. GIGABYTE Technology Corp. PCIE-to-SATAII/IDE RAID Controller BIOSv1.06.59 [ Main Menu ] [ Hard Disk Drive List ] Create RAID Disk Drive Delete RAID Disk Drive Revert HDD to Non-RAID Solve Mirror... the RAID Disk Drive List block. The selection bar will appear to confirm your settings before exiting the RAID BIOS utility, then press (Figure 10). a small triangle will move to create the SATA RAID/AHCI driver diskette and the installation of the SATA RAID/AHCI driver and...
...KL]-Select RAID GA-X38-DQ6 Motherboard [SPACE]-Mark Delete [DEL]-Confirm Figure 11 - 88 - [ESC]-Abort English 7. GIGABYTE Technology Corp. PCIE-to-SATAII/IDE RAID Controller BIOSv1.06.59 [ Main Menu ] [ Hard Disk Drive List ] Create RAID Disk Drive Delete RAID Disk Drive Revert HDD to Non-RAID Solve Mirror... the RAID Disk Drive List block. The selection bar will appear to confirm your settings before exiting the RAID BIOS utility, then press (Figure 10). a small triangle will move to create the SATA RAID/AHCI driver diskette and the installation of the SATA RAID/AHCI driver and...

Manual
Page 89
... Windows 32-bit operating system or 8) Intel Matrix Storage Manager 64 bit for Windows 64-bit. • For GIGABYTE SATA2 SATA controller, select E) GIGABYTE SATA-RAID Driver 32Bit for Windows 32-bit operating system or F) GIGABYTE SATA-RAID Driver 64Bit for Windows 64-bit. Press to your system. See the instructions below about how to a floppy disk...
... Windows 32-bit operating system or 8) Intel Matrix Storage Manager 64 bit for Windows 64-bit. • For GIGABYTE SATA2 SATA controller, select E) GIGABYTE SATA-RAID Driver 32Bit for Windows 32-bit operating system or F) GIGABYTE SATA-RAID Driver 64Bit for Windows 64-bit. Press to your system. See the instructions below about how to a floppy disk...

Manual
Page 90
...Press F6 if you need to install a 3rd party SCSI or RAID driver" (Figure 1). English 5-1-4 Installing the SATA RAID/AHCI Driver and Operating System Now that below appears, insert the floppy disk containing the SATA RAID/AHCI driver and press (Figure 2). Windows Setup Setup could not determine the ... controllers for use with Windows, including those for use with Windows, press ENTER. S=Specify Additional Device ENTER=Continue F3=Exit Figure 2 GA-X38-DQ6 Motherboard - 90 - Windows Setup Press F6 if you are ready to install Windows Vista/XP/2000 onto your system to boot from ...
...Press F6 if you need to install a 3rd party SCSI or RAID driver" (Figure 1). English 5-1-4 Installing the SATA RAID/AHCI Driver and Operating System Now that below appears, insert the floppy disk containing the SATA RAID/AHCI driver and press (Figure 2). Windows Setup Setup could not determine the ... controllers for use with Windows, including those for use with Windows, press ENTER. S=Specify Additional Device ENTER=Continue F3=Exit Figure 2 GA-X38-DQ6 Motherboard - 90 - Windows Setup Press F6 if you are ready to install Windows Vista/XP/2000 onto your system to boot from ...

Manual
Page 91
... a controller menu similar to Figure 3 below appears, press to continue the driver installation from the floppy disk. If you set the SATA RAID/AHCI Mode item in BIOS Setup to RAID mode, select Intel(R) ICH8R/ICH9R SATA RAID Controller. (Select ICH9 SATA AHCI Controller (Desktop ICH9R) for AHCI mode.) ...press ESC to return to the previous screen. Windows Setup Setup will be found, please check the floppy disk or copy the correct SATA RAID/AHCI driver again from a mass storage device manufacturer, or do not have chosen to configure a SCSI Adapter for use with Windows, using a device ...
... a controller menu similar to Figure 3 below appears, press to continue the driver installation from the floppy disk. If you set the SATA RAID/AHCI Mode item in BIOS Setup to RAID mode, select Intel(R) ICH8R/ICH9R SATA RAID Controller. (Select ICH9 SATA AHCI Controller (Desktop ICH9R) for AHCI mode.) ...press ESC to return to the previous screen. Windows Setup Setup will be found, please check the floppy disk or copy the correct SATA RAID/AHCI driver again from a mass storage device manufacturer, or do not have chosen to configure a SCSI Adapter for use with Windows, using a device ...

Manual
Page 92
...support disks from a mass storage device manufacturer, or do not want from the following mass storage device(s): GIGABYTE GBB363 RAID Controller (Windows 2K/XP/2003) * To specify additional SCSI adapters, CD-ROM drives, or special disk.... English Step 3: For GIGABYTE SATA2 SATA controller: When Setup correctly recognizes the GIGABYTE SATA2 SATA RAID/AHCI driver in the floppy disk, a controller menu similar to Figure 5 below appears, press to continue the driver installation from the floppy disk.... S=Specify Additional Device ENTER=Continue F3=Exit Figure 6 GA-X38-DQ6 Motherboard - 92 -
...support disks from a mass storage device manufacturer, or do not want from the following mass storage device(s): GIGABYTE GBB363 RAID Controller (Windows 2K/XP/2003) * To specify additional SCSI adapters, CD-ROM drives, or special disk.... English Step 3: For GIGABYTE SATA2 SATA controller: When Setup correctly recognizes the GIGABYTE SATA2 SATA RAID/AHCI driver in the floppy disk, a controller menu similar to Figure 5 below appears, press to continue the driver installation from the floppy disk.... S=Specify Additional Device ENTER=Continue F3=Exit Figure 6 GA-X38-DQ6 Motherboard - 92 -

Manual
Page 93
Enter= Continue R=Repair F3=Exit Figure 7 - 93 - To quit Setup without installing Windows XP, press F3. WindowsXP Professional Setup Welcome to run on your computer. To repair a Windows XP installation using Recovery Console, press R. English Step 4: After the SATA RAID/AHCI driver installation is completed, you can proceed with the Windows XP installation. To set up Windows XP now, press ENTER. Appendix This port of the Setup program prepares Microsoft(R) Windows (R) XP to Setup.
Enter= Continue R=Repair F3=Exit Figure 7 - 93 - To quit Setup without installing Windows XP, press F3. WindowsXP Professional Setup Welcome to run on your computer. To repair a Windows XP installation using Recovery Console, press R. English Step 4: After the SATA RAID/AHCI driver installation is completed, you can proceed with the Windows XP installation. To set up Windows XP now, press ENTER. Appendix This port of the Setup program prepares Microsoft(R) Windows (R) XP to Setup.
Manual
Page 94
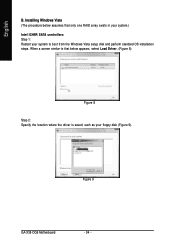
Figure 8 Step 2: Specify the location where the driver is saved, such as your system to that only one RAID array exists in your system.) Intel ICH9R SATA controllers: Step 1: Restart your floppy disk (Figure 9). Figure 9 GA-X38-DQ6 Motherboard - 94 - English B. Installing Windows Vista (The procedure below assumes that below appears, select Load Driver. (Figure 8). When a screen similar to boot from the Windows Vista setup disk and perform standard OS installation steps.
Figure 8 Step 2: Specify the location where the driver is saved, such as your system to that only one RAID array exists in your system.) Intel ICH9R SATA controllers: Step 1: Restart your floppy disk (Figure 9). Figure 9 GA-X38-DQ6 Motherboard - 94 - English B. Installing Windows Vista (The procedure below assumes that below appears, select Load Driver. (Figure 8). When a screen similar to boot from the Windows Vista setup disk and perform standard OS installation steps.

Manual
Page 95
Figure 10 Step 4: After the driver is loaded, select the RAID/AHCI drive(s) where you want to install the operating system and then press Next to AHCI mode. - 95 - English Step 3: When a screen as shown in Figure 10 will be shown as Intel(R) ICH9 SATA AHCI Controller when the SATA controllers are set to continue the OS installation (Figure 11). Figure 11 (Note) The item displayed in Figure 10 appears, select Intel(R) ICH8R/ICH9R SATA RAID Controller (Note) and press Next. Appendix
Figure 10 Step 4: After the driver is loaded, select the RAID/AHCI drive(s) where you want to install the operating system and then press Next to AHCI mode. - 95 - English Step 3: When a screen as shown in Figure 10 will be shown as Intel(R) ICH9 SATA AHCI Controller when the SATA controllers are set to continue the OS installation (Figure 11). Figure 11 (Note) The item displayed in Figure 10 appears, select Intel(R) ICH8R/ICH9R SATA RAID Controller (Note) and press Next. Appendix

Manual
Page 96
English GIGABYTE SATA2 controllers: Step 1: Restart your floppy disk (Figure 13). When a screen similar to boot from the Windows Vista setup disk and perform standard OS installation steps. Figure 12 Step 2: Specify the location where the driver is saved, such as your system to that below appears (RAID/AHCI hard drive(s) will not be detected at this stage), select Load Driver. (Figure 12). Figure 13 GA-X38-DQ6 Motherboard - 96 -
English GIGABYTE SATA2 controllers: Step 1: Restart your floppy disk (Figure 13). When a screen similar to boot from the Windows Vista setup disk and perform standard OS installation steps. Figure 12 Step 2: Specify the location where the driver is saved, such as your system to that below appears (RAID/AHCI hard drive(s) will not be detected at this stage), select Load Driver. (Figure 12). Figure 13 GA-X38-DQ6 Motherboard - 96 -

Manual
Page 97
Figure 14 Step 4: After the driver is loaded, select the RAID/AHCI drive(s) where you want to install the operating system and then press Next to continue the OS installation (Figure 15). Figure 15 - 97 - Appendix English Step 3: When a screen as shown in Figure 14 appears, select GIGABYTE GBB36X Controller and press Next.
Figure 14 Step 4: After the driver is loaded, select the RAID/AHCI drive(s) where you want to install the operating system and then press Next to continue the OS installation (Figure 15). Figure 15 - 97 - Appendix English Step 3: When a screen as shown in Figure 14 appears, select GIGABYTE GBB36X Controller and press Next.


