
Manual
Page 11
... fan header w 2 x system fan headers w 1 x power fan header w 1 x front panel header w 1 x front panel audio header w 1 x S/PDIF Out header w 3 x USB 2.0/1.1 headers w 1 x USB 3.0/2.0 header w 1 x serial port header w 1 x clearing CMOS jumper Back Panel w 1 x PS/2 keyboard/mouse port Connectors w 1 x coaxial S/PDIF Out connector w 1 x optical S/PDIF Out connector w 8 x USB 2.0/1.1 ports w 2 x USB 3.0/2.0 ports w 2 x eSATA 6Gb/s ports w 1 x RJ-45...
... fan header w 2 x system fan headers w 1 x power fan header w 1 x front panel header w 1 x front panel audio header w 1 x S/PDIF Out header w 3 x USB 2.0/1.1 headers w 1 x USB 3.0/2.0 header w 1 x serial port header w 1 x clearing CMOS jumper Back Panel w 1 x PS/2 keyboard/mouse port Connectors w 1 x coaxial S/PDIF Out connector w 1 x optical S/PDIF Out connector w 8 x USB 2.0/1.1 ports w 2 x USB 3.0/2.0 ports w 2 x eSATA 6Gb/s ports w 1 x RJ-45...

Manual
Page 24
...the headers. 6) BAT (Battery) The battery provides power to keep the values (such as BIOS configurations, date, and time information) in the CMOS when the computer is the ground wire). Plug in accordance with fan speed control design. You may hang. • These fan headers are ...not able to the CPU or the system may clear the CMOS values by yourself or uncertain about the bat- tery model. • When installing the battery, note the orientation of the positive side ...
...the headers. 6) BAT (Battery) The battery provides power to keep the values (such as BIOS configurations, date, and time information) in the CMOS when the computer is the ground wire). Plug in accordance with fan speed control design. You may hang. • These fan headers are ...not able to the CPU or the system may clear the CMOS values by yourself or uncertain about the bat- tery model. • When installing the battery, note the orientation of the positive side ...
Manual
Page 29
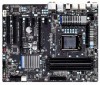
...- 9 NRI- 10 No Pin 15) CLR_CMOS (Clearing CMOS Jumper) Use this jumper to Chapter 2, "BIOS Setup," for a few seconds. To clear the CMOS values, place a jumper cap on your computer, be sure to remove the jumper cap from the power outlet before clearing the CMOS values. • After clearing the CMOS values and before turning on the two...
...- 9 NRI- 10 No Pin 15) CLR_CMOS (Clearing CMOS Jumper) Use this jumper to Chapter 2, "BIOS Setup," for a few seconds. To clear the CMOS values, place a jumper cap on your computer, be sure to remove the jumper cap from the power outlet before clearing the CMOS values. • After clearing the CMOS values and before turning on the two...

Manual
Page 31
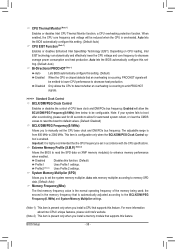
... settings or to prevent system instability or other unexpected results. To upgrade the BIOS, use either the GIGABYTE Q-Flash or @BIOS utility. • Q-Flash allows the user to clear the CMOS values.) - 31 - Chapter 2 BIOS Setup BIOS (Basic Input and Output System) records hardware parameters...to activate certain system features. If this occurs, try to clear the CMOS values and reset the board to default values. (Refer to the "Load Optimized Defaults" section in this chapter or introductions of the battery/ clearing CMOS jumper in system malfunction. • BIOS will emit a beep...
... settings or to prevent system instability or other unexpected results. To upgrade the BIOS, use either the GIGABYTE Q-Flash or @BIOS utility. • Q-Flash allows the user to clear the CMOS values.) - 31 - Chapter 2 BIOS Setup BIOS (Basic Input and Output System) records hardware parameters...to activate certain system features. If this occurs, try to clear the CMOS values and reset the board to default values. (Refer to the "Load Optimized Defaults" section in this chapter or introductions of the battery/ clearing CMOS jumper in system malfunction. • BIOS will emit a beep...

Manual
Page 35
...to prevent system instability or other unexpected results. (Inadequately altering the settings may result in system's failure to default values.) CMOS Setup Utility-Copyright (C) 1984-2010 Award Software MB Intelligent Tweaker(M.I.T.) } M.I .T Current Status } Advanced Frequency Settings }... , CPU temperature, Chipset temperature, Vcore, and memory voltage. - 35 - If this occurs, clear the CMOS values and reset the board to boot. 2-3 MB Intelligent Tweaker(M.I.T.) CMOS Setup Utility-Copyright (C) 1984-2010 Award Software MB Intelligent Tweaker(M.I.T.) } M.I .T Current Status } ...
...to prevent system instability or other unexpected results. (Inadequately altering the settings may result in system's failure to default values.) CMOS Setup Utility-Copyright (C) 1984-2010 Award Software MB Intelligent Tweaker(M.I.T.) } M.I .T Current Status } Advanced Frequency Settings }... , CPU temperature, Chipset temperature, Vcore, and memory voltage. - 35 - If this occurs, clear the CMOS values and reset the board to boot. 2-3 MB Intelligent Tweaker(M.I.T.) CMOS Setup Utility-Copyright (C) 1984-2010 Award Software MB Intelligent Tweaker(M.I.T.) } M.I .T Current Status } ...
Manual
Page 38
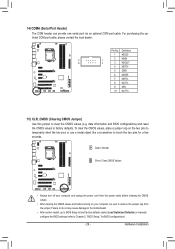
... that is automatically adjusted according to decrease heat production. Note: If your system fails to boot after overclocking, please wait for automated system reboot, or clear the CMOS values to reset the board to set - The adjustable range is occurring to enhance memory performance when enabled. CPU Thermal Monitor (Note 1) Enables or...
... that is automatically adjusted according to decrease heat production. Note: If your system fails to boot after overclocking, please wait for automated system reboot, or clear the CMOS values to reset the board to set - The adjustable range is occurring to enhance memory performance when enabled. CPU Thermal Monitor (Note 1) Enables or...

Manual
Page 52
...+/-/PU/PD: Value F10: Save F6: Fail-Safe Defaults ESC: Exit F1: General Help F7: Optimized Defaults Reset Case Open Status Keeps or clears the record of previous chassis intrusion status and the Case Opened field will show "No" at next boot. (Default: Disabled) Case Opened Displays... the detection status of the chassis intrusion detection device attached to the CMOS, and then restart your system. To clear the chassis intrusion status record, set Reset Case Open Status to Enabled, save the settings to the motherboard CI header. ...
...+/-/PU/PD: Value F10: Save F6: Fail-Safe Defaults ESC: Exit F1: General Help F7: Optimized Defaults Reset Case Open Status Keeps or clears the record of previous chassis intrusion status and the Case Opened field will show "No" at next boot. (Default: Disabled) Case Opened Displays... the detection status of the chassis intrusion detection device attached to the CMOS, and then restart your system. To clear the chassis intrusion status record, set Reset Case Open Status to Enabled, save the settings to the motherboard CI header. ...

Manual
Page 54
... the Optimized defaults after updating the BIOS or after clearing the CMOS values. BIOS Setup - 54 - ENxit Setup Exit Without Saving ESC: Quit F8: Q-Flash Select Item F10: Save & Exit Setup Load Fail-Safe Defaults F11: Save CMOS to BIOS F12: Load CMOS from BIOS Press on this item and then press ... Optimized DefaultsS(aYve/N&)?ENxit Setup Exit Without Saving ESC: Quit F8: Q-Flash Select Item F10: Save & Exit Setup Load Optimized Defaults F11: Save CMOS to BIOS F12: Load CMOS from BIOS Press on this item and then press the key to load the safest BIOS default settings.
... the Optimized defaults after updating the BIOS or after clearing the CMOS values. BIOS Setup - 54 - ENxit Setup Exit Without Saving ESC: Quit F8: Q-Flash Select Item F10: Save & Exit Setup Load Fail-Safe Defaults F11: Save CMOS to BIOS F12: Load CMOS from BIOS Press on this item and then press ... Optimized DefaultsS(aYve/N&)?ENxit Setup Exit Without Saving ESC: Quit F8: Q-Flash Select Item F10: Save & Exit Setup Load Optimized Defaults F11: Save CMOS to BIOS F12: Load CMOS from BIOS Press on this item and then press the key to load the safest BIOS default settings.

Manual
Page 55
...to BIOS settings. Type the password again and press . In BIOS Setup, you must enter the supervisor password for the password, press again. To clear the password, press on this item and type the password with up to 8 characters and then press . BIOS Setup User Password When the Password... Exit Setup Exit Without Saving ESC: Quit F8: Q-Flash Select Item F10: Save & Exit Setup Change/Set/Disable Password F11: Save CMOS to BIOS F12: Load CMOS from BIOS Press on the password item and when requested for entering BIOS Setup and making BIOS changes. When the Password Check item...
...to BIOS settings. Type the password again and press . In BIOS Setup, you must enter the supervisor password for the password, press again. To clear the password, press on this item and type the password with up to 8 characters and then press . BIOS Setup User Password When the Password... Exit Setup Exit Without Saving ESC: Quit F8: Q-Flash Select Item F10: Save & Exit Setup Change/Set/Disable Password F11: Save CMOS to BIOS F12: Load CMOS from BIOS Press on the password item and when requested for entering BIOS Setup and making BIOS changes. When the Password Check item...
Manual
Page 106
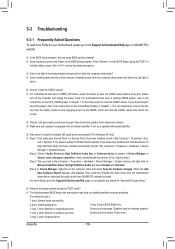
...New Hardware Wizard appears, click Cancel. Q: What do the beeps emitted during the POST. eral > System). If your board doesn't have a clearing CMOS jumper, refer to the instructions on the CLR_CMOS jumper in My Computer > Properties > Gen- A: Make sure your speaker is present in Chapter ...if Audio Device on . Then install the onboard HD audio driver from the motherboard driver disk or download the audio driver from GIGABYTE's website to clear the CMOS values (before doing this jumper, refer to My Computer > Properties > Hardware > Device Manager > System devices and right-click...
...New Hardware Wizard appears, click Cancel. Q: What do the beeps emitted during the POST. eral > System). If your board doesn't have a clearing CMOS jumper, refer to the instructions on the CLR_CMOS jumper in My Computer > Properties > Gen- A: Make sure your speaker is present in Chapter ...if Audio Device on . Then install the onboard HD audio driver from the motherboard driver disk or download the audio driver from GIGABYTE's website to clear the CMOS values (before doing this jumper, refer to My Computer > Properties > Hardware > Device Manager > System devices and right-click...


