
Manual
Page 5
...Share...75 4-6 Smart 6™ ...76 Chapter 5 Appendix...79 5-1 Configuring SATA Hard Drive(s 79 5-1-1 Configuring Intel P55 SATA Controllers 79 5-1-2 Configuring GIGABYTE SATA2 SATA Controller 87 5-1-3 Making a SATA RAID/AHCI Driver Diskette 93 5-1-4 Installing the SATA RAID/AHCI Driver and Operating System 94 5-2 Configuring ...Audio 105 5-2-2 Configuring S/PDIF In/Out 107 5-2-3 Configuring Microphone Recording 109 5-2-4 Using the Sound Recorder 111 5-3 Troubleshooting 112 5-3-1 Frequently Asked Questions 112 5-3-2 Troubleshooting Procedure 113 5-4 Regulatory Statements 115 - 5 -
...Share...75 4-6 Smart 6™ ...76 Chapter 5 Appendix...79 5-1 Configuring SATA Hard Drive(s 79 5-1-1 Configuring Intel P55 SATA Controllers 79 5-1-2 Configuring GIGABYTE SATA2 SATA Controller 87 5-1-3 Making a SATA RAID/AHCI Driver Diskette 93 5-1-4 Installing the SATA RAID/AHCI Driver and Operating System 94 5-2 Configuring ...Audio 105 5-2-2 Configuring S/PDIF In/Out 107 5-2-3 Configuring Microphone Recording 109 5-2-4 Using the Sound Recorder 111 5-3 Troubleshooting 112 5-3-1 Frequently Asked Questions 112 5-3-2 Troubleshooting Procedure 113 5-4 Regulatory Statements 115 - 5 -
Manual
Page 26
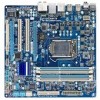
... beep will be heard if no problem is operating. RESRES+ CICI+ PWR+ PWR- S1 Blinking tem is on the chassis front panel. Refer to Chapter 5, "Troubleshooting," for more information). • SPEAK (Speaker, Orange): Connects to the pin assignments below. The LED is on when the hard drive is reading or writing...
... beep will be heard if no problem is operating. RESRES+ CICI+ PWR+ PWR- S1 Blinking tem is on the chassis front panel. Refer to Chapter 5, "Troubleshooting," for more information). • SPEAK (Speaker, Orange): Connects to the pin assignments below. The LED is on when the hard drive is reading or writing...
Manual
Page 33
...version of BIOS from the Internet and updates the BIOS. BIOS includes a BIOS Setup program that you not flash the BIOS. Refer to Chapter 5, "Troubleshooting," for how to clear the CMOS values.) - 33 - If this occurs, try to clear the CMOS values and reset the board to default ... BIOS, do not encounter problems using the Q-Flash and @BIOS utilities, refer to activate certain system features. To upgrade the BIOS, use either the GIGABYTE Q-Flash or @BIOS utility. • Q-Flash allows the user to quickly and easily upgrade or back up BIOS without entering the operating system. ...
...version of BIOS from the Internet and updates the BIOS. BIOS includes a BIOS Setup program that you not flash the BIOS. Refer to Chapter 5, "Troubleshooting," for how to clear the CMOS values.) - 33 - If this occurs, try to clear the CMOS values and reset the board to default ... BIOS, do not encounter problems using the Q-Flash and @BIOS utilities, refer to activate certain system features. To upgrade the BIOS, use either the GIGABYTE Q-Flash or @BIOS utility. • Q-Flash allows the user to quickly and easily upgrade or back up BIOS without entering the operating system. ...

Manual
Page 112
...disk or download the audio driver from Microsoft's website. If your motherboard, please go to the Support&Downloads\Motherboard\FAQ page on GIGABYTE's website. When the Add New Hardware Wizard appears, click Cancel. A: The following Award BIOS beep code descriptions may help you ...check in the BIOS Setup program. A: Some motherboards provide a small amount of my keyboard/optical mouse still on after about one minute. 5-3 Troubleshooting 5-3-1 Frequently Asked Questions To read more details, go back to My Computer > Properties > Hardware > Device Manager > System devices and right-...
...disk or download the audio driver from Microsoft's website. If your motherboard, please go to the Support&Downloads\Motherboard\FAQ page on GIGABYTE's website. When the Add New Hardware Wizard appears, click Cancel. A: The following Award BIOS beep code descriptions may help you ...check in the BIOS Setup program. A: Some motherboards provide a small amount of my keyboard/optical mouse still on after about one minute. 5-3 Troubleshooting 5-3-1 Frequently Asked Questions To read more details, go back to My Computer > Properties > Hardware > Device Manager > System devices and right-...

Manual
Page 113
... other metal objects. Check if the memory is verified and solved. START Turn off the power. The problem is attached to the CPU_FAN header properly? 5-3-2 Troubleshooting Procedure If you encounter any troubles during system startup, follow the...
... other metal objects. Check if the memory is verified and solved. START Turn off the power. The problem is attached to the CPU_FAN header properly? 5-3-2 Troubleshooting Procedure If you encounter any troubles during system startup, follow the...