Manual
Page 7
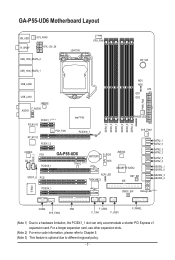
... F_AUDIO AUDIO PCIEX1_1 (Note 1) RTL8111D PCH_FAN RTL8111D PCIEX1_2 Intel® P55 PCIEX16_1 CODEC CD_IN SPDIF_I PCI1 PCIEX8_1 GA-P55-UD6 BATTERY TPM IC (Note 3) B_BIOS M_BIOS SPDIF_O PCI2 ACPI LED TSB43AB23 DDR3_3 DDR3_2 DDR3_1 DDR3_6 DDR3_5 DDR3_4 MD1 MD2 ATX GD1 GD2 PWR_FAN PHASE LED SYS_FAN1 JMB362 GIGABYTE SATA2 RST_SW IDE SATA2_1 SATA2_0 SATA2_3 SATA2_2 SATA2_5 SATA2_4 GSATA2_1...
... F_AUDIO AUDIO PCIEX1_1 (Note 1) RTL8111D PCH_FAN RTL8111D PCIEX1_2 Intel® P55 PCIEX16_1 CODEC CD_IN SPDIF_I PCI1 PCIEX8_1 GA-P55-UD6 BATTERY TPM IC (Note 3) B_BIOS M_BIOS SPDIF_O PCI2 ACPI LED TSB43AB23 DDR3_3 DDR3_2 DDR3_1 DDR3_6 DDR3_5 DDR3_4 MD1 MD2 ATX GD1 GD2 PWR_FAN PHASE LED SYS_FAN1 JMB362 GIGABYTE SATA2 RST_SW IDE SATA2_1 SATA2_0 SATA2_3 SATA2_2 SATA2_5 SATA2_4 GSATA2_1...

Manual
Page 23
... S4_S5_LED - 23 - Hardware Installation 1-9 Onboard LEDs and Buttons CPU VTT/Memory Phase Indicator LEDs This motherboard contains 4 phase indicator LEDs controlled by the system BIOS to improper plug/unplug actions. The green LEDs light up under normal working conditions (green LED) MD2: Excessive overvoltage or overloading (yellow LED) ACPI LEDs The 4 embedded ACPI LEDs indicate the system power status (S0...
... S4_S5_LED - 23 - Hardware Installation 1-9 Onboard LEDs and Buttons CPU VTT/Memory Phase Indicator LEDs This motherboard contains 4 phase indicator LEDs controlled by the system BIOS to improper plug/unplug actions. The green LEDs light up under normal working conditions (green LED) MD2: Excessive overvoltage or overloading (yellow LED) ACPI LEDs The 4 embedded ACPI LEDs indicate the system power status (S0...

Manual
Page 24
...Optimized Defaults) or manually configure the BIOS settings (refer to Chapter 2, "BIOS Setup," for more the number of lighted LEDs. To enable the PHASE LED display function, please first enable Dynamic Energy Saver™ 2. date information and BIOS configurations) and reset the CMOS values... to clear the CMOS values (e.g. PHASE LED The Phase LEDs indicate the CPU loading. The higher the CPU loading, the more details. Use the clearing CMOS button to factory defaults when needed...
...Optimized Defaults) or manually configure the BIOS settings (refer to Chapter 2, "BIOS Setup," for more the number of lighted LEDs. To enable the PHASE LED display function, please first enable Dynamic Energy Saver™ 2. date information and BIOS configurations) and reset the CMOS values... to clear the CMOS values (e.g. PHASE LED The Phase LEDs indicate the CPU loading. The higher the CPU loading, the more details. Use the clearing CMOS button to factory defaults when needed...
Manual
Page 79
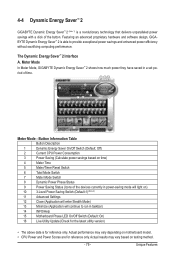
... without sacrificing computing performance. Actual performance may vary based on testing method. - 79 - Featuring an advanced proprietary hardware and software design, GIGABYTE Dynamic Energy Saver™ 2 is for reference only. The Dynamic Energy Saver™ 2 Interface A. Actual results may vary depending on time...Power and Power Scores are for reference only. Meter Mode In Meter Mode, GIGABYTE Dynamic Energy Saver™ 2 shows how much power they have saved in taskbar) 14 INFO/Help 15 Motherboard Phase LED On/Off Switch (Default: On) 16 Live Utility Update (Check for the...
... without sacrificing computing performance. Actual performance may vary based on testing method. - 79 - Featuring an advanced proprietary hardware and software design, GIGABYTE Dynamic Energy Saver™ 2 is for reference only. The Dynamic Energy Saver™ 2 Interface A. Actual results may vary depending on time...Power and Power Scores are for reference only. Meter Mode In Meter Mode, GIGABYTE Dynamic Energy Saver™ 2 shows how much power they have saved in taskbar) 14 INFO/Help 15 Motherboard Phase LED On/Off Switch (Default: On) 16 Live Utility Update (Check for the...
Manual
Page 80
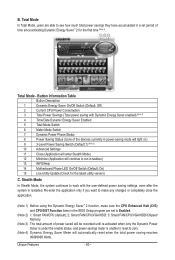
... with Dynamic Energy Saver enabled) (Note 4) 4 Time/Date Dynamic Energy Saver Enabled 5 Total Mode Switch 6 Meter Mode Switch 7 Dynamic Power Phase Status 8 Power Saving Status (Icons of power saved will continue to make any changes or completely close the application. (Note 1) Before using the... Dynamic Energy Saver™ 2 function, make sure the CPU Enhanced Halt (C1E) and CPU EIST Function items in taskbar) 13 INFO/Help 14 Motherboard Phase LED On/Off Switch (Default: On) 15 Live Utility Update (Check for the first time (Note 3). 11 12 13 3 2 4 65 7 1 8 14...
... with Dynamic Energy Saver enabled) (Note 4) 4 Time/Date Dynamic Energy Saver Enabled 5 Total Mode Switch 6 Meter Mode Switch 7 Dynamic Power Phase Status 8 Power Saving Status (Icons of power saved will continue to make any changes or completely close the application. (Note 1) Before using the... Dynamic Energy Saver™ 2 function, make sure the CPU Enhanced Halt (C1E) and CPU EIST Function items in taskbar) 13 INFO/Help 14 Motherboard Phase LED On/Off Switch (Default: On) 15 Live Utility Update (Check for the first time (Note 3). 11 12 13 3 2 4 65 7 1 8 14...


