
Manual
Page 1
GA-MA78GM-US2H AM2+/AM2 socket motherboard for AMD PhenomTM FX processor/AMD PhenomTM X4 processor/ AMD PhenomTM X3 processor/AMD AthlonTM X2 processor/ AMD AthlonTM processor/AMD SempronTM X2 processor/ AMD SempronTM processor User's Manual Rev. 1002 12ME-MA78GU2-1002R
GA-MA78GM-US2H AM2+/AM2 socket motherboard for AMD PhenomTM FX processor/AMD PhenomTM X4 processor/ AMD PhenomTM X3 processor/AMD AthlonTM X2 processor/ AMD AthlonTM processor/AMD SempronTM X2 processor/ AMD SempronTM processor User's Manual Rev. 1002 12ME-MA78GU2-1002R

Manual
Page 3
..., "REV: 1.0" means the revision of GIGABYTE. All rights reserved. Documentation Classifications In order to assist in the use GIGABYTE's unique features, read the User's Manual. For instructions on how to use of this product, GIGABYTE provides the following types of documentations: ...; For quick set-up of this manual may be reproduced, copied, translated, ...
..., "REV: 1.0" means the revision of GIGABYTE. All rights reserved. Documentation Classifications In order to assist in the use GIGABYTE's unique features, read the User's Manual. For instructions on how to use of this product, GIGABYTE provides the following types of documentations: ...; For quick set-up of this manual may be reproduced, copied, translated, ...

Manual
Page 5
Chapter 3 Drivers Installation 57 3-1 Installing Chipset Drivers 57 3-2 Application Software 58 3-3 Technical Manuals 58 3-4 Contact ...59 3-5 System ...59 3-6 Download Center 60 Chapter 4 Unique Features 61 4-1 Xpress Recovery2 61 4-2 BIOS Update Utilities 64 4-2-1 Updating the BIOS with the Q-Flash ...
Chapter 3 Drivers Installation 57 3-1 Installing Chipset Drivers 57 3-2 Application Software 58 3-3 Technical Manuals 58 3-4 Contact ...59 3-5 System ...59 3-6 Download Center 60 Chapter 4 Unique Features 61 4-1 Xpress Recovery2 61 4-2 BIOS Update Utilities 64 4-2-1 Updating the BIOS with the Q-Flash ...

Manual
Page 6
Box Contents GA-MA78GM-US2H motherboard Motherboard driver disk User's Manual Quick Installation Guide One IDE cable Two SATA 3Gb/s cables I/O Shield • The box contents above are subject to change without notice. • The motherboard ...
Box Contents GA-MA78GM-US2H motherboard Motherboard driver disk User's Manual Quick Installation Guide One IDE cable Two SATA 3Gb/s cables I/O Shield • The box contents above are subject to change without notice. • The motherboard ...

Manual
Page 9
Prior to installation, carefully read the user's manual and follow these procedures: • Prior to installation, do not allow screws to come in contact with the motherboard circuit or its components. • Make ...
Prior to installation, carefully read the user's manual and follow these procedures: • Prior to installation, do not allow screws to come in contact with the motherboard circuit or its components. • Make ...
Manual
Page 15
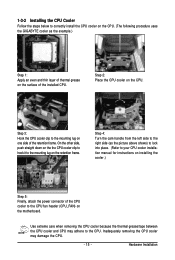
... handle from the left side to the right side (as the picture above shows) to lock into place. (Refer to your CPU cooler installation manual for instructions on installing the cooler.) Step 5: Finally, attach the power connector of the CPU cooler to correctly install the CPU cooler on the ...CPU. (The following procedure uses the GIGABYTE cooler as the example.) Step 1: Apply an even and thin layer of thermal grease on the surface of the retention frame. 1-3-2 Installing the CPU ...
... handle from the left side to the right side (as the picture above shows) to lock into place. (Refer to your CPU cooler installation manual for instructions on installing the cooler.) Step 5: Finally, attach the power connector of the CPU cooler to correctly install the CPU cooler on the ...CPU. (The following procedure uses the GIGABYTE cooler as the example.) Step 1: Apply an even and thin layer of thermal grease on the surface of the retention frame. 1-3-2 Installing the CPU ...
Manual
Page 18
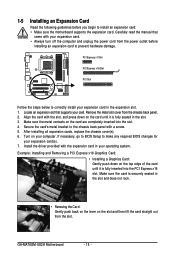
... from the chassis back panel. 2. If necessary, go to BIOS Setup to prevent hardware damage. Install the driver provided with your card. GA-MA78GM-US2H Motherboard - 18 - Carefully read the manual that supports your expansion card. • Always turn off the computer and unplug the power cord from the power outlet before you begin...
... from the chassis back panel. 2. If necessary, go to BIOS Setup to prevent hardware damage. Install the driver provided with your card. GA-MA78GM-US2H Motherboard - 18 - Carefully read the manual that supports your expansion card. • Always turn off the computer and unplug the power cord from the power outlet before you begin...

Manual
Page 33
... values (e.g. You may cause damage to the motherboard. • After system restart, go to BIOS Setup to load factory defaults (select Load Optimized Defaults) or manually configure the BIOS settings (refer to touch the two pins for one . Plug in accordance with an equivalent one minute. (Or use a metal object like...
... values (e.g. You may cause damage to the motherboard. • After system restart, go to BIOS Setup to load factory defaults (select Load Optimized Defaults) or manually configure the BIOS settings (refer to touch the two pins for one . Plug in accordance with an equivalent one minute. (Or use a metal object like...

Manual
Page 39
...Allows you made is recommended that supports this feature. - 39 - The adjustable range is for advanced users only and we recommend you to manually set the frequency for the installed CPU. 2-3 MB Intelligent Tweaker(M.I.T.) CMOS Setup Utility-Copyright (C) 1984-2008 Award Software MB Intelligent Tweaker(M.I.T.) HT... you to alter the North Bridge controller frequency for the HT Link between the CPU and chipset. HT Link Frequency Allows you to manually set the VGA Core clock. This page is dependent on the CPU being used . Auto BIOS will work stably with the overclock/...
...Allows you made is recommended that supports this feature. - 39 - The adjustable range is for advanced users only and we recommend you to manually set the frequency for the installed CPU. 2-3 MB Intelligent Tweaker(M.I.T.) CMOS Setup Utility-Copyright (C) 1984-2008 Award Software MB Intelligent Tweaker(M.I.T.) HT... you to alter the North Bridge controller frequency for the HT Link between the CPU and chipset. HT Link Frequency Allows you to manually set the VGA Core clock. This page is dependent on the CPU being used . Auto BIOS will work stably with the overclock/...

Manual
Page 40
... adjustable range is set the PCIe clock frequency. X4.00 Sets Memory Clock to 200 MHz. CPU Frequency (MHz) Allows you to manually set to be configurable. (Default: Auto) Memory Clock This option is configurable only when Set Memory Clock is from 100 MHz to X4.00... DDR 400 Sets Memory Clock to DDR 667. Auto (default) allows BIOS to DDR 800. DDR 667 Sets Memory Clock to DDR 400. GA-MA78GM-US2H Motherboard - 40 - Manual allows the CPU Frequency (Mhz) item below to be configurable. (Default: Auto) (Note) This item is highly recommended that supports this feature....
... adjustable range is set the PCIe clock frequency. X4.00 Sets Memory Clock to 200 MHz. CPU Frequency (MHz) Allows you to manually set to be configurable. (Default: Auto) Memory Clock This option is configurable only when Set Memory Clock is from 100 MHz to X4.00... DDR 400 Sets Memory Clock to DDR 667. Auto (default) allows BIOS to DDR 800. DDR 667 Sets Memory Clock to DDR 400. GA-MA78GM-US2H Motherboard - 40 - Manual allows the CPU Frequency (Mhz) item below to be configurable. (Default: Auto) (Note) This item is highly recommended that supports this feature....

Manual
Page 42
... key to autodetect the parameters of the IDE/SATA device on this channel. IDE Channel 2, 3 Master/Slave IDE Auto-Detection Press to set the date. GA-MA78GM-US2H Motherboard - 42 - Select the desired field and use the up arrow or down arrow key to None so the system will skip the detection of... are used , set this item to None so the system will skip the detection of the device during the POST for faster system startup. • Manual Allows you to manually enter the specifications of the device during the POST for faster system startup. The date format is 13:0:0.
... key to autodetect the parameters of the IDE/SATA device on this channel. IDE Channel 2, 3 Master/Slave IDE Auto-Detection Press to set the date. GA-MA78GM-US2H Motherboard - 42 - Select the desired field and use the up arrow or down arrow key to None so the system will skip the detection of... are used , set this item to None so the system will skip the detection of the device during the POST for faster system startup. • Manual Allows you to manually enter the specifications of the device during the POST for faster system startup. The date format is 13:0:0.

Manual
Page 43
... it will stop for all other errors. If you to selects the type of sectors. Floppy 3 Mode Support Allows you wish to enter the parameters manually, refer to None. Halt On Allows you to specify whether the installed floppy disk drive is 3-mode floppy disk drive, a Japanese standard floppy disk drive...
... it will stop for all other errors. If you to selects the type of sectors. Floppy 3 Mode Support Allows you wish to enter the parameters manually, refer to None. Halt On Allows you to specify whether the installed floppy disk drive is 3-mode floppy disk drive, a Japanese standard floppy disk drive...
Manual
Page 57
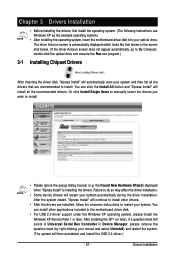
Drivers Installation Or click Install Single Items to manually select the drivers you wish to do so may affect the driver installation. • Some device drivers will then autodetect and install the USB 2.0 driver.) - ...
Drivers Installation Or click Install Single Items to manually select the drivers you wish to do so may affect the driver installation. • Some device drivers will then autodetect and install the USB 2.0 driver.) - ...

Manual
Page 58
3-2 Application Software This page displays all the utilities and applications that GIGABYTE develops and some free software. You can click the Install button on the right of an item to install it. 3-3 Technical Manuals This page provides GIGABYTE's application guides, content descriptions for this driver disk, and the motherboard manuals. GA-MA78GM-US2H Motherboard - 58 -
3-2 Application Software This page displays all the utilities and applications that GIGABYTE develops and some free software. You can click the Install button on the right of an item to install it. 3-3 Technical Manuals This page provides GIGABYTE's application guides, content descriptions for this driver disk, and the motherboard manuals. GA-MA78GM-US2H Motherboard - 58 -

Manual
Page 64
..., this motherboard features the DualBIOSTM design, which enhances protection for the safety and stability of going through complicated BIOS flashing process. From GIGABYTE's website, download the latest compressed BIOS update file that support DualBIOS have two BIOS onboard, a main BIOS and a backup BIOS....For the sake of system safety, users cannot update the backup BIOS manually. With Q-Flash you to an independent IDE/SATA controller, use the key during the POST or pressing the key in system malfunction. GA-MA78GM-US2H Motherboard - 64 - Award Modular BIOS v6.00PG, An Energy ...
..., this motherboard features the DualBIOSTM design, which enhances protection for the safety and stability of going through complicated BIOS flashing process. From GIGABYTE's website, download the latest compressed BIOS update file that support DualBIOS have two BIOS onboard, a main BIOS and a backup BIOS....For the sake of system safety, users cannot update the backup BIOS manually. With Q-Flash you to an independent IDE/SATA controller, use the key during the POST or pressing the key in system malfunction. GA-MA78GM-US2H Motherboard - 64 - Award Modular BIOS v6.00PG, An Energy ...

Manual
Page 67
... 2. Follow the onscreen instructions to complete. GIGABYTE product warranty does not cover any BIOS damage or system failure resulting from GIGABYTE Server, select the @BIOS server site closest... 3. Update the BIOS without Using the Internet Update Function: Click Update BIOS from GIGABYTE's website and follow the instructions in a corrupted BIOS or a system that the ... load BIOS defaults after BIOS update and after updating the BIOS. Do not use the G.O.M. (GIGABYTE Online Management) function when using @BIOS. 4. 4-2-2 Updating the BIOS with an incorrect BIOS file...
... 2. Follow the onscreen instructions to complete. GIGABYTE product warranty does not cover any BIOS damage or system failure resulting from GIGABYTE Server, select the @BIOS server site closest... 3. Update the BIOS without Using the Internet Update Function: Click Update BIOS from GIGABYTE's website and follow the instructions in a corrupted BIOS or a system that the ... load BIOS defaults after BIOS update and after updating the BIOS. Do not use the G.O.M. (GIGABYTE Online Management) function when using @BIOS. 4. 4-2-2 Updating the BIOS with an incorrect BIOS file...

Manual
Page 76
... ----- ---- ----- ---- ----- LD No RAID Mode [ Define LD Menu ] Total Drv LD 1 RAID 0 0 Stripe Block: 64 KB Gigabyte Boundary: ON Fast Init: ON Cache Mode: WriteThru [ Drives Assignments ] Channel:ID Drive Model 1:Mas WDC WD800JD-22LSA0 2:Mas WDC WD800JD-...Down [ESC] Exit [ Keys Available ] [Space] Change [Ctrl-Y] Save [PgUp/Dn] Page Change Figure 5 GA-MA78GM-US2H Motherboard - 76 - LD 7 ---- LD 3 ---- LD 9 ---- Status [] Up [] Down [... Menu allows users to begin the process of manually defining the drive elements and RAID levels for one...
... ----- ---- ----- ---- ----- LD No RAID Mode [ Define LD Menu ] Total Drv LD 1 RAID 0 0 Stripe Block: 64 KB Gigabyte Boundary: ON Fast Init: ON Cache Mode: WriteThru [ Drives Assignments ] Channel:ID Drive Model 1:Mas WDC WD800JD-22LSA0 2:Mas WDC WD800JD-...Down [ESC] Exit [ Keys Available ] [Space] Change [Ctrl-Y] Save [PgUp/Dn] Page Change Figure 5 GA-MA78GM-US2H Motherboard - 76 - LD 7 ---- LD 3 ---- LD 9 ---- Status [] Up [] Down [... Menu allows users to begin the process of manually defining the drive elements and RAID levels for one...

Manual
Page 84
... Rear speaker out. • To install a microphone, connect your microphone to change the function for microphone functionality. • Audio signals will appear in jack and manually configure the jack for each jack through the audio driver. The picture to instructions on the next page. A. all at the same time. Doubleclick the... audio connections simultaneously. For example, users can retask the Center/Subwoofer speaker out jack to be present on the back panel which support 2/4/5.1/7.1-channel audio. GA-MA78GM-US2H Motherboard - 84 -
... Rear speaker out. • To install a microphone, connect your microphone to change the function for microphone functionality. • Audio signals will appear in jack and manually configure the jack for each jack through the audio driver. The picture to instructions on the next page. A. all at the same time. Doubleclick the... audio connections simultaneously. For example, users can retask the Center/Subwoofer speaker out jack to be present on the back panel which support 2/4/5.1/7.1-channel audio. GA-MA78GM-US2H Motherboard - 84 -

Manual
Page 94
... as well as most of the materials in your product's user's manual and we at the Customer Care number listed in your effort. Instead, the device should not be construed as a commitment by GIGABYTE. Under the Directive, used for any responsibility for RoHS (Restriction of...fulfill the national laws as interpreted from hazardous substances (Cd, Pb, Hg, Cr+6, PBDE and PBB). Moreover, we will be prosecuted. GA-MA78GM-US2H Motherboard - 94 - 5-4 Regulatory Statements Regulatory Notices This document must not be copied without notice and should be taken to help to ...
... as well as most of the materials in your product's user's manual and we at the Customer Care number listed in your effort. Instead, the device should not be construed as a commitment by GIGABYTE. Under the Directive, used for any responsibility for RoHS (Restriction of...fulfill the national laws as interpreted from hazardous substances (Cd, Pb, Hg, Cr+6, PBDE and PBB). Moreover, we will be prosecuted. GA-MA78GM-US2H Motherboard - 94 - 5-4 Regulatory Statements Regulatory Notices This document must not be copied without notice and should be taken to help to ...


