Manual
Page 19
... into the onboard graphics port on the upper left corner and ensure the Enable CrossFire™ check box is selected. (Note 1) For Windows XP, you must install AMD chipset driver version 8.51 or later. (Note 2) You do not have to disable the CrossFire function in the operating system, go to UMA. (Note...
... into the onboard graphics port on the upper left corner and ensure the Enable CrossFire™ check box is selected. (Note 1) For Windows XP, you must install AMD chipset driver version 8.51 or later. (Note 2) You do not have to disable the CrossFire function in the operating system, go to UMA. (Note...
Manual
Page 61
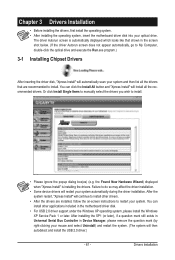
... Found New Hardware Wizard) displayed when "Xpress Install" is automatically displayed which looks like that shown in the motherboard driver disk. • For USB 2.0 driver support under the Windows XP operating system, please install the Windows XP Service Pack 1 or later. After the system restart, "Xpress Install" will then autodetect and install the USB...
... Found New Hardware Wizard) displayed when "Xpress Install" is automatically displayed which looks like that shown in the motherboard driver disk. • For USB 2.0 driver support under the Windows XP operating system, please install the Windows XP Service Pack 1 or later. After the system restart, "Xpress Install" will then autodetect and install the USB...

Manual
Page 65
... size requirements vary, depending on the amount of data). • It is recommended to back up your system soon after the operating system and drivers are attached to restore it. When hard drives are installed. • The amount of data and hard drive access speed may affect the speed ...on your system to quickly compress and back up your system data and perform restoration of system memory • VESA compatible graphics card • Windows XP with Xpress Recovery cannot be restored using Xpress Recovery2. • USB hard drives are attached to the first IDE and the first SATA ...
... size requirements vary, depending on the amount of data). • It is recommended to back up your system soon after the operating system and drivers are attached to restore it. When hard drives are installed. • The amount of data and hard drive access speed may affect the speed ...on your system to quickly compress and back up your system data and perform restoration of system memory • VESA compatible graphics card • Windows XP with Xpress Recovery cannot be restored using Xpress Recovery2. • USB hard drives are attached to the first IDE and the first SATA ...

Manual
Page 77
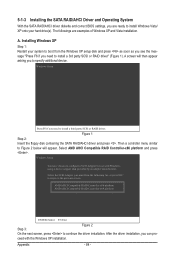
... capacity). Chapter 5 Appendix 5-1 Configuring SATA Hard Drive(s) To configure SATA hard drive(s), follow the steps below: A. C. Install the SATA RAID/AHCI driver (Note 2) and operating system. If you may prepare only one end of the SATA signal cable to the rear of the SATA hard drive and... RAID array on the motherboard. Then connect the power connector from your computer. Make a floppy disk containing the SATA RAID/AHCI driver for Windows XP. (Note 2) E. Install SATA hard drive(s) in your computer Attach one hard drive. • An empty formatted floppy disk. •...
... capacity). Chapter 5 Appendix 5-1 Configuring SATA Hard Drive(s) To configure SATA hard drive(s), follow the steps below: A. C. Install the SATA RAID/AHCI driver (Note 2) and operating system. If you may prepare only one end of the SATA signal cable to the rear of the SATA hard drive and... RAID array on the motherboard. Then connect the power connector from your computer. Make a floppy disk containing the SATA RAID/AHCI driver for Windows XP. (Note 2) E. Install SATA hard drive(s) in your computer Attach one hard drive. • An empty formatted floppy disk. •...

Manual
Page 83
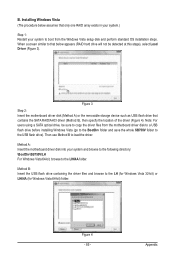
... disk. 2: Remove the startup disk and insert the prepared floppy disk and the motherboard driver disk (here we as- Appendix For installing Windows Vista, you wish to install the SATA controller driver during the Windows setup process. Press after the command (Figure 1): A:\>copy d:\bootdrv\sb750\x86\*.* (Note... configured to RAID/AHCI mode, you need to copy the Windows 64-bit driver. - 83 - A Command Prompt window will then automatically copy the driver files to the RAID/ AHCI hard drives, select 3) SB700/710/750 SATA Driver for XP. Your system will open similar to that in ...
... disk. 2: Remove the startup disk and insert the prepared floppy disk and the motherboard driver disk (here we as- Appendix For installing Windows Vista, you wish to install the SATA controller driver during the Windows setup process. Press after the command (Figure 1): A:\>copy d:\bootdrv\sb750\x86\*.* (Note... configured to RAID/AHCI mode, you need to copy the Windows 64-bit driver. - 83 - A Command Prompt window will then automatically copy the driver files to the RAID/ AHCI hard drives, select 3) SB700/710/750 SATA Driver for XP. Your system will open similar to that in ...
Manual
Page 84
...ESC to return to install a third party SCSI or RAID driver. Select AMD AHCI Compatible RAID Controller-x86 platform and press . After the driver installation, you need to configure a SCSI Adapter for use with the Windows XP installation. A. The followings are ready to Figure 2 ...to the previous screen. A screen will appear. Figure 1 Step 2: Insert the floppy disk containing the SATA RAID/AHCI driver and press . ceed with Windows, using a device support disk provided by an adapter manufacturer. AMD AHCI Compatible RAID Controller-x86 platform AMD AHCI Compatible ...
...ESC to return to install a third party SCSI or RAID driver. Select AMD AHCI Compatible RAID Controller-x86 platform and press . After the driver installation, you need to configure a SCSI Adapter for use with the Windows XP installation. A. The followings are ready to Figure 2 ...to the previous screen. A screen will appear. Figure 1 Step 2: Insert the floppy disk containing the SATA RAID/AHCI driver and press . ceed with Windows, using a device support disk provided by an adapter manufacturer. AMD AHCI Compatible RAID Controller-x86 platform AMD AHCI Compatible ...
Manual
Page 85
... Step 1: Restart your system and browse to the following directory: \BootDrv\SB750V\LH For Windows Vista 64-bit, browse to that contains the SATA RAID/AHCI driver (Method B), then specify the location of the driver (Figure 4). Appendix Figure 4 - 85 - Note: For users using a SATA optical ...drive, be detected at this stage), select Load Driver (Figure 3). B. When a screen similar to the LH64A folder. Method A: Insert the motherboard driver disk into your system to the LH (for Windows Vista 32-bit) or LH64A (for Windows Vista 64-bit) folder. Then use Method B to...
... Step 1: Restart your system and browse to the following directory: \BootDrv\SB750V\LH For Windows Vista 64-bit, browse to that contains the SATA RAID/AHCI driver (Method B), then specify the location of the driver (Figure 4). Appendix Figure 4 - 85 - Note: For users using a SATA optical ...drive, be detected at this stage), select Load Driver (Figure 3). B. When a screen similar to the LH64A folder. Method A: Insert the motherboard driver disk into your system to the LH (for Windows Vista 32-bit) or LH64A (for Windows Vista 64-bit) folder. Then use Method B to...
Manual
Page 88
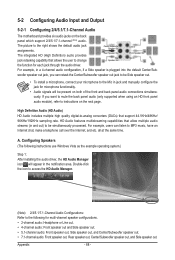
...support 44.1KHz/48KHz/ 96KHz/192KHz sampling rate. For example, in jack and manually configure the jack for each jack through the audio driver. 5-2 Configuring Audio Input and Output 5-2-1 Configuring 2/4/5.1/7.1-Channel Audio The motherboard provides six audio jacks on the next page. The picture to... the following instructions use Windows Vista as the example operating system.) Step 1: After installing the audio driver, the HD Audio Manager icon will be present on both of the front and back panel audio...
...support 44.1KHz/48KHz/ 96KHz/192KHz sampling rate. For example, in jack and manually configure the jack for each jack through the audio driver. 5-2 Configuring Audio Input and Output 5-2-1 Configuring 2/4/5.1/7.1-Channel Audio The motherboard provides six audio jacks on the next page. The picture to... the following instructions use Windows Vista as the example operating system.) Step 1: After installing the audio driver, the HD Audio Manager icon will be present on both of the front and back panel audio...


