
Manual
Page 5
Channel Audio Function Introduction 73 4-2 Troubleshooting 78 - 5 - Chapter 3 Drivers Installation 47 3-1 Install Chipset Drivers 47 3-2 SoftwareApplication 48 3-3 Software Information 48 3-4 Hardware Information 49 3-5 Contact Us ...49 Chapter 4 Appendix 51 4-1 Unique Software Utilities 51 4-1-1 EasyTune 5 Introduction 51 4-1-2 Xpress Recovery2 Introduction 52 4-1-3 Flash BIOS Method Introduction 54 4-1-4 Configuring SATA Hard Drive(s 58 4-1-5 Installation of TV Output Cable (Optional Device 69 4-1-6 2- / 4- / 6- / 8-
Channel Audio Function Introduction 73 4-2 Troubleshooting 78 - 5 - Chapter 3 Drivers Installation 47 3-1 Install Chipset Drivers 47 3-2 SoftwareApplication 48 3-3 Software Information 48 3-4 Hardware Information 49 3-5 Contact Us ...49 Chapter 4 Appendix 51 4-1 Unique Software Utilities 51 4-1-1 EasyTune 5 Introduction 51 4-1-2 Xpress Recovery2 Introduction 52 4-1-3 Flash BIOS Method Introduction 54 4-1-4 Configuring SATA Hard Drive(s 58 4-1-5 Installation of TV Output Cable (Optional Device 69 4-1-6 2- / 4- / 6- / 8-

Manual
Page 23
... the pin assignment carefully while you connect the front USB cable, incorrect connection between the module and connector will make the audio device unable to work or even damage it . Incorrect connection between the cable and connector will make the device unable to...LINE2_R 5 Line Out (R) 6 FSENSE1 6 NC 7 FAUDIO_JD 7 NC 8 No Pin 8 No Pin 9 LINE2_L 9 Line Out (L) 10 FSENSE2 10 NC By default, the audio driver is configured to the instructions on Page 77 about the software settings. 11) F_ USB1 / F_USB2 / F_USB3 (Front USB Connector) Be careful with the polarity...
... the pin assignment carefully while you connect the front USB cable, incorrect connection between the module and connector will make the audio device unable to work or even damage it . Incorrect connection between the cable and connector will make the device unable to...LINE2_R 5 Line Out (R) 6 FSENSE1 6 NC 7 FAUDIO_JD 7 NC 8 No Pin 8 No Pin 9 LINE2_L 9 Line Out (L) 10 FSENSE2 10 NC By default, the audio driver is configured to the instructions on Page 77 about the software settings. 11) F_ USB1 / F_USB2 / F_USB3 (Front USB Connector) Be careful with the polarity...
Manual
Page 36
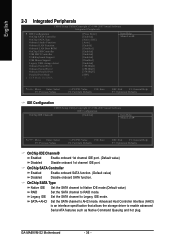
... storage driver to Legacy IDE mode. Legacy IDE Set the SATA channel to enable advanced Serial ATA features such as Native Command Queuing and hot plug. GA-MA69VM-S2 Motherboard - 36 - English 2-3 Integrated Peripherals CMOS Setup Utility-Copyright (C) 1984-2007 Award Software Integrated Peripherals ` IDE Configuration OnChip SATA Controller OnChip SATA Type Onboard Audio Function...
... storage driver to Legacy IDE mode. Legacy IDE Set the SATA channel to enable advanced Serial ATA features such as Native Command Queuing and hot plug. GA-MA69VM-S2 Motherboard - 36 - English 2-3 Integrated Peripherals CMOS Setup Utility-Copyright (C) 1984-2007 Award Software Integrated Peripherals ` IDE Configuration OnChip SATA Controller OnChip SATA Type Onboard Audio Function...

Manual
Page 73
... over the Internet, and etc. English 4-1-6 2- / 4- / 6- / 8- The jack retasking capability supported by HD Audio allows users to open the Audio Control Panel. - 73 - STEP 1 : After installation of the audio driver, you should find the icon in and out) simultaneously. HD Audio With multiple built-in the picture to acquire the best sound effect if the...
... over the Internet, and etc. English 4-1-6 2- / 4- / 6- / 8- The jack retasking capability supported by HD Audio allows users to open the Audio Control Panel. - 73 - STEP 1 : After installation of the audio driver, you should find the icon in and out) simultaneously. HD Audio With multiple built-in the picture to acquire the best sound effect if the...

Manual
Page 74
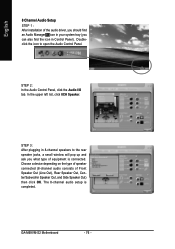
...equipment is plugged into the rear Line Out jack, a small window will pop up and ask you what type of the audio driver, you should find an Audio Manager icon in your system tray (you can also find the icon in Control Panel). STEP 3: After a speaker or headphone... is connected. Doubleclick the icon to open the Audio Control Panel. STEP 2: In the Audio Control Panel, click the Audio I /O tab. English STEP 2: In the Audio Control Panel, click the Audio I /O tab. GA-M69VM-S2 Motherboard - 74 - In the upper left list, click 4CH Speaker.
...equipment is plugged into the rear Line Out jack, a small window will pop up and ask you what type of the audio driver, you should find an Audio Manager icon in your system tray (you can also find the icon in Control Panel). STEP 3: After a speaker or headphone... is connected. Doubleclick the icon to open the Audio Control Panel. STEP 2: In the Audio Control Panel, click the Audio I /O tab. English STEP 2: In the Audio Control Panel, click the Audio I /O tab. GA-M69VM-S2 Motherboard - 74 - In the upper left list, click 4CH Speaker.

Manual
Page 75
...English The 6-channel audio setup is connected. STEP 2: In the Audio Control Panel, click the Audio I/O tab. STEP 3: After plugging in Control Panel). The 4-channel audio setup is completed. 6 Channel Audio Setup STEP 1 : After installation of equipment is connected. Doubleclick the icon to open the Audio Control Panel. Choose... 4-channel speakers to the rear speaker jacks, a small window will pop up and ask you what type of the audio driver, you should find an Audio Manager icon in your system tray (you can also find the icon in 6-channel speakers to the rear speaker jacks,...
...English The 6-channel audio setup is connected. STEP 2: In the Audio Control Panel, click the Audio I/O tab. STEP 3: After plugging in Control Panel). The 4-channel audio setup is completed. 6 Channel Audio Setup STEP 1 : After installation of equipment is connected. Doubleclick the icon to open the Audio Control Panel. Choose... 4-channel speakers to the rear speaker jacks, a small window will pop up and ask you what type of the audio driver, you should find an Audio Manager icon in your system tray (you can also find the icon in 6-channel speakers to the rear speaker jacks,...
Manual
Page 76
... Control Panel). In the upper left list, click 8CH Speaker. GA-M69VM-S2 Motherboard - 76 - Choose a device depending on the type of speaker connected (8-channel audio consists of equipment is completed. English 8 Channel Audio Setup STEP 1 : After installation of the audio driver, you should find an Audio Manager icon in your system tray (you what type of...
... Control Panel). In the upper left list, click 8CH Speaker. GA-M69VM-S2 Motherboard - 76 - Choose a device depending on the type of speaker connected (8-channel audio consists of equipment is completed. English 8 Channel Audio Setup STEP 1 : After installation of the audio driver, you should find an Audio Manager icon in your system tray (you what type of...


