Manual
Page 16
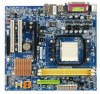
...Windows XP operating system. Graphics Chip Nvidia ATi Maker Gigabyte Gigabyte Gigabyte Gigabyte Gigabyte Gigabyte Gigabyte Gigabyte Gigabyte Gigabyte Gigabyte Gigabyte Gigabyte Gigabyte Gigabyte Gigabyte Gigabyte Gigabyte Gigabyte Gigabyte Gigabyte Gigabyte Gigabyte Gigabyte Nvidia Nvidia Nvidia ASUS ASUS MSI Leadtek ELSA ELSA Gigabyte Gigabyte Gigabyte Gigabyte Gigabyte Gigabyte Gigabyte Gigabyte Gigabyte Gigabyte Gigabyte Gigabyte Gigabyte... GA-M61SME-S2 Motherboard - 16 - When using an add-on graphics card, please first delete the onboard graphics driver before installing the driver for...
...Windows XP operating system. Graphics Chip Nvidia ATi Maker Gigabyte Gigabyte Gigabyte Gigabyte Gigabyte Gigabyte Gigabyte Gigabyte Gigabyte Gigabyte Gigabyte Gigabyte Gigabyte Gigabyte Gigabyte Gigabyte Gigabyte Gigabyte Gigabyte Gigabyte Gigabyte Gigabyte Gigabyte Gigabyte Nvidia Nvidia Nvidia ASUS ASUS MSI Leadtek ELSA ELSA Gigabyte Gigabyte Gigabyte Gigabyte Gigabyte Gigabyte Gigabyte Gigabyte Gigabyte Gigabyte Gigabyte Gigabyte Gigabyte... GA-M61SME-S2 Motherboard - 16 - When using an add-on graphics card, please first delete the onboard graphics driver before installing the driver for...

Manual
Page 47
... system, please install the NVIDIA® GeForceTM 6100/nForceTM Series Utility CD. For USB2.0 driver support under "Device Manager". Pictures below are shown in "Universal Serial Bus controller" under Windows XP operating system, please use Windows Service Pack. Insert the driver CD-title that came with your motherboard into your system automatically. Please pick the...
... system, please install the NVIDIA® GeForceTM 6100/nForceTM Series Utility CD. For USB2.0 driver support under "Device Manager". Pictures below are shown in "Universal Serial Bus controller" under Windows XP operating system, please use Windows Service Pack. Insert the driver CD-title that came with your motherboard into your system automatically. Please pick the...
Manual
Page 52
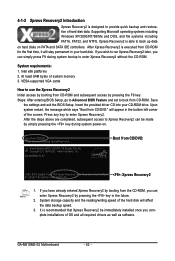
...-ROM drive. Insert the provided driver CD into your hard disk. Press any key to enter Xpress Recovery2. Boot from CD/DVD:" will appear in the future. 2. It is recommended that Xpress Recovery2 be made by booting from CD-ROM. GA-M61SME-S2 Motherboard - 52 - After Xpress... Recovery2 is executed from the CD-ROM, you complete installations of system memory 3. If you can enter Xpress Recovery2 by pressing the key in the bottom left corner of hard disk data. Supporting Microsoft operating systems including Windows XP/2000/NT...
...-ROM drive. Insert the provided driver CD into your hard disk. Press any key to enter Xpress Recovery2. Boot from CD/DVD:" will appear in the future. 2. It is recommended that Xpress Recovery2 be made by booting from CD-ROM. GA-M61SME-S2 Motherboard - 52 - After Xpress... Recovery2 is executed from the CD-ROM, you complete installations of system memory 3. If you can enter Xpress Recovery2 by pressing the key in the bottom left corner of hard disk data. Supporting Microsoft operating systems including Windows XP/2000/NT...

Manual
Page 53
...physical hard disk. Xpress Recovery2 will not appear if there is normal that data backup takes longer time than 128G under Windows 2000, be reserved. 3. USB hard disks are currently not supported. 6. SATA IDE channel 2 e. SATA IDE ...support RAID/AHCI (class code 0104/0106) hard disks. 7. For the use of backing up data from the driver CD before data backup. 2. Capable of Xpress Recovery2, a primary partition must be backed up) 4. When ...2. RESTORE: Restore the backed-up hard disks installed with Windows operating systems including DOS and Windows XP/2000/NT/9x/Me. 5.
...physical hard disk. Xpress Recovery2 will not appear if there is normal that data backup takes longer time than 128G under Windows 2000, be reserved. 3. USB hard disks are currently not supported. 6. SATA IDE channel 2 e. SATA IDE ...support RAID/AHCI (class code 0104/0106) hard disks. 7. For the use of backing up data from the driver CD before data backup. 2. Capable of Xpress Recovery2, a primary partition must be backed up) 4. When ...2. RESTORE: Restore the backed-up hard disks installed with Windows operating systems including DOS and Windows XP/2000/NT/9x/Me. 5.
Manual
Page 58
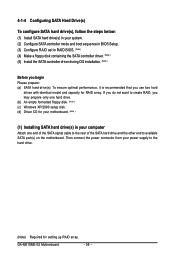
GA-M61SME-S2 Motherboard - 58 - To ensure optimal performance, it is recommended that you begin Please prepare: (a) SATA hard drive(s). If you do not want to create RAID, you may prepare only one hard drive. (b) An empty formatted floppy disk. (Note ) (c) Windows XP/2000 setup disk. (d) Driver CD for your motherboard. (Note ) (1) Installing SATA hard drive(s) in...
GA-M61SME-S2 Motherboard - 58 - To ensure optimal performance, it is recommended that you begin Please prepare: (a) SATA hard drive(s). If you do not want to create RAID, you may prepare only one hard drive. (b) An empty formatted floppy disk. (Note ) (c) Windows XP/2000 setup disk. (d) Driver CD for your motherboard. (Note ) (1) Installing SATA hard drive(s) in...
Manual
Page 64
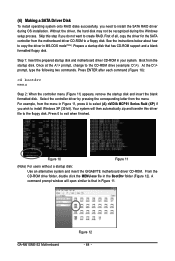
... without a startup disk: Use an alternative system and insert the GIGABYTE motherboard driver CD-ROM. First of all, copy the driver for the SATA controller from the menu in Figure 11, press ... formatted disk. Press 0 to a floppy disk. GA-M61SME-S2 Motherboard Figure 12 - 64 - Skip this driver file to install the SATA RAID driver during the Windows setup process. See the instructions below about how to...not want to copy the driver in Figure 11. Your system will open similar to install Windows XP (32-bit). Boot from the menu. (4) Making a SATA Driver Disk To install operating ...
... without a startup disk: Use an alternative system and insert the GIGABYTE motherboard driver CD-ROM. First of all, copy the driver for the SATA controller from the menu in Figure 11, press ... formatted disk. Press 0 to a floppy disk. GA-M61SME-S2 Motherboard Figure 12 - 64 - Skip this driver file to install the SATA RAID driver during the Windows setup process. See the instructions below about how to...not want to copy the driver in Figure 11. Your system will open similar to install Windows XP (32-bit). Boot from the menu. (4) Making a SATA Driver Disk To install operating ...
Manual
Page 65
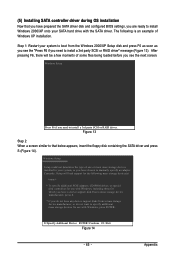
... the type of Windows XP installation. S=Specify Additional Device ENTER=Continue F3=Exit Figure 14 - 65 - Appendix Step 1: Restart your system to boot from a mass storage device manufacturer, or do not have chosen to install a 3rd party SCSI or RAID driver" message (Figure 13). Windows Setup Press F6 ... special disk controllers for which you have prepared the SATA driver disk and configured BIOS settings, you are ready to install Windows 2000/XP onto your system, or you have any device support disks from the Windows 2000/XP Setup disk and press F6 as soon as you need to...
... the type of Windows XP installation. S=Specify Additional Device ENTER=Continue F3=Exit Figure 14 - 65 - Appendix Step 1: Restart your system to boot from a mass storage device manufacturer, or do not have chosen to install a 3rd party SCSI or RAID driver" message (Figure 13). Windows Setup Press F6 ... special disk controllers for which you have prepared the SATA driver disk and configured BIOS settings, you are ready to install Windows 2000/XP onto your system, or you have any device support disks from the Windows 2000/XP Setup disk and press F6 as soon as you need to...
Manual
Page 67
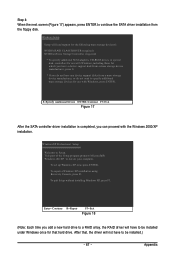
... next screen (Figure 17) appears, press ENTER to run on your computer. This port of the Setup program prepares Microsoft(R) Windows (R) XP to continue the SATA driver installation from the floppy disk. To repair a Windows XP installation using Recovery Console, press R. Enter= Continue R=Repair F3=Exit Figure 18 (Note: Each time you do not have...
... next screen (Figure 17) appears, press ENTER to run on your computer. This port of the Setup program prepares Microsoft(R) Windows (R) XP to continue the SATA driver installation from the floppy disk. To repair a Windows XP installation using Recovery Console, press R. Enter= Continue R=Repair F3=Exit Figure 18 (Note: Each time you do not have...

Manual
Page 69
... 2CH Speaker. Choose Headphone or Line Out depending on the device connected and click OK. Doubleclick the icon to the rear Line Out jack, a small window will pop up to 192 kHz/24-bit quality and multi-streaming applications, HD Audio is completed. - 69 - STEP 3: Connect a speaker or headphone to ...the speaker with amplifier to acquire the best sound effect if the stereo output is applied. all at the same time. (The procedure below uses Windows XP as the example operating system. ) Setting Up Stereo Speakers We recommend that support audio output at up and ask you what type of the audio...
... 2CH Speaker. Choose Headphone or Line Out depending on the device connected and click OK. Doubleclick the icon to the rear Line Out jack, a small window will pop up to 192 kHz/24-bit quality and multi-streaming applications, HD Audio is completed. - 69 - STEP 3: Connect a speaker or headphone to ...the speaker with amplifier to acquire the best sound effect if the stereo output is applied. all at the same time. (The procedure below uses Windows XP as the example operating system. ) Setting Up Stereo Speakers We recommend that support audio output at up and ask you what type of the audio...


