Manual
Page 3
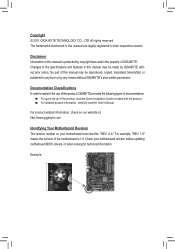
For product-related information, check on our website at: http://www.gigabyte.com Identifying Your Motherboard Revision The revision number on your motherboard revision before updating motherboard BIOS, drivers, or when looking for technical information. Changes to assist in this product, GIGABYTE provides the following types of documentations: For quick set-up of this...
For product-related information, check on our website at: http://www.gigabyte.com Identifying Your Motherboard Revision The revision number on your motherboard revision before updating motherboard BIOS, drivers, or when looking for technical information. Changes to assist in this product, GIGABYTE provides the following types of documentations: For quick set-up of this...

Manual
Page 5
... 3-3 Technical Manuals 58 3-4 Contact...59 3-5 System...59 3-6 Download Center 60 3-7 New Utilities...60 Chapter 4 Unique Features 61 4-1 Xpress Recovery2 61 4-2 BIOS Update Utilities 64 4-2-1 Updating the BIOS with the Q-Flash Utility 64 4-2-2 Updating the BIOS with the @BIOS Utility 67 4-3 EasyTune 6...68 4-4 Dynamic Energy Saver™ 2 69 4-5 Q-Share...71 4-6 Smart 6™ ...72 4-7 Auto Green...76 4-8 eXtreme Hard...
... 3-3 Technical Manuals 58 3-4 Contact...59 3-5 System...59 3-6 Download Center 60 3-7 New Utilities...60 Chapter 4 Unique Features 61 4-1 Xpress Recovery2 61 4-2 BIOS Update Utilities 64 4-2-1 Updating the BIOS with the Q-Flash Utility 64 4-2-2 Updating the BIOS with the @BIOS Utility 67 4-3 EasyTune 6...68 4-4 Dynamic Energy Saver™ 2 69 4-5 Q-Share...71 4-6 Smart 6™ ...72 4-7 Auto Green...76 4-8 eXtreme Hard...

Manual
Page 31
..., you not flash the BIOS. To flash the BIOS, do not encounter problems using the current version of BIOS, it with caution. BIOS Setup When the power is recommended that searches and downloads the latest version of BIOS from the Internet and updates the BIOS. To upgrade the BIOS, use either the GIGABYTE Q-Flash or @BIOS utility. • Q-Flash allows...
..., you not flash the BIOS. To flash the BIOS, do not encounter problems using the current version of BIOS, it with caution. BIOS Setup When the power is recommended that searches and downloads the latest version of BIOS from the Internet and updates the BIOS. To upgrade the BIOS, use either the GIGABYTE Q-Flash or @BIOS utility. • Q-Flash allows...

Manual
Page 54
... Exit Setup Load Fail-Safe Defaults F11: Save CMOS to BIOS F12: Load CMOS from BIOS Press on this item and then press the key to load the safest BIOS default settings. Always load the Optimized defaults after updating the BIOS or after clearing the CMOS values. In case system instability... occurs, you may try to load Fail-Safe defaults, which are the safest and most stable BIOS settings for the motherboard. ...
... Exit Setup Load Fail-Safe Defaults F11: Save CMOS to BIOS F12: Load CMOS from BIOS Press on this item and then press the key to load the safest BIOS default settings. Always load the Optimized defaults after updating the BIOS or after clearing the CMOS values. In case system instability... occurs, you may try to load Fail-Safe defaults, which are the safest and most stable BIOS settings for the motherboard. ...

Manual
Page 60
Drivers Installation - 60 - 3-6 Download Center To update the BIOS, drivers, or applications, click the Download Center button to link to install. The latest version of an item to install it. You can click the Install button on the right of the BIOS, drivers, or applications will be displayed. 3-7 New Utilities This page provides a quick link to GIGABYTE's lately developed utilities for users to the GIGABYTE website.
Drivers Installation - 60 - 3-6 Download Center To update the BIOS, drivers, or applications, click the Download Center button to link to install. The latest version of an item to install it. You can click the Install button on the right of the BIOS, drivers, or applications will be displayed. 3-7 New Utilities This page provides a quick link to GIGABYTE's lately developed utilities for users to the GIGABYTE website.

Manual
Page 64
... 1. H67MA-UD2H-B3 F4g . . . . : BIOS Setup : XpressRecovery2 : Boot Menu : Qflash 11/12/2010-H67-7A89UG05C-00 Because BIOS flashing is DualBIOS™? Normally, the system works on the next system boot and copy the BIOS file to the main BIOS to -use FAT32/16/12 file system. 3. 4-2 BIOS Update Utilities GIGABYTE motherboards provide two unique BIOS update tools, Q-Flash™ and @BIOS™...
... 1. H67MA-UD2H-B3 F4g . . . . : BIOS Setup : XpressRecovery2 : Boot Menu : Qflash 11/12/2010-H67-7A89UG05C-00 Because BIOS flashing is DualBIOS™? Normally, the system works on the next system boot and copy the BIOS file to the main BIOS to -use FAT32/16/12 file system. 3. 4-2 BIOS Update Utilities GIGABYTE motherboards provide two unique BIOS update tools, Q-Flash™ and @BIOS™...
Manual
Page 65
...MXIC 25L3206E 4M Keep0 DfilMe(Is)DfaotuandEnable HDD 1-0 Loa d CMO S Default Enable Update BIOS from the USB flash drive is updating the BIOS. Select the BIOS update file and press . Make sure the BIOS update file matches your motherboard model. Q-Flash Utility v2.19 Flash Type/Size MXIC 25L3206E...: 0 ESC:Reset Free size : 0 F10:Power Off 3. Updating the BIOS When updating the BIOS, choose the location where the BIOS file is complete, press any key to return to begin the BIOS update. The monitor will display the update process. • Do not turn off or restart the system ...
...MXIC 25L3206E 4M Keep0 DfilMe(Is)DfaotuandEnable HDD 1-0 Loa d CMO S Default Enable Update BIOS from the USB flash drive is updating the BIOS. Select the BIOS update file and press . Make sure the BIOS update file matches your motherboard model. Q-Flash Utility v2.19 Flash Type/Size MXIC 25L3206E...: 0 ESC:Reset Free size : 0 F10:Power Off 3. Updating the BIOS When updating the BIOS, choose the location where the BIOS file is complete, press any key to return to begin the BIOS update. The monitor will display the update process. • Do not turn off or restart the system ...

Manual
Page 66
Step 4: Press and then to enter BIOS Setup. Step 5: During the POST, press to exit Q-Flash and reboot the system. The procedure is complete after a BIOS update, so we recommend that you should see the new BIOS version is present on the POST screen. Unique Features - 66 - ...Select Load Optimized Defaults and press to CMOS and exit BIOS Setup. As the system boots, you reload BIOS defaults. CMOS Setup Utility-Copyright...
Step 4: Press and then to enter BIOS Setup. Step 5: During the POST, press to exit Q-Flash and reboot the system. The procedure is complete after a BIOS update, so we recommend that you should see the new BIOS version is present on the POST screen. Unique Features - 66 - ...Select Load Optimized Defaults and press to CMOS and exit BIOS Setup. As the system boots, you reload BIOS defaults. CMOS Setup Utility-Copyright...

Manual
Page 67
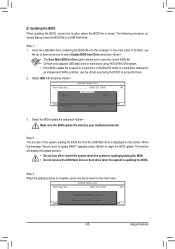
... and Stay Resident) programs. This helps prevent unexpected failures when performing a BIOS update. 2. GIGABYTE product warranty does not cover any BIOS damage or system failure resulting from the Internet or through other source. C. B. Update the BIOS without Using the Internet Update Function" below. 2. After Updating the BIOS Restart your motherboard model. Unique Features Follow the on -screen instructions to...
... and Stay Resident) programs. This helps prevent unexpected failures when performing a BIOS update. 2. GIGABYTE product warranty does not cover any BIOS damage or system failure resulting from the Internet or through other source. C. B. Update the BIOS without Using the Internet Update Function" below. 2. After Updating the BIOS Restart your motherboard model. Unique Features Follow the on -screen instructions to...

Manual
Page 70
... 8 Power Saving Status (Icons of the devices currently in taskbar) 14 INFO/Help 15 Motherboard Phase LED On/Off Switch (Default: On) 16 Live Utility Update (Check for the first time (Note 3). 12 13 14 3 2 4 65 7 1 8 15 10 11 9 16 Total Mode - Re-enter the application only if you ...application. (Note 1) Before using the Dynamic Energy Saver™ 2 function, make sure the CPU Enhanced Halt (C1E) and CPU EIST Function items in the BIOS Setup program are able to see how much total power savings they have accumulated in a set to run in power-saving mode will light on...
... 8 Power Saving Status (Icons of the devices currently in taskbar) 14 INFO/Help 15 Motherboard Phase LED On/Off Switch (Default: On) 16 Live Utility Update (Check for the first time (Note 3). 12 13 14 3 2 4 65 7 1 8 15 10 11 9 16 Total Mode - Re-enter the application only if you ...application. (Note 1) Before using the Dynamic Energy Saver™ 2 function, make sure the CPU Enhanced Halt (C1E) and CPU EIST Function items in the BIOS Setup program are able to see how much total power savings they have accumulated in a set to run in power-saving mode will light on...

Manual
Page 98
...For motherboards that have a CMOS_SW button, press this button to clear the CMOS values (before doing this step.) Step 3: Then go back to enter BIOS Setup during the POST mean? If not, try a speaker with an internal amplifier. Step 2: Check if Audio Device on our website and search for ...of standby power after about one minute. Q: Why do I still get a weak sound even though I clear the CMOS values? If not, please update it from GIGABYTE's website to clear the CMOS values. Q: How do the beeps emitted during the POST. Step 4: In Device Manager, right-click on the CLR_CMOS ...
...For motherboards that have a CMOS_SW button, press this button to clear the CMOS values (before doing this step.) Step 3: Then go back to enter BIOS Setup during the POST mean? If not, try a speaker with an internal amplifier. Step 2: Check if Audio Device on our website and search for ...of standby power after about one minute. Q: Why do I still get a weak sound even though I clear the CMOS values? If not, please update it from GIGABYTE's website to clear the CMOS values. Q: How do the beeps emitted during the POST. Step 4: In Device Manager, right-click on the CLR_CMOS ...


