Gigabyte GA-H61MA-D3V Support and Manuals
Get Help and Manuals for this Gigabyte item
View All Support Options Below
Free Gigabyte GA-H61MA-D3V manuals!
Problems with Gigabyte GA-H61MA-D3V?
Ask a Question
Free Gigabyte GA-H61MA-D3V manuals!
Problems with Gigabyte GA-H61MA-D3V?
Ask a Question
Most Recent Gigabyte GA-H61MA-D3V Questions

Usb Ports Remain Powered After Shutdown?
Greetings - the usb ports of my Gigabyte GA-H61MA-D3V motherboard remain power after exiting Windows...
Greetings - the usb ports of my Gigabyte GA-H61MA-D3V motherboard remain power after exiting Windows...
(Posted by mseyf04 11 years ago)
Gigabyte GA-H61MA-D3V Videos

How to replace your old CPU and Mainboard with Intel Core i3 and Gigabyte GA-H61MA-D2V
Duration: 3:11
Total Views: 5,744
Duration: 3:11
Total Views: 5,744
Popular Gigabyte GA-H61MA-D3V Manual Pages
Manual - Page 4

...
GA-H61MA-D3V Motherboard Layout 5 GA-H61MA-D3V Motherboard Block Diagram 6
Chapter 1 Hardware Installation 7 1-1 Installation Precautions 7 1-2 Product Specifications 8 1-3 Installing the CPU 10 1-4 Installing the Memory 11 1-5 Installing an Expansion Card 11 1-6 Back Panel Connectors 12 1-7 Internal Connectors 13
Chapter 2 BIOS Setup 20 2-1 Startup Screen 20 2-2 The Main Menu 21...
Manual - Page 5

...
PCIEX16
PCIEX1_1
Realtek/
Atheros
GbE LAN
PCIEX1_2
B_BIOS
M_BIOS
CODEC
PCIEX1_3
F_AUDIO
SYS_FAN
BAT
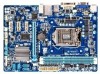
GA-H61MA-D3V
ATX
SATA2
iTE IT8728
Marvell 88SE9172
Intel® H61
SATA2
GSATA3 1 0
CLR_CMOS
F_USB2 F_USB1 F_PANEL
Box Contents GA-H61MA-D3V motherboard Motherboard driver disk User's Manual
Two SATA cables I/O Shield
* The box contents above are for reference only and...
Manual - Page 6

GA-H61MA-D3V Motherboard Block Diagram
1 PCI Express x16
CPU CLK+/- (100 MHz)
LGA1155 CPU
DDR3 1333/1066/800 MHz Dual Channel Memory
...
x1
Etron EJ168
x1
Marvell 88SE9172
x1
PCI Express Bus x1 x1 x1
PCIe CLK (100 MHz)
3 PCI Express x1
Intel® H61 CODEC
Dual BIOS 4 SATA 3Gb/s 8 USB 2.0/1.1
LPC Bus iTE
IT8728
PS/2 KB/Mouse
MIC (Center/Subwoofer Speaker Out) Line Out (Front Speaker ...
Manual - Page 7

... are connected. •• To prevent damage to the motherboard, do not have a problem related to the use of electrostatic discharge (ESD).
ponents such as a motherboard, CPU or memory. These stickers are required for the motherboard. •• Prior to installation, do not remove or break motherboard S/N (Serial Number) sticker or
warranty sticker provided by unplugging...
Manual - Page 8

...USB 3.0/2.0 ports on the back panel
- 8 - 1-2 Product Specifications
CPU
ŠŠ Support for Intel® Core™ i7 processors/Intel® Core&#...installed, the actual memory size displayed will be less than 4 GB. ŠŠ Dual channel memory architecture ŠŠ Support for DDR3 1333/1066/800 MHz memory modules ŠŠ Support for non-ECC memory modules (Go to GIGABYTE...
Manual - Page 10
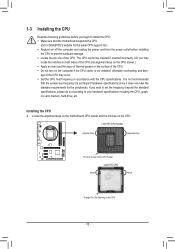
.... The CPU cannot be set the frequency beyond hardware specifications since it does not meet the standard requirements for the peripherals. 1-3 Installing the CPU
Read the following guidelines before you begin to install the CPU: •• Make sure that the motherboard supports the CPU.
(Go to GIGABYTE's website for the latest CPU support list.) •• Always...
Manual - Page 11

... automatically detect the specifications and capacity of the memory. It is recommended that memory of the same capacity, brand, speed, and chips be used . (Go to GIGABYTE's website for optimum performance.
1-5 Installing an Expansion Card
Read the following guidelines before you begin to install the memory: •• Make sure that the motherboard supports the memory...
Manual - Page 19

... load factory defaults (select Load Optimized Defaults) or manually configure the BIOS settings (refer to Chapter 2, "BIOS Setup," for BIOS configurations).
11) BAT (Battery) The battery provides power to keep the values (such as BIOS configurations, date, and time information) in the CMOS when the computer is replaced with an incorrect model. •• Contact the place of the...
Manual - Page 20

... "Load Optimized Defaults" section in this chapter or introductions of BIOS from the Internet
and updates the BIOS.
•• Because BIOS flashing is potentially risky, if you do it is turned off, the battery on the motherboard. To flash the BIOS, do not encounter problems using the current version of the system in the CMOS on...
Manual - Page 21

...to configure the default language used by BIOS version.
- 21 - This menu also displays information on the devices connected to the SATA ports. „„ BIOS Features Use this menu to configure the...devices, such as usual, select the Load Optimized Defaults item to set your system to its defaults.
•• The BIOS Setup menus described in this menu to configure all the power-saving ...
Manual - Page 24

... cores. Auto lets the BIOS automatically configure this setting. (Default: Auto)
&& CPU Enhanced Halt (C1E) (Note) Enables or disables Intel CPU Enhanced Halt (C1E) function, a CPU power-saving function in order to reduce the current. This feature only works for different number of CPU cores you install a CPU that supports this setting. (Default: Auto)
(Note...
Manual - Page 28

...Silent Allows the system fan to run at slow speeds. Manual Allows you to control the system fan speed under the ...BIOS will show "Yes", otherwise it will emit warning sound. Check the fan condition or fan connection when this field will show "No". This item is configurable only when CPU Fan Speed Control is set Reset Case Open Status to Enabled, save the settings to the motherboard...
Manual - Page 29

... Chipset. For more information about Intel CPUs' unique features, please visit Intel's website. (Default: Enabled)
2-4 System
This section provides information on your motherboard model and BIOS version. You can also select the default language used by the BIOS and manually set the system time.
- 29 - This item is present only when you install a CPU that supports this feature.
Manual - Page 31

... administrator password (or user password) at system startup and when entering BIOS Setup. This item is present only when you install a CPU that supports this item to enter the submenu that presents the devices of the keyboard after the POST. (Default: Enabled)
&& Full Screen LOGO Show Allows you to display the GIGABYTE Logo at system startup. Set this...
Manual - Page 38

... hard drives are marked with identical model and capacity). Then press on the RAID tab. B. Configuring RAID set GSATA Controller on the motherboard.
Turn on the motherboard you installed. Press on NEXT. 2. Press on the two hard
drives respectively to Chapter 2, "BIOS Setup," "Peripherals." Set the required items in your motherboard. Options include 32 KB, 64 KB...
Gigabyte GA-H61MA-D3V Reviews
We have not received any reviews for Gigabyte yet.