
Manual
Page 4
.... For product-related information, check on our website at: http://www.gigabyte.com Identifying Your Motherboard Revision The revision number on your motherboard revision before updating motherboard BIOS, drivers, or when looking for technical information. Changes to the specifications and features in this...this manual may be made by any form or by GIGABYTE without GIGABYTE's prior written permission. In order to their respective owners. No part of GIGABYTE. Disclaimer Information in the use of the motherboard is the property of this manual may be reproduced, ...
.... For product-related information, check on our website at: http://www.gigabyte.com Identifying Your Motherboard Revision The revision number on your motherboard revision before updating motherboard BIOS, drivers, or when looking for technical information. Changes to the specifications and features in this...this manual may be made by any form or by GIGABYTE without GIGABYTE's prior written permission. In order to their respective owners. No part of GIGABYTE. Disclaimer Information in the use of the motherboard is the property of this manual may be reproduced, ...
Manual
Page 5
Table of Contents GA-H61M-D2-B3/GA-H61M-S2V-B3 Motherboard Layout 6 GA-H61M-D2-B3/GA-H61M-S2V-B3 Motherboard Block Diagram 7 Chapter 1 Hardware Installation 8 1-1 Installation Precautions 8 1-2 Product Specifications 9 1-3 Installing the CPU and CPU Cooler 11 1-4 Installing the Memory 12 1-5 Installing an Expansion Card 12 1-6 ...-Safe Defaults 37 2-10 Load Optimized Defaults 37 2-11 Set Supervisor/User Password 38 2-12 Save & Exit Setup 38 2-13 Exit Without Saving 39 Chapter 3 Drivers Installation 39 - 5 -
Table of Contents GA-H61M-D2-B3/GA-H61M-S2V-B3 Motherboard Layout 6 GA-H61M-D2-B3/GA-H61M-S2V-B3 Motherboard Block Diagram 7 Chapter 1 Hardware Installation 8 1-1 Installation Precautions 8 1-2 Product Specifications 9 1-3 Installing the CPU and CPU Cooler 11 1-4 Installing the Memory 12 1-5 Installing an Expansion Card 12 1-6 ...-Safe Defaults 37 2-10 Load Optimized Defaults 37 2-11 Set Supervisor/User Password 38 2-12 Save & Exit Setup 38 2-13 Exit Without Saving 39 Chapter 3 Drivers Installation 39 - 5 -
Manual
Page 6
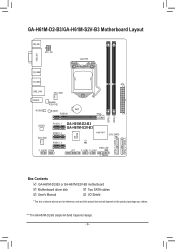
GA-H61M-D2-B3/GA-H61M-S2V-B3 Motherboard Layout KB_MS ATX_12V LGA1155 VGA_DVI R_USB2 R_USB1 ATX USB_LAN CPU_FAN AUDIO Realtek RTL8111E M_BIOS B_BIOS BAT PCIEX16 DDR3_1 DDR3_2 CODEC PCIEX1_1 SYS_FAN PCIEX1_2 PCIEX1_3 F_AUDIO COMA GA-H61M-D2-B3 GA-H61M-S2V-B3 Intel® H61 CLR_CMOS iTE IT8728 CI PWR_LED LPT F_USB2 F_USB1 F_PANEL SATA2_3 SATA2_1 SATA2_2 SATA2_0 Box Contents GA-H61M-D2-B3 or GA-H61M-S2V-B3 motherboard Motherboard driver disk Two SATA...
GA-H61M-D2-B3/GA-H61M-S2V-B3 Motherboard Layout KB_MS ATX_12V LGA1155 VGA_DVI R_USB2 R_USB1 ATX USB_LAN CPU_FAN AUDIO Realtek RTL8111E M_BIOS B_BIOS BAT PCIEX16 DDR3_1 DDR3_2 CODEC PCIEX1_1 SYS_FAN PCIEX1_2 PCIEX1_3 F_AUDIO COMA GA-H61M-D2-B3 GA-H61M-S2V-B3 Intel® H61 CLR_CMOS iTE IT8728 CI PWR_LED LPT F_USB2 F_USB1 F_PANEL SATA2_3 SATA2_1 SATA2_2 SATA2_0 Box Contents GA-H61M-D2-B3 or GA-H61M-S2V-B3 motherboard Motherboard driver disk Two SATA...
Manual
Page 13
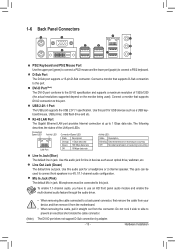
... panel audio module and enable the multi-channel audio feature through the audio driver. (Note) •• When removing the cable connected to a back panel connector, first remove the cable from your device and then remove it from the motherboard. •• When removing the cable, pull it side to side to...
... panel audio module and enable the multi-channel audio feature through the audio driver. (Note) •• When removing the cable connected to a back panel connector, first remove the cable from your device and then remove it from the motherboard. •• When removing the cable, pull it side to side to...
Manual
Page 39
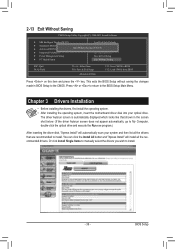
...: Save & Exit Setup Abandon all the recommended drivers. Chapter 3 Drivers Installation • Before installing the drivers, first install the operating system. • After installing the operating system, insert the motherboard driver disk into your system and then list all the drivers that shown in BIOS Setup to install. The driver Autorun screen is automatically displayed which looks...
...: Save & Exit Setup Abandon all the recommended drivers. Chapter 3 Drivers Installation • Before installing the drivers, first install the operating system. • After installing the operating system, insert the motherboard driver disk into your system and then list all the drivers that shown in BIOS Setup to install. The driver Autorun screen is automatically displayed which looks...


