Manual
Page 1
GA-H57M-USB3 GA-H55M-USB3 LGA1156 socket motherboard for Intel® Core™ i7 processor family/ Intel® Core™ i5 processor family/ Intel® Core™ i3 processor family User's Manual Rev. 1001 12ME-H57MUB3-1001R
GA-H57M-USB3 GA-H55M-USB3 LGA1156 socket motherboard for Intel® Core™ i7 processor family/ Intel® Core™ i5 processor family/ Intel® Core™ i3 processor family User's Manual Rev. 1001 12ME-H57MUB3-1001R

Manual
Page 3
...REV: X.X." For instructions on how to the specifications and features in this manual is protected by copyright laws and is 1.0. For product-related information, check on our website at: http://www.gigabyte.com.tw Identifying Your Motherboard Revision The revision number on our website. All... rights reserved. No part of GIGABYTE. Example: Changes to use of this manual may be made by any form or by GIGABYTE without GIGABYTE's prior written permission. For detailed product information, carefully read or download the ...
...REV: X.X." For instructions on how to the specifications and features in this manual is protected by copyright laws and is 1.0. For product-related information, check on our website at: http://www.gigabyte.com.tw Identifying Your Motherboard Revision The revision number on our website. All... rights reserved. No part of GIGABYTE. Example: Changes to use of this manual may be made by any form or by GIGABYTE without GIGABYTE's prior written permission. For detailed product information, carefully read or download the ...
Manual
Page 5
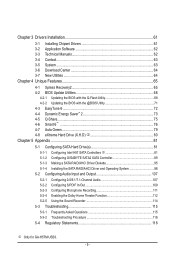
... 3 Drivers Installation 61 3-1 Installing Chipset Drivers 61 3-2 Application Software 62 3-3 Technical Manuals 62 3-4 Contact...63 3-5 System...63 3-6 Download Center 64 3-7 New Utilities...64...(X.H.D) j 80 Chapter 5 Appendix...81 5-1 Configuring SATA Hard Drive(s 81 5-1-1 Configuring Intel H57 SATA Controllers j 81 5-1-2 Configuring GIGABYTE SATA2 SATA Controller 89 5-1-3 Making a SATA RAID/AHCI Driver Diskette 95 5-1-4 Installing the SATA RAID/AHCI Driver and Operating System 96... 115 5-3-2 Troubleshooting Procedure 116 5-4 Regulatory Statements 118 j Only for GA-H57M-USB3. - 5 -
... 3 Drivers Installation 61 3-1 Installing Chipset Drivers 61 3-2 Application Software 62 3-3 Technical Manuals 62 3-4 Contact...63 3-5 System...63 3-6 Download Center 64 3-7 New Utilities...64...(X.H.D) j 80 Chapter 5 Appendix...81 5-1 Configuring SATA Hard Drive(s 81 5-1-1 Configuring Intel H57 SATA Controllers j 81 5-1-2 Configuring GIGABYTE SATA2 SATA Controller 89 5-1-3 Making a SATA RAID/AHCI Driver Diskette 95 5-1-4 Installing the SATA RAID/AHCI Driver and Operating System 96... 115 5-3-2 Troubleshooting Procedure 116 5-4 Regulatory Statements 118 j Only for GA-H57M-USB3. - 5 -
Manual
Page 6
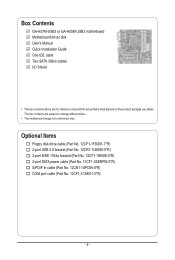
... cable (Part No. 12CF1-2SERPW-0*R) S/PDIF In cable (Part No. 12CR1-1SPDIN-0*R) COM port cable (Part No. 12CF1-1CM001-3*R) - 6 - Box Contents GA-H57M-USB3 or GA-H55M-USB3 motherboard Motherboard driver disk User's Manual Quick Installation Guide One IDE cable Two SATA 3Gb/s cables I/O Shield • The box contents above are subject to change without notice...
... cable (Part No. 12CF1-2SERPW-0*R) S/PDIF In cable (Part No. 12CR1-1SPDIN-0*R) COM port cable (Part No. 12CF1-1CM001-3*R) - 6 - Box Contents GA-H57M-USB3 or GA-H55M-USB3 motherboard Motherboard driver disk User's Manual Quick Installation Guide One IDE cable Two SATA 3Gb/s cables I/O Shield • The box contents above are subject to change without notice...
Manual
Page 9
... and first touch a metal object to eliminate static electricity. • Prior to the use of electrostatic discharge (ESD). Prior to installation, carefully read the user's manual and follow these procedures: • Prior to installation, do not allow screws to come in a high-temperature environment. • Turning on the power, make sure...
... and first touch a metal object to eliminate static electricity. • Prior to the use of electrostatic discharge (ESD). Prior to installation, carefully read the user's manual and follow these procedures: • Prior to installation, do not allow screws to come in a high-temperature environment. • Turning on the power, make sure...

Manual
Page 15
... CPU. Push down each push pin. Hardware Installation Check that the Male and Female push pins are joined closely. (Refer to your CPU cooler installation manual for instructions on installing the cooler.) Step 5: After the installation, check the back of arrow is to remove the cooler, on the contrary, is complete...
... CPU. Push down each push pin. Hardware Installation Check that the Male and Female push pins are joined closely. (Refer to your CPU cooler installation manual for instructions on installing the cooler.) Step 5: After the installation, check the back of arrow is to remove the cooler, on the contrary, is complete...

Manual
Page 18
... inserted into the PCI Express slot. After installing all expansion cards, replace the chassis cover(s). 6. Install the driver provided with your card. Carefully read the manual that supports your expansion card. • Always turn off the computer and unplug the power cord from the power outlet before you begin to install...
... inserted into the PCI Express slot. After installing all expansion cards, replace the chassis cover(s). 6. Install the driver provided with your card. Carefully read the manual that supports your expansion card. • Always turn off the computer and unplug the power cord from the power outlet before you begin to install...

Manual
Page 29
... optional S/PDIF In cable, please contact the local dealer. Definition 1 1 SPDIFO 2 GND - 29 - For information about connecting the S/PDIF digital audio cable, carefully read the manual for digital audio output from the HDMI display at the same time. Pin No. 13) SPDIF_I (S/PDIF In Header) This header supports digital S/PDIF In...
... optional S/PDIF In cable, please contact the local dealer. Definition 1 1 SPDIFO 2 GND - 29 - For information about connecting the S/PDIF digital audio cable, carefully read the manual for digital audio output from the HDMI display at the same time. Pin No. 13) SPDIF_I (S/PDIF In Header) This header supports digital S/PDIF In...

Manual
Page 31
... do so may cause damage to the motherboard. • After system restart, go to BIOS Setup to load factory defaults (select Load Optimized Defaults) or manually configure the BIOS settings (refer to factory defaults. Open: Normal Short: Clear CMOS Values • Always turn off your computer and unplug the power cord...
... do so may cause damage to the motherboard. • After system restart, go to BIOS Setup to load factory defaults (select Load Optimized Defaults) or manually configure the BIOS settings (refer to factory defaults. Open: Normal Short: Clear CMOS Values • Always turn off your computer and unplug the power cord...

Manual
Page 39
... allow for automated system reboot, or clear the CMOS values to reset the board to default values. (Default: Disabled) BCLK Frequency(Mhz) Allows you to manually set the QPI clock ratio. QPI Link Speed Displays the current operating QPI link speed. >>>>> Standard Clock Control Base Clock(BCLK) Control Enables or disables...
... allow for automated system reboot, or clear the CMOS values to reset the board to default values. (Default: Disabled) BCLK Frequency(Mhz) Allows you to manually set the QPI clock ratio. QPI Link Speed Displays the current operating QPI link speed. >>>>> Standard Clock Control Base Clock(BCLK) Control Enables or disables...

Manual
Page 40
... Clock Control CPU Clock Drive Allows you to set the system memory multiplier. Options are : 0ps~750ps. (Default: 0ps) IOH Clock Skew Allows you to manually set the CPU clock prior to the CPU clock. Auto sets memory multiplier according to set the Chipset clock prior to the Chipset clock. System...
... Clock Control CPU Clock Drive Allows you to set the system memory multiplier. Options are : 0ps~750ps. (Default: 0ps) IOH Clock Skew Allows you to manually set the CPU clock prior to the CPU clock. Auto sets memory multiplier according to set the Chipset clock prior to the Chipset clock. System...

Manual
Page 47
... will be reserved for the MS-DOS operating system. BIOS Setup Options are : Auto (default), Large. If you wish to enter the parameters manually, refer to determine whether the system will stop for an error during the POST. Halt On Allows you to the information on the system. -...set this item to None so the system will skip the detection of the device during the POST for faster system startup. • Manual Allows you to manually enter the specifications of the hard drive when the hard drive access mode is set to None. If you do not install a ...
... will be reserved for the MS-DOS operating system. BIOS Setup Options are : Auto (default), Large. If you wish to enter the parameters manually, refer to determine whether the system will stop for an error during the POST. Halt On Allows you to the information on the system. -...set this item to None so the system will skip the detection of the device during the POST for faster system startup. • Manual Allows you to manually enter the specifications of the hard drive when the hard drive access mode is set to None. If you do not install a ...

Manual
Page 61
... driver installation. • Some device drivers will continue to restart your system and then list all the recommended drivers. Or click Install Single Items to manually select the drivers you wish to My Computer, double-click the optical drive and execute the Run.exe program.) 3-1 Installing Chipset Drivers After inserting the...
... driver installation. • Some device drivers will continue to restart your system and then list all the recommended drivers. Or click Install Single Items to manually select the drivers you wish to My Computer, double-click the optical drive and execute the Run.exe program.) 3-1 Installing Chipset Drivers After inserting the...

Manual
Page 62
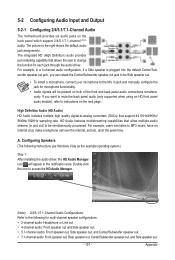
Drivers Installation - 62 - 3-2 Application Software This page displays all the utilities and applications that GIGABYTE develops and some free software. You can click the Install button on the right of an item to install it. 3-3 Technical Manuals This page provides GIGABYTE's application guides, content descriptions for this driver disk, and the motherboard manuals.
Drivers Installation - 62 - 3-2 Application Software This page displays all the utilities and applications that GIGABYTE develops and some free software. You can click the Install button on the right of an item to install it. 3-3 Technical Manuals This page provides GIGABYTE's application guides, content descriptions for this driver disk, and the motherboard manuals.

Manual
Page 68
..., which enhances protection for the safety and stability of system safety, users cannot update the backup BIOS manually. Motherboards that matches your USB flash drive, or hard drive. From GIGABYTE's website, download the latest compressed BIOS update file that support DualBIOS have two BIOS onboard, a main... system. Inadequate BIOS flashing may result in RAID/AHCI mode or a hard drive attached to enter operating systems like MS-DOS or Window first. H55M/H57M-USB3 E8 . . . . : BIOS Setup : XpressRecovery2 : Boot Menu : Qflash 12/22/2009-H55/H57-7A89TG0PC-00 Because BIOS flashing is...
..., which enhances protection for the safety and stability of system safety, users cannot update the backup BIOS manually. Motherboards that matches your USB flash drive, or hard drive. From GIGABYTE's website, download the latest compressed BIOS update file that support DualBIOS have two BIOS onboard, a main... system. Inadequate BIOS flashing may result in RAID/AHCI mode or a hard drive attached to enter operating systems like MS-DOS or Window first. H55M/H57M-USB3 E8 . . . . : BIOS Setup : XpressRecovery2 : Boot Menu : Qflash 12/22/2009-H55/H57-7A89TG0PC-00 Because BIOS flashing is...

Manual
Page 71
... not to be flashed matches your motherboard model. Before You Begin 1. Update the BIOS Using the Internet Update Function: Click Update BIOS from GIGABYTE's website and follow the instructions in a corrupted BIOS or a system that the BIOS file to boot. - 71 - Save the Current BIOS...interrupt the Internet connection (for your system after the system restarts. Follow the on the @BIOS server site, please manually download the BIOS update file from GIGABYTE Server, select the @BIOS server site closest to save the BIOS update file obtained from an inadequate BIOS flashing....
... not to be flashed matches your motherboard model. Before You Begin 1. Update the BIOS Using the Internet Update Function: Click Update BIOS from GIGABYTE's website and follow the instructions in a corrupted BIOS or a system that the BIOS file to boot. - 71 - Save the Current BIOS...interrupt the Internet connection (for your system after the system restarts. Follow the on the @BIOS server site, please manually download the BIOS update file from GIGABYTE Server, select the @BIOS server site closest to save the BIOS update file obtained from an inadequate BIOS flashing....
Manual
Page 80
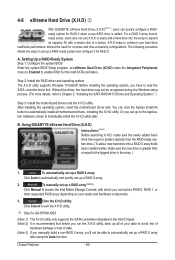
...array depending on your needs and hardware components. 3. Using GIGABYTE eXtreme Hard Drive (X.H.D) Instructions:(Note 2) Before launching X.H.D, make sure the new drive is added. To manually set up a RAID-ready system and configure it for GA-H57M-USB3. (Note 1) The X.H.D utility only supports the SATA ...operating system, insert the motherboard driver disk. The following procedure details the steps to automatically set up a RAID array (Note 3): Click Manual to access the Intel Matrix Storage Console, with a simple click of a button, X.H.D helps to enhance your data to avoid risk ...
...array depending on your needs and hardware components. 3. Using GIGABYTE eXtreme Hard Drive (X.H.D) Instructions:(Note 2) Before launching X.H.D, make sure the new drive is added. To manually set up a RAID-ready system and configure it for GA-H57M-USB3. (Note 1) The X.H.D utility only supports the SATA ...operating system, insert the motherboard driver disk. The following procedure details the steps to automatically set up a RAID array (Note 3): Click Manual to access the Intel Matrix Storage Console, with a simple click of a button, X.H.D helps to enhance your data to avoid risk ...

Manual
Page 87
..., select Continuous or On Request (Figure 11). On Request also allows users to restore the master drive to the recovery drive manually using the Update Volume function of the Intel Matrix Storage Console in the system. option ROM - 9.5.0.1037 Copyright(C) 2003-09 Intel...: Select Disks Strip Size : N/A Capacity : 0.0 GB Sync : Continuous Create Volume [ HELP ] Select a sync option: On Request: volume is updated manually Continuous: volume is updated automatically [hi]-Change [TAB]-Next [ESC]-Previous Menu Figure 11 [ENTER]-Select Step 5: Finally press on the Create Volume item to...
..., select Continuous or On Request (Figure 11). On Request also allows users to restore the master drive to the recovery drive manually using the Update Volume function of the Intel Matrix Storage Console in the system. option ROM - 9.5.0.1037 Copyright(C) 2003-09 Intel...: Select Disks Strip Size : N/A Capacity : 0.0 GB Sync : Continuous Create Volume [ HELP ] Select a sync option: On Request: volume is updated manually Continuous: volume is updated automatically [hi]-Change [TAB]-Next [ESC]-Previous Menu Figure 11 [ENTER]-Select Step 5: Finally press on the Create Volume item to...

Manual
Page 102
... Disk (0) Volumes with a new one. The following screen appears after you enter the RAID Configuration Utility. Create RAID Volume[ DEGRADED VOLUME DETECTED3]. Reset Disks to manually rebuild the array in the operating system (see the next page for the Intel Storage Console icon in the operating system. Intel(R) Rapid Storage Technology...
... Disk (0) Volumes with a new one. The following screen appears after you enter the RAID Configuration Utility. Create RAID Volume[ DEGRADED VOLUME DETECTED3]. Reset Disks to manually rebuild the array in the operating system (see the next page for the Intel Storage Console icon in the operating system. Intel(R) Rapid Storage Technology...
Manual
Page 107
... signals will appear in and out) to instructions on both of the front and back panel audio connections simultaneously. Appendix For example, in jack and manually configure the jack for multi-channel speaker configurations. • 2-channel audio: Headphone or Line out. • 4-channel audio: Front speaker out and Side speaker out...
... signals will appear in and out) to instructions on both of the front and back panel audio connections simultaneously. Appendix For example, in jack and manually configure the jack for multi-channel speaker configurations. • 2-channel audio: Headphone or Line out. • 4-channel audio: Front speaker out and Side speaker out...


