
Manual
Page 7
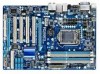
GA-H55-UD3H Motherboard Layout KB_USB VGA_DVI ATX_12V LGA1156 PHASE LED HDMI OPTICAL ATX R_USB USB_LAN CPU_FAN IT8213 IT8720 AUDIO F_AUDIO PCIEX1 RTL8111D PCIEX16 PCI1 CODEC PCI2 SPDIF_O SPDIF_I CD_IN PCI3 PCI4 PCIEX4 COMA BAT GA-H55-UD3H DDR3_2 DDR3_1 DDR3_4 DDR3_3 PWR_FAN Intel® H55 M_BIOS B_BIOS SATA2_3 SATA2_4 CLR_CMOS SATA2_0 SATA2_1 SATA2_2 SATA2_5 IDE F_USB1 SYS_FAN1 FDD SYS_FAN2 F_USB2 F_PANEL - 7 -
GA-H55-UD3H Motherboard Layout KB_USB VGA_DVI ATX_12V LGA1156 PHASE LED HDMI OPTICAL ATX R_USB USB_LAN CPU_FAN IT8213 IT8720 AUDIO F_AUDIO PCIEX1 RTL8111D PCIEX16 PCI1 CODEC PCI2 SPDIF_O SPDIF_I CD_IN PCI3 PCI4 PCIEX4 COMA BAT GA-H55-UD3H DDR3_2 DDR3_1 DDR3_4 DDR3_3 PWR_FAN Intel® H55 M_BIOS B_BIOS SATA2_3 SATA2_4 CLR_CMOS SATA2_0 SATA2_1 SATA2_2 SATA2_5 IDE F_USB1 SYS_FAN1 FDD SYS_FAN2 F_USB2 F_PANEL - 7 -

Manual
Page 11
Hardware Installation Up to 12 USB 2.0/1.1 ports (8 on the back panel, 4 via the USB brackets connected to the internal USB headers) Internal w 1 x 24-pin ATX main power connector Connectors w 1 x 4-pin ATX 12V power connector w 1 x floppy disk drive connector w 1 x IDE connector w 6 x SATA 3Gb/s connectors w 1 x CPU fan header w 2 x system fan headers w 1 x power fan header w 1 x front...
Hardware Installation Up to 12 USB 2.0/1.1 ports (8 on the back panel, 4 via the USB brackets connected to the internal USB headers) Internal w 1 x 24-pin ATX main power connector Connectors w 1 x 4-pin ATX 12V power connector w 1 x floppy disk drive connector w 1 x IDE connector w 6 x SATA 3Gb/s connectors w 1 x CPU fan header w 2 x system fan headers w 1 x power fan header w 1 x front...

Manual
Page 12
.... (Note 5) For optimum performance, if only one of the onboard digital graphics ports (e.g. HDMI and DVI-D) for Microsoft® Windows® 7/Vista/XP Form Factor w ATX Form Factor; 30.5cm x 21.0cm (Note 1) Due to x4 mode when ATI CrossFireX™ is enabled. (Note 8) Whether the CPU/system fan speed control...
.... (Note 5) For optimum performance, if only one of the onboard digital graphics ports (e.g. HDMI and DVI-D) for Microsoft® Windows® 7/Vista/XP Form Factor w ATX Form Factor; 30.5cm x 21.0cm (Note 1) Due to x4 mode when ATI CrossFireX™ is enabled. (Note 8) Whether the CPU/system fan speed control...

Manual
Page 21
1-7 Internal Connectors 1 18 3 2 10 16 5 13 17 11 8 12 7 4 15 64 14 9 1) ATX_12V 2) ATX 3) CPU_FAN 4) SYS_FAN1/2 5) PWR_FAN 6) FDD 7) IDE 8) SATA2_0/1/2/3/4/5 9) F_PANEL 10) F_AUDIO 11) CD_IN 12) SPDIF_I 13) SPDIF_O 14) F_USB1/F_USB2 15) COMA 16) BAT 17) CLR_CMOS 18) ...
1-7 Internal Connectors 1 18 3 2 10 16 5 13 17 11 8 12 7 4 15 64 14 9 1) ATX_12V 2) ATX 3) CPU_FAN 4) SYS_FAN1/2 5) PWR_FAN 6) FDD 7) IDE 8) SATA2_0/1/2/3/4/5 9) F_PANEL 10) F_AUDIO 11) CD_IN 12) SPDIF_I 13) SPDIF_O 14) F_USB1/F_USB2 15) COMA 16) BAT 17) CLR_CMOS 18) ...

Manual
Page 22
... to all devices are properly installed. When using a 2x10 power supply. 42 31 ATX_12V ATX_12V: Pin No. 1 2 3 4 Definition GND GND +12V +12V 12 24 1 13 ATX ATX: Pin No. 1 2 3 4 5 6 7 8 9 10 11 12 Definition Pin No. 3.3V 13 3.3V 14 GND 15 +5V 16 GND 17 +5V 18 GND 19 Power Good... first make sure the power supply is compatible with power supplies with 2x10 power connectors. Connect the power supply cable to the CPU. 1/2) ATX_12V/ATX (2x2 12V Power Connector and 2x12 Main Power Connector) With the use of the power connector, the power supply can lead to an unstable or...
... to all devices are properly installed. When using a 2x10 power supply. 42 31 ATX_12V ATX_12V: Pin No. 1 2 3 4 Definition GND GND +12V +12V 12 24 1 13 ATX ATX: Pin No. 1 2 3 4 5 6 7 8 9 10 11 12 Definition Pin No. 3.3V 13 3.3V 14 GND 15 +5V 16 GND 17 +5V 18 GND 19 Power Good... first make sure the power supply is compatible with power supplies with 2x10 power connectors. Connect the power supply cable to the CPU. 1/2) ATX_12V/ATX (2x2 12V Power Connector and 2x12 Main Power Connector) With the use of the power connector, the power supply can lead to an unstable or...

Manual
Page 51
... to be off and consumes less power than 4 seconds, the system will be resumed at any time. Note: To use this function, you need an ATX power supply providing at a desired time. (Default: Disabled) If enabled, set the date and time as following: (Note) Supported on the +5VSB lead. (Default: Enabled...
... to be off and consumes less power than 4 seconds, the system will be resumed at any time. Note: To use this function, you need an ATX power supply providing at a desired time. (Default: Disabled) If enabled, set the date and time as following: (Note) Supported on the +5VSB lead. (Default: Enabled...

Manual
Page 52
...: To use this function. (Default) Double Click Double click on left button on the PS/2 mouse to turn on the system. Note: you need an ATX power supply providing at least 1A on the +5VSB lead. When prompted for the password, press again without entering the password to select the HPET... mode for Windows 7/Vista operating system. (Default: Enabled) HPET Mode (Note) Allows you need an ATX power supply providing at least 1A on the +5VSB lead. AC Back Function Determines the state of the system after the return of power from...
...: To use this function. (Default) Double Click Double click on left button on the PS/2 mouse to turn on the system. Note: you need an ATX power supply providing at least 1A on the +5VSB lead. When prompted for the password, press again without entering the password to select the HPET... mode for Windows 7/Vista operating system. (Default: Enabled) HPET Mode (Note) Allows you need an ATX power supply providing at least 1A on the +5VSB lead. AC Back Function Determines the state of the system after the return of power from...

Manual
Page 87
... power cable to the CPU_FAN header properly? Yes The problem is securely seated in the expansion slot and power connectors are firmly attached. Connect the ATX main power cable and the 12V power cable. Remove all peripherals, connecting cables, and power cord etc. Make sure the graphics card is verified and...
... power cable to the CPU_FAN header properly? Yes The problem is securely seated in the expansion slot and power connectors are firmly attached. Connect the ATX main power cable and the 12V power cable. Remove all peripherals, connecting cables, and power cord etc. Make sure the graphics card is verified and...
