Manual
Page 7
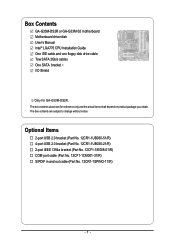
The box contents are for GA-G33M-DS2R. Box Contents GA-G33M-DS2R or GA-G33M-S2 motherboard Motherboard driver disk User's Manual Intel® LGA775 CPU Installation Guide One IDE cable and one floppy disk drive cable Tow SATA 3Gb/s cables One SATA bracket I/O ...
The box contents are for GA-G33M-DS2R. Box Contents GA-G33M-DS2R or GA-G33M-S2 motherboard Motherboard driver disk User's Manual Intel® LGA775 CPU Installation Guide One IDE cable and one floppy disk drive cable Tow SATA 3Gb/s cables One SATA bracket I/O ...

Manual
Page 14
...," "Integrated Peripherals," for details on enabling AHCI.) (Note 3) Available functions in Easytune may differ by motherboard model. (Note 4) Due to chipset limitation, Intel ICH9R RAID driver does not support Windows 2000 operating system. GA-G33M-DS2R/S2 Motherboard - 14 -
...," "Integrated Peripherals," for details on enabling AHCI.) (Note 3) Available functions in Easytune may differ by motherboard model. (Note 4) Due to chipset limitation, Intel ICH9R RAID driver does not support Windows 2000 operating system. GA-G33M-DS2R/S2 Motherboard - 14 -
Manual
Page 20
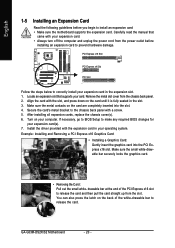
...fully seated in your card. PCI Express x16 Slot PCI Express x4 Slot PCI Slot Follow the steps below to correctly install your computer. GA-G33M-DS2R/S2 Motherboard - 20 - Make sure the metal contacts on the back of the PCI Express x16 slot to release the card and then ... Make sure the motherboard supports the expansion card. Secure the card's metal bracket to the chassis back panel with your expansion card(s). 7. Install the driver provided with the slot, and press down on your expansion card in the expansion slot. 1. Locate an expansion slot that came with a screw. 5....
...fully seated in your card. PCI Express x16 Slot PCI Express x4 Slot PCI Slot Follow the steps below to correctly install your computer. GA-G33M-DS2R/S2 Motherboard - 20 - Make sure the metal contacts on the back of the PCI Express x16 slot to release the card and then ... Make sure the motherboard supports the expansion card. Secure the card's metal bracket to the chassis back panel with your expansion card(s). 7. Install the driver provided with the slot, and press down on your expansion card in the expansion slot. 1. Locate an expansion slot that came with a screw. 5....

Manual
Page 36
...subsequent access to set the first boot device without having to accept. GA-G33M-DS2R/S2 Motherboard - 36 - You can be based on BIOS Setup settings. In Boot Menu, use the up hard drive data using the motherboard driver disk, the key can access Boot Menu again to change the first... boot device setting as needed. : Q-Flash Press the key to access the Q-Flash utility directly without entering BIOS Setup. To exit Boot Menu, press . Intel G33 BIOS for G33M-DS2R D26 . . . . : ...
...subsequent access to set the first boot device without having to accept. GA-G33M-DS2R/S2 Motherboard - 36 - You can be based on BIOS Setup settings. In Boot Menu, use the up hard drive data using the motherboard driver disk, the key can access Boot Menu again to change the first... boot device setting as needed. : Q-Flash Press the key to access the Q-Flash utility directly without entering BIOS Setup. To exit Boot Menu, press . Intel G33 BIOS for G33M-DS2R D26 . . . . : ...

Manual
Page 44
...driver to enable advanced Serial ATA features such as Native Command Queuing and hot plug. RAID Enables RAID for GA-G33M-DS2R. For more information about AHCI, please visit Intel's website. For more information about AHCI, please visit Intel's website. Only for the SATA controllers. GA-G33M-DS2R/S2... Motherboard - 44 - SATA AHCI Mode Enables or disables AHCI for GA-G33M-S2. (Note) Supported on Windows® Vista® operating system only. Disabled ...
...driver to enable advanced Serial ATA features such as Native Command Queuing and hot plug. RAID Enables RAID for GA-G33M-DS2R. For more information about AHCI, please visit Intel's website. For more information about AHCI, please visit Intel's website. Only for the SATA controllers. GA-G33M-DS2R/S2... Motherboard - 44 - SATA AHCI Mode Enables or disables AHCI for GA-G33M-S2. (Note) Supported on Windows® Vista® operating system only. Disabled ...

Manual
Page 52
... installed and sets the optimal CPU fan control mode. (Default) Voltage Sets Voltage mode for a 4-pin CPU fan. GA-G33M-DS2R/S2 Motherboard - 52 - A small portion of Intel Host Embedded Control Interface (HECI) driver from the motherboard driver disk. PWM Sets PWM mode for a 3-pin CPU fan. However, for a 3-pin CPU fan or a 4-pin CPU fan...
... installed and sets the optimal CPU fan control mode. (Default) Voltage Sets Voltage mode for a 4-pin CPU fan. GA-G33M-DS2R/S2 Motherboard - 52 - A small portion of Intel Host Embedded Control Interface (HECI) driver from the motherboard driver disk. PWM Sets PWM mode for a 3-pin CPU fan. However, for a 3-pin CPU fan or a 4-pin CPU fan...

Manual
Page 60
You may press the Install button following an item to install it. 3-3 Driver CD Information This page provides information about the drivers, applications and tools in this driver disk. GA-G33M-DS2R/S2 Motherboard - 60 - English 3-2 Software Applications This page displays all the tools and applications that GIGABYTE develops and some free software.
You may press the Install button following an item to install it. 3-3 Driver CD Information This page provides information about the drivers, applications and tools in this driver disk. GA-G33M-DS2R/S2 Motherboard - 60 - English 3-2 Software Applications This page displays all the tools and applications that GIGABYTE develops and some free software.
Manual
Page 66
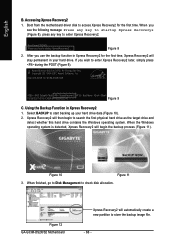
... GA-G33M-DS2R/S2 Motherboard Xpress Recovery2 will stay permanent in Xpress Recovery2 1. Select BACKUP to store the backup image file. - 66 - Figure 10 Figure 11 3. When you wish to access Xpress Recovery2 for G33M-DS2R D26 . . . . : BIOS Setup/Q-Flash : XpressRecovery2 : Boot Menu : Qflash 03/30/2007-G33-ICH9R-6A79OG02C-00 Figure 9 C. Boot from the motherboard driver...
... GA-G33M-DS2R/S2 Motherboard Xpress Recovery2 will stay permanent in Xpress Recovery2 1. Select BACKUP to store the backup image file. - 66 - Figure 10 Figure 11 3. When you wish to access Xpress Recovery2 for G33M-DS2R D26 . . . . : BIOS Setup/Q-Flash : XpressRecovery2 : Boot Menu : Qflash 03/30/2007-G33-ICH9R-6A79OG02C-00 Figure 9 C. Boot from the motherboard driver...

Manual
Page 82
...to boot from a mass storage device manufacturer, or do not want to install a third party SCSI or RAID driver. S=Specify Additional Device ENTER=Continue F3=Exit Figure 2 GA-G33M-DS2R/S2 Motherboard - 82 - Figure 1 Step 2: When a screen similar to manually specify an adapter. Step 1: Restart ...your system, or you have chosen to that you have prepared the SATA RAID/AHCI driver diskette and configured the required BIOS settings...
...to boot from a mass storage device manufacturer, or do not want to install a third party SCSI or RAID driver. S=Specify Additional Device ENTER=Continue F3=Exit Figure 2 GA-G33M-DS2R/S2 Motherboard - 82 - Figure 1 Step 2: When a screen similar to manually specify an adapter. Step 1: Restart ...your system, or you have chosen to that you have prepared the SATA RAID/AHCI driver diskette and configured the required BIOS settings...
Manual
Page 84
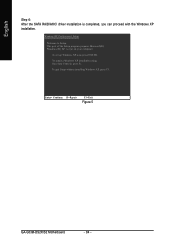
This port of the Setup program prepares Microsoft(R) Windows (R) XP to Setup. Enter= Continue R=Repair F3=Exit Figure 5 GA-G33M-DS2R/S2 Motherboard - 84 - To repair a Windows XP installation using Recovery Console, press R. To set up Windows XP now, press ENTER. To quit Setup without installing Windows XP, press F3. WindowsXP Professional Setup Welcome to run on your computer. English Step 4: After the SATA RAID/AHCI driver installation is completed, you can proceed with the Windows XP installation.
This port of the Setup program prepares Microsoft(R) Windows (R) XP to Setup. Enter= Continue R=Repair F3=Exit Figure 5 GA-G33M-DS2R/S2 Motherboard - 84 - To repair a Windows XP installation using Recovery Console, press R. To set up Windows XP now, press ENTER. To quit Setup without installing Windows XP, press F3. WindowsXP Professional Setup Welcome to run on your computer. English Step 4: After the SATA RAID/AHCI driver installation is completed, you can proceed with the Windows XP installation.


