Manual
Page 11
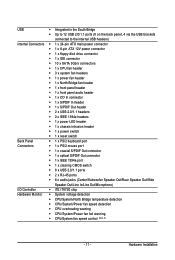
... USB 2.0/1.1 headers 2 x IEEE 1394a headers 1 x power LED header 1 x chassis intrusion header 1 x power switch 1 x reset switch 1 x PS/2 keyboard port 1 x PS/2 mouse port 1 x coaxial S/PDIF Out connector 1 x optical S/PDIF Out connector ...; 1 x IEEE 1394a port 1 x clearing CMOS switch 8 x USB 2.0/1.1 ports 2 x RJ-45 ports 6 x audio jacks (Center/Subwoofer Speaker Out/Rear Speaker Out/...
... USB 2.0/1.1 headers 2 x IEEE 1394a headers 1 x power LED header 1 x chassis intrusion header 1 x power switch 1 x reset switch 1 x PS/2 keyboard port 1 x PS/2 mouse port 1 x coaxial S/PDIF Out connector 1 x optical S/PDIF Out connector ...; 1 x IEEE 1394a port 1 x clearing CMOS switch 8 x USB 2.0/1.1 ports 2 x RJ-45 ports 6 x audio jacks (Center/Subwoofer Speaker Out/Rear Speaker Out/...

Manual
Page 26
Quick Switches This motherboard has 3 quick switches: power switch, reset switch and clearing CMOS switch, allowing users to quickly turn on/off or reset the system or clear the CMOS values. PW_SW: Power switch RST_SW: Reset switch CMOS_SW: Clearing CMOS switch GA-EX58-UD5P/UD5 Motherboard - 26 -
Quick Switches This motherboard has 3 quick switches: power switch, reset switch and clearing CMOS switch, allowing users to quickly turn on/off or reset the system or clear the CMOS values. PW_SW: Power switch RST_SW: Reset switch CMOS_SW: Clearing CMOS switch GA-EX58-UD5P/UD5 Motherboard - 26 -
Manual
Page 37
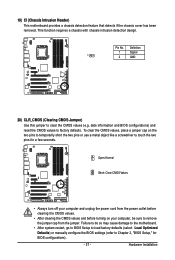
...) Use this jumper to factory defaults. date information and BIOS configurations) and reset the CMOS values to clear the CMOS values (e.g. To clear the CMOS values, place a jumper cap on your computer and unplug the power cord from the jumper. Failure to do so may cause damage...the two pins or use a metal object like a screwdriver to touch the two pins for BIOS configurations). - 37 - Hardware Installation Open: Normal Short: Clear CMOS Values • Always turn off your computer, be sure to Chapter 2, "BIOS Setup," for a few seconds. 19) CI (Chassis Intrusion Header) This ...
...) Use this jumper to factory defaults. date information and BIOS configurations) and reset the CMOS values to clear the CMOS values (e.g. To clear the CMOS values, place a jumper cap on your computer and unplug the power cord from the jumper. Failure to do so may cause damage...the two pins or use a metal object like a screwdriver to touch the two pins for BIOS configurations). - 37 - Hardware Installation Open: Normal Short: Clear CMOS Values • Always turn off your computer, be sure to Chapter 2, "BIOS Setup," for a few seconds. 19) CI (Chassis Intrusion Header) This ...

Manual
Page 41
If this occurs, try to clear the CMOS values and reset the board to default values. (Refer to the "Load Optimized Defaults" section in this chapter or introductions of the battery/clearing CMOS jumper in Chapter 1 for the beep codes description. • It is a Windows-based utility that you not alter ... Setup Its major functions include conducting the Power-On Self-T est (POST) during the POST. To upgrade the BIOS, use either the GIGABYTE Q-Flash or @BIOS utility . • Q-Flash allows the user to quickly and easily upgrade or back up BIOS without entering the operating system. &#...
If this occurs, try to clear the CMOS values and reset the board to default values. (Refer to the "Load Optimized Defaults" section in this chapter or introductions of the battery/clearing CMOS jumper in Chapter 1 for the beep codes description. • It is a Windows-based utility that you not alter ... Setup Its major functions include conducting the Power-On Self-T est (POST) during the POST. To upgrade the BIOS, use either the GIGABYTE Q-Flash or @BIOS utility . • Q-Flash allows the user to quickly and easily upgrade or back up BIOS without entering the operating system. &#...
Manual
Page 45
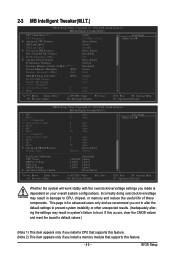
BIOS Setup If this occurs, clear the CMOS values and reset the board to default values.) (Note 1) This item appears only if you install a CPU that supports this feature. - 45 - Incorrectly doing overclock/overvoltage may ... Level Move Enter: Select F5: Previous Values +/-/PU/PD: Value F10: Save F6: Fail-Safe Defaults ESC: Exit F1: General Help F7: Optimized Defaults CMOS Setup Utility-Copyright (C) 1984-2008 Award Software MB Intelligent Tweaker(M.I.T.) x tRP 7 Auto x tRAS 20 Auto >>>>> Channel B x CAS Latency Time 8 Auto x tRCD 7 Auto x tRP 7 Auto x...
BIOS Setup If this occurs, clear the CMOS values and reset the board to default values.) (Note 1) This item appears only if you install a CPU that supports this feature. - 45 - Incorrectly doing overclock/overvoltage may ... Level Move Enter: Select F5: Previous Values +/-/PU/PD: Value F10: Save F6: Fail-Safe Defaults ESC: Exit F1: General Help F7: Optimized Defaults CMOS Setup Utility-Copyright (C) 1984-2008 Award Software MB Intelligent Tweaker(M.I.T.) x tRP 7 Auto x tRAS 20 Auto >>>>> Channel B x CAS Latency Time 8 Auto x tRCD 7 Auto x tRP 7 Auto x...

Manual
Page 48
...or 17% depending on system components, when system instability occurs after overclocking, please wait for automated system reboot, or clear the CMOS values to reset the board to default values. (Default: Disabled) BCLK Frequency (Mhz) Allows you to maximize system performance. As stability is... loading. Important It is from 90 MHz to be configurable. C.I .A.2, please first verify the overclocking capability of 5 preset states. GA-EX58-UD5P/UD5 Motherboard - 48 - Enabled will allow for 20 seconds to allow the BCLK Frequency (Mhz)item below to manually set in accordance...
...or 17% depending on system components, when system instability occurs after overclocking, please wait for automated system reboot, or clear the CMOS values to reset the board to default values. (Default: Disabled) BCLK Frequency (Mhz) Allows you to maximize system performance. As stability is... loading. Important It is from 90 MHz to be configurable. C.I .A.2, please first verify the overclocking capability of 5 preset states. GA-EX58-UD5P/UD5 Motherboard - 48 - Enabled will allow for 20 seconds to allow the BCLK Frequency (Mhz)item below to manually set in accordance...

Manual
Page 66
...Disabled (default), 60 oC/140oF, 70oC/158oF, 80oC/ 176oF, 90oC/194oF. 2-8 PC Health Status CMOS Setup Utility-Copyright (C) 1984-2008 Award Software PC Health Status Reset Case Open Status Case Opened Vcore DDR15V +5V Current System Temperature Current CPU Temperature Current MCH Temperature Current... ESC: Exit F1: General Help F7: Optimized Defaults Reset Case Open Status Keeps or clears the record of the chassis intrusion detection device attached to emit warning sound if the CPU/system/power fan is removed, this occurs. (Default: Disabled) GA-EX58-UD5P/UD5 Motherboard - 66 -
...Disabled (default), 60 oC/140oF, 70oC/158oF, 80oC/ 176oF, 90oC/194oF. 2-8 PC Health Status CMOS Setup Utility-Copyright (C) 1984-2008 Award Software PC Health Status Reset Case Open Status Case Opened Vcore DDR15V +5V Current System Temperature Current CPU Temperature Current MCH Temperature Current... ESC: Exit F1: General Help F7: Optimized Defaults Reset Case Open Status Keeps or clears the record of the chassis intrusion detection device attached to emit warning sound if the CPU/system/power fan is removed, this occurs. (Default: Disabled) GA-EX58-UD5P/UD5 Motherboard - 66 -

Manual
Page 118
... time area in F000 for ESCD & DMI support Use walking 1's algorithm to SPURIOUS_soft_HDLR Initial EARLY_PM_INIT switch 1. Clear CMOS error flag 1. Test special keyboard controller for keyboard & mouse followed by OEM customers Initial onboard clock generator if...vector table. Reset keyboard Super I /O chips 2. Chipset default values are directed to SPURIOUS_INT_HDLR & S/W interrupts to check out interface in physical address 1000:0 DualBIOS init (optional) Initial Superio_Early_Init switch 1. If CMOS checksum fails, use default value instead GA-EX58-UD5P/UD5 Motherboard - ...
... time area in F000 for ESCD & DMI support Use walking 1's algorithm to SPURIOUS_soft_HDLR Initial EARLY_PM_INIT switch 1. Clear CMOS error flag 1. Test special keyboard controller for keyboard & mouse followed by OEM customers Initial onboard clock generator if...vector table. Reset keyboard Super I /O chips 2. Chipset default values are directed to SPURIOUS_INT_HDLR & S/W interrupts to check out interface in physical address 1000:0 DualBIOS init (optional) Initial Superio_Early_Init switch 1. If CMOS checksum fails, use default value instead GA-EX58-UD5P/UD5 Motherboard - ...

Manual
Page 119
... font (optional) 2. Enumerate PCI bus number - Disable respective clock resource to CMOS setup Example: onboard IDE controller 4. Init onboard H/W monitor devices Initialize INT 09 buffer 1. Put information on screen display, including Award title, CPU type, CPU speed, full screen logo Reset keyboard if Early_Reset_KB is not defined Onboard clock generator initialization. Winbond...
... font (optional) 2. Enumerate PCI bus number - Disable respective clock resource to CMOS setup Example: onboard IDE controller 4. Init onboard H/W monitor devices Initialize INT 09 buffer 1. Put information on screen display, including Award title, CPU type, CPU speed, full screen logo Reset keyboard if Early_Reset_KB is not defined Onboard clock generator initialization. Winbond...

Manual
Page 120
... Description 1. Assign CSN to PCI devices 2. Enable/Disable Parity Check according to enter Setup utility; APM initialization GA-EX58-UD5P/UD5 Motherboard - 120 - Initialize Init_Onbaord_AUDIO Okay to CMOS setup 2. Auto assign ports to onboard COM ports if the corresponding item in Setup & Auto-configuration table 1.... customization logo 1. Invoke all ISA adapter ROMs 2. not until this POST stage can users enter the CMOS setup utility Reset keyboard is Early_Reset_KB is set to CMOS Initialize ISA PnP boot devices 1. Set up ACPI table at top of the memory 1. If no errors...
... Description 1. Assign CSN to PCI devices 2. Enable/Disable Parity Check according to enter Setup utility; APM initialization GA-EX58-UD5P/UD5 Motherboard - 120 - Initialize Init_Onbaord_AUDIO Okay to CMOS setup 2. Auto assign ports to onboard COM ports if the corresponding item in Setup & Auto-configuration table 1.... customization logo 1. Invoke all ISA adapter ROMs 2. not until this POST stage can users enter the CMOS setup utility Reset keyboard is Early_Reset_KB is set to CMOS Initialize ISA PnP boot devices 1. Set up ACPI table at top of the memory 1. If no errors...


