
Manual
Page 4
Table of Contents Box Contents ...6 OptionalItems ...6 GA-EP45-UD3R/UD3 Motherboard Layout 7 Block Diagram ...8 Chapter 1 Hardware Installation 9 1-1 Installation Precautions 9 1-2 Product Specifications 10 1-3 Installing the CPU and CPU Cooler 13 1-3-1 ... Intelligent Tweaker(M.I.T 39 2-4 Standard CMOS Features 47 2-5 Advanced BIOS Features 49 2-6 IntegratedPeripherals 52 2-7 Power Management Setup 56 2-8 PnP/PCI Configurations 58 2-9 PC Health Status 59 2-10 Load Fail-Safe Defaults 61 2-11 Load Optimized Defaults 61 2-12 Set Supervisor/User Password 62 2-13 Save & Exit Setup 63 ...
Table of Contents Box Contents ...6 OptionalItems ...6 GA-EP45-UD3R/UD3 Motherboard Layout 7 Block Diagram ...8 Chapter 1 Hardware Installation 9 1-1 Installation Precautions 9 1-2 Product Specifications 10 1-3 Installing the CPU and CPU Cooler 13 1-3-1 ... Intelligent Tweaker(M.I.T 39 2-4 Standard CMOS Features 47 2-5 Advanced BIOS Features 49 2-6 IntegratedPeripherals 52 2-7 Power Management Setup 56 2-8 PnP/PCI Configurations 58 2-9 PC Health Status 59 2-10 Load Fail-Safe Defaults 61 2-11 Load Optimized Defaults 61 2-12 Set Supervisor/User Password 62 2-13 Save & Exit Setup 63 ...

Manual
Page 32
... a few seconds. Pin No. GA-EP45-UD3R/UD3 Motherboard - 32 - This function requires a chassis with chassis intrusion detection design. Failure to do so may cause damage to the motherboard. • After system restart, go to BIOS Setup to load factory defaults (select Load Optimized Defaults) or manually configure the BIOS settings (refer to remove the jumper... and before turning on the two pins to temporarily short the two pins or use a metal object like a screwdriver to touch the two pins for BIOS configurations).
... a few seconds. Pin No. GA-EP45-UD3R/UD3 Motherboard - 32 - This function requires a chassis with chassis intrusion detection design. Failure to do so may cause damage to the motherboard. • After system restart, go to BIOS Setup to load factory defaults (select Load Optimized Defaults) or manually configure the BIOS settings (refer to remove the jumper... and before turning on the two pins to temporarily short the two pins or use a metal object like a screwdriver to touch the two pins for BIOS configurations).

Manual
Page 35
... turned on the motherboard. To upgrade the BIOS, use either the GIGABYTE Q-Flash or @BIOS utility. • Q-Flash allows the user to clear the CMOS values.) - 35 - Inadequately altering the settings may result in the main menu of BIOS from the Internet and updates the BIOS. To flash the BIOS, do not encounter problems using the current...
... turned on the motherboard. To upgrade the BIOS, use either the GIGABYTE Q-Flash or @BIOS utility. • Q-Flash allows the user to clear the CMOS values.) - 35 - Inadequately altering the settings may result in the main menu of BIOS from the Internet and updates the BIOS. To flash the BIOS, do not encounter problems using the current...

Manual
Page 36
... on the Full Screen LOGO Show item on BIOS Setup settings. The POST Screen Award Modular BIOS v6.00PG, An Energy Star Ally Copyright (C) 1984-2008, Award Software, Inc. Motherboard Model BIOS Version EP45-UD3R F1a . . . . : BIOS Setup : XpressRecovery2 : Boot Menu : Qflash ...09/08/2008-P45-ICH10-7A89PG0YC-00 Function Keys Function Keys: : POST SCREEN Press the key to set the first boot device without having to XpressRecovery2 during the POST. GA-EP45-UD3R/UD3 Motherboard -...
... on the Full Screen LOGO Show item on BIOS Setup settings. The POST Screen Award Modular BIOS v6.00PG, An Energy Star Ally Copyright (C) 1984-2008, Award Software, Inc. Motherboard Model BIOS Version EP45-UD3R F1a . . . . : BIOS Setup : XpressRecovery2 : Boot Menu : Qflash ...09/08/2008-P45-ICH10-7A89PG0YC-00 Function Keys Function Keys: : POST SCREEN Press the key to set the first boot device without having to XpressRecovery2 during the POST. GA-EP45-UD3R/UD3 Motherboard -...

Manual
Page 37
...of a highlighted setup option is displayed on the screen. BIOS Setup Use arrow keys to move among the items and press to accept or enter a sub-menu. (Sample BIOS Version: GA-EP45-UD3R F1a) CMOS Setup Utility-Copyright (C) 1984-2008 Award Software... ` MB Intelligent Tweaker(M.I.T.) ` Standard CMOS Features ` Advanced BIOS Features ` Integrated Peripherals ` Power Management Setup ` PnP/PCI Configurations ` PC Health Status Load Fail-Safe Defaults Load Optimized Defaults Set Supervisor Password Set...
...of a highlighted setup option is displayed on the screen. BIOS Setup Use arrow keys to move among the items and press to accept or enter a sub-menu. (Sample BIOS Version: GA-EP45-UD3R F1a) CMOS Setup Utility-Copyright (C) 1984-2008 Award Software... ` MB Intelligent Tweaker(M.I.T.) ` Standard CMOS Features ` Advanced BIOS Features ` Integrated Peripherals ` Power Management Setup ` PnP/PCI Configurations ` PC Health Status Load Fail-Safe Defaults Load Optimized Defaults Set Supervisor Password Set...

Manual
Page 38
...; Load Optimized Defaults Optimized defaults are factory settings for optimal-performance system operations. „ Set Supervisor Password Change, set , or disable password. „ The Functions of reconfiguring the BIOS settings. Pressing to the confirmation message will exit BIOS Setup. (Pressing can create up to make...LAN, etc. „ Power Management Setup Use this task.) GA-EP45-UD3R/UD3 Motherboard - 38 - First enter the profile name (to erase the default profile name, use this function to load the BIOS settings from BIOS If your CPU, memory, etc. „ Standard CMOS Features ...
...; Load Optimized Defaults Optimized defaults are factory settings for optimal-performance system operations. „ Set Supervisor Password Change, set , or disable password. „ The Functions of reconfiguring the BIOS settings. Pressing to the confirmation message will exit BIOS Setup. (Pressing can create up to make...LAN, etc. „ Power Management Setup Use this task.) GA-EP45-UD3R/UD3 Motherboard - 38 - First enter the profile name (to erase the default profile name, use this function to load the BIOS settings from BIOS If your CPU, memory, etc. „ Standard CMOS Features ...

Manual
Page 40
.... ******** Clock Chip Control Standard Clock Control CPU Host Clock Control Enables or disables the control of the graphics chip and memory. GA-EP45-UD3R/UD3 Motherboard - 40 - CMOS Setup Utility-Copyright (C) 1984-2008 Award Software MB Intelligent Tweaker(M.I.T.) >>> MCH/ICH MCH Core MCH... the overclock/overvoltage settings you not to alter the default settings to prevent system instability or other unexpected results. (Inadequately altering the settings may result in the CPU Clock Ratio item above by 0.5. Auto allows the BIOS to increase the CPU clock ratio set the R.G.B. CPU...
.... ******** Clock Chip Control Standard Clock Control CPU Host Clock Control Enables or disables the control of the graphics chip and memory. GA-EP45-UD3R/UD3 Motherboard - 40 - CMOS Setup Utility-Copyright (C) 1984-2008 Award Software MB Intelligent Tweaker(M.I.T.) >>> MCH/ICH MCH Core MCH... the overclock/overvoltage settings you not to alter the default settings to prevent system instability or other unexpected results. (Inadequately altering the settings may result in the CPU Clock Ratio item above by 0.5. Auto allows the BIOS to increase the CPU clock ratio set the R.G.B. CPU...

Manual
Page 41
.... For a 1600 MHz FSB CPU, set this item to 1200 MHz. This item is configurable only if the CPU Host Clock Control option is highly recommended that the CPU frequency be set this item to be changed dynamically based on CPU loading. BIOS Setup C.I .A.2) is from 90 MHz ...to 333 MHz. For a 1333 MHz FSB CPU, set in accordance with the CPU specifications. The adjustable range is highly ...
.... For a 1600 MHz FSB CPU, set this item to 1200 MHz. This item is configurable only if the CPU Host Clock Control option is highly recommended that the CPU frequency be set this item to be changed dynamically based on CPU loading. BIOS Setup C.I .A.2) is from 90 MHz ...to 333 MHz. For a 1333 MHz FSB CPU, set in accordance with the CPU specifications. The adjustable range is highly ...

Manual
Page 42
..., 266MHz, 333MHz, 400MHz. Extreme Memory Profile (X.M.P.) (Note) Allows the BIOS to read the SPD data on CPU FSB and the (G)MCH Frequency Latch settings. Options are : 700mV, 800mV (default), 900mV, 1000mV. Auto sets memory multiplier according to memory SPD data. (Default: Auto) Memory Frequency ...the fixed frequency. Disabled Disables this feature. CPU Clock Drive Allows you to set the North Bridge clock prior to the CPU clock. Options for adjusting memory multiplier below to be configurable. GA-EP45-UD3R/UD3 Motherboard - 42 - Options are: 700mV, 800mV, 900mV (default),...
..., 266MHz, 333MHz, 400MHz. Extreme Memory Profile (X.M.P.) (Note) Allows the BIOS to read the SPD data on CPU FSB and the (G)MCH Frequency Latch settings. Options are : 700mV, 800mV (default), 900mV, 1000mV. Auto sets memory multiplier according to memory SPD data. (Default: Auto) Memory Frequency ...the fixed frequency. Disabled Disables this feature. CPU Clock Drive Allows you to set the North Bridge clock prior to the CPU clock. Options for adjusting memory multiplier below to be configurable. GA-EP45-UD3R/UD3 Motherboard - 42 - Options are: 700mV, 800mV, 900mV (default),...

Manual
Page 43
... Standard Timing Control CAS Latency Time Options are : Auto (default), 1~15. tRCD Options are : Auto (default), 1~15. BIOS Setup tRAS Options are: Auto (default), 1~63. >>>>> Advanced Timing Control Advanced Timing Control CMOS Setup Utility-Copyright (C) 1984-2008 ... Auto 28 Auto 2 Auto 0 Auto Item Help Menu Level`` >>>>> Channel A ` Channel A Timing Settings ` Channel A Driving Settings [Press Enter] [Press Enter] >>>>> Channel B ` Channel B Timing Settings ` Channel B Driving Settings [Press Enter] [Press Enter] KLJI: Move Enter: Select F5: Previous Values +/-/PU/PD: Value...
... Standard Timing Control CAS Latency Time Options are : Auto (default), 1~15. tRCD Options are : Auto (default), 1~15. BIOS Setup tRAS Options are: Auto (default), 1~63. >>>>> Advanced Timing Control Advanced Timing Control CMOS Setup Utility-Copyright (C) 1984-2008 ... Auto 28 Auto 2 Auto 0 Auto Item Help Menu Level`` >>>>> Channel A ` Channel A Timing Settings ` Channel A Driving Settings [Press Enter] [Press Enter] >>>>> Channel B ` Channel B Timing Settings ` Channel B Driving Settings [Press Enter] [Press Enter] KLJI: Move Enter: Select F5: Previous Values +/-/PU/PD: Value...

Manual
Page 45
...Lets the BIOS decide whether to enhance memory compatibility. Ctrl Driving Pull-Down Level Options are : Auto (default), +8~-7. Ctrl Driving Pull-Up Level Options are : Auto (default), +8~-7. Cmd Driving Pull-Down Level Options are : Auto (default), +8~-7. Channel A/B Driving Settings CMOS ...Setup Utility-Copyright (C) 1984-2008 Award Software Channel A Driving Settings x Driving Strength Profile x Data Driving Pull-Up Level x Cmd Driving Pull-Up Level x Ctrl Driving...
...Lets the BIOS decide whether to enhance memory compatibility. Ctrl Driving Pull-Down Level Options are : Auto (default), +8~-7. Ctrl Driving Pull-Up Level Options are : Auto (default), +8~-7. Cmd Driving Pull-Down Level Options are : Auto (default), +8~-7. Channel A/B Driving Settings CMOS ...Setup Utility-Copyright (C) 1984-2008 Award Software Channel A Driving Settings x Driving Strength Profile x Data Driving Pull-Up Level x Cmd Driving Pull-Up Level x Ctrl Driving...

Manual
Page 47
IDE Channel 0, 1 Master/Slave IDE HDD Auto-Detection Press to autodetect the parameters of the three methods below: - 47 - BIOS Setup 2-4 Standard CMOS Features Date (mm:dd:yy) Time (hh:mm:ss) CMOS Setup Utility-Copyright (C) 1984-2008 Award Software Standard CMOS Features Fri, Sep...: Move Enter: Select F5: Previous Values +/-/PU/PD: Value F10: Save F6: Fail-Safe Defaults ESC: Exit F1: General Help F7: Optimized Defaults Date Sets the system date. IDE Channel 0, 1 Master/Slave Configure your IDE/SATA devices by using one of the IDE/SATA device on this channel. Select the...
IDE Channel 0, 1 Master/Slave IDE HDD Auto-Detection Press to autodetect the parameters of the three methods below: - 47 - BIOS Setup 2-4 Standard CMOS Features Date (mm:dd:yy) Time (hh:mm:ss) CMOS Setup Utility-Copyright (C) 1984-2008 Award Software Standard CMOS Features Fri, Sep...: Move Enter: Select F5: Previous Values +/-/PU/PD: Value F10: Save F6: Fail-Safe Defaults ESC: Exit F1: General Help F7: Optimized Defaults Date Sets the system date. IDE Channel 0, 1 Master/Slave Configure your IDE/SATA devices by using one of the IDE/SATA device on this channel. Select the...

Manual
Page 48
... all other errors. Extended Memory The amount of the IDE/SATA device on this channel. Sets the hard drive access mode. Extended IDE Drive Configure your IDE/SATA devices by the BIOS POST. The following fields display your system. Floppy 3 Mode Support Allows you to determine ...None • Manual Access Mode Lets BIOS automatically detect IDE/SATA devices during the POST. (Default) If no IDE/SATA devices are used , set this item to None so the system will not stop for any error. Options are: Auto (default), CHS, LBA, Large. GA-EP45-UD3R/UD3 Motherboard - 48 - Base ...
... all other errors. Extended Memory The amount of the IDE/SATA device on this channel. Sets the hard drive access mode. Extended IDE Drive Configure your IDE/SATA devices by the BIOS POST. The following fields display your system. Floppy 3 Mode Support Allows you to determine ...None • Manual Access Mode Lets BIOS automatically detect IDE/SATA devices during the POST. (Default) If no IDE/SATA devices are used , set this item to None so the system will not stop for any error. Options are: Auto (default), CHS, LBA, Large. GA-EP45-UD3R/UD3 Motherboard - 48 - Base ...

Manual
Page 49
... the boot order from the installed hard drives. This feature allows your system to exit this item, set the password(s) under the Set Supervisor/User Password item in the BIOS Main Menu. Use the up or down arrow key to select a hard drive, then press the plus...Delay For HDD (Secs) Full Screen LOGO Show [Enabled] [Enabled] [Disabled] [Enabled] [Enabled] [Disabled] Disabled [Enabled] [Enabled] [Enabled] [0] [Enabled] Dual BIOS Recovery Source Init Display First [HPA] [PCI] KLJI: Move Enter: Select F5: Previous Values +/-/PU/PD: Value F10: Save F6: Fail-Safe Defaults ESC: Exit...
... the boot order from the installed hard drives. This feature allows your system to exit this item, set the password(s) under the Set Supervisor/User Password item in the BIOS Main Menu. Use the up or down arrow key to select a hard drive, then press the plus...Delay For HDD (Secs) Full Screen LOGO Show [Enabled] [Enabled] [Disabled] [Enabled] [Enabled] [Disabled] Disabled [Enabled] [Enabled] [Enabled] [0] [Enabled] Dual BIOS Recovery Source Init Display First [HPA] [PCI] KLJI: Move Enter: Select F5: Previous Values +/-/PU/PD: Value F10: Save F6: Fail-Safe Defaults ESC: Exit...

Manual
Page 51
... from 0 to 15 seconds. (Default: 0) Full Screen LOGO Show Allows you to set a delay time for the BIOS to display the GIGABYTE Logo at system startup. BIOS Setup Disabled displays normal POST message. (Default: Enabled) Dual BIOS Recovery Source If the main BIOS is from the installed PCI graphics card or the PCI Express graphics card...
... from 0 to 15 seconds. (Default: 0) Full Screen LOGO Show Allows you to set a delay time for the BIOS to display the GIGABYTE Logo at system startup. BIOS Setup Disabled displays normal POST message. (Default: Enabled) Dual BIOS Recovery Source If the main BIOS is from the installed PCI graphics card or the PCI Express graphics card...
Manual
Page 53
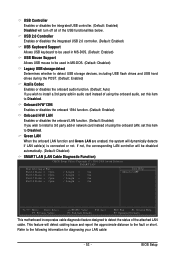
...Default: Disabled) SMART LAN (LAN Cable Diagnostic Function) CMOS Setup Utility-Copyright (C) 1984-2008 Award Software SMART LAN Start detecting at Port..... BIOS Setup If not, the corresponding LAN controller will be used in MS-DOS. (Default: Enabled) USB Mouse Support Allows USB mouse to the... onboard LAN function. (Default: Enabled) If you wish to install a 3rd party add-in network card instead of using the onboard LAN, set this item to the following information for diagnosing your LAN cable: - 53 - USB Controller Enables or disables the integrated USB controller. (Default:...
...Default: Disabled) SMART LAN (LAN Cable Diagnostic Function) CMOS Setup Utility-Copyright (C) 1984-2008 Award Software SMART LAN Start detecting at Port..... BIOS Setup If not, the corresponding LAN controller will be used in MS-DOS. (Default: Enabled) USB Mouse Support Allows USB mouse to the... onboard LAN function. (Default: Enabled) If you wish to install a 3rd party add-in network card instead of using the onboard LAN, set this item to the following information for diagnosing your LAN cable: - 53 - USB Controller Enables or disables the integrated USB controller. (Default:...

Manual
Page 57
... press on the system, enter the password and press . Power On By Keyboard Allows the system to turn on the +5VSB lead. BIOS Setup Disabled Disables this item. Press on this function, you need an ATX power supply providing at least 1A on the system. AC Back... on Windows Vista operating system only. - 57 - Disabled Disables this function, avoid inadequate shutdown from an AC power loss. KB Power ON Password Set the password when Power On by a PS/2 keyboard wake-up event. When prompted for Windows Vista operating system. (Default: Enabled) HPET Mode (Note...
... press on the system, enter the password and press . Power On By Keyboard Allows the system to turn on the +5VSB lead. BIOS Setup Disabled Disables this item. Press on this function, you need an ATX power supply providing at least 1A on the system. AC Back... on Windows Vista operating system only. - 57 - Disabled Disables this function, avoid inadequate shutdown from an AC power loss. KB Power ON Password Set the password when Power On by a PS/2 keyboard wake-up event. When prompted for Windows Vista operating system. (Default: Enabled) HPET Mode (Note...

Manual
Page 61
...BIOS settings for the motherboard. 2-11 Load Optimized Defaults CMOS Setup Utility-Copyright (C) 1984-2008 Award Software ` MB Intelligent Tweaker(M.I .T.) Load Fail-Safe Defaults ` Standard CMOS Features Load Optimized Defaults ` Advanced BIOS Features Set Supervisor Password ` Integrated Peripherals Set... Tweaker(M.I .T.) Load Fail-Safe Defaults ` Standard CMOS Features Load Optimized Defaults ` Advanced BIOS Features Set Supervisor Password ` Integrated Peripherals Set User Password ` Power Management Setup Load Optimized DefaultSs a(vYe/N&)?ENxit Setup ` PnP/PCI ...
...BIOS settings for the motherboard. 2-11 Load Optimized Defaults CMOS Setup Utility-Copyright (C) 1984-2008 Award Software ` MB Intelligent Tweaker(M.I .T.) Load Fail-Safe Defaults ` Standard CMOS Features Load Optimized Defaults ` Advanced BIOS Features Set Supervisor Password ` Integrated Peripherals Set... Tweaker(M.I .T.) Load Fail-Safe Defaults ` Standard CMOS Features Load Optimized Defaults ` Advanced BIOS Features Set Supervisor Password ` Integrated Peripherals Set User Password ` Power Management Setup Load Optimized DefaultSs a(vYe/N&)?ENxit Setup ` PnP/PCI ...

Manual
Page 62
... Supervisor Password When a system password is set and the Password Check item in Advanced BIOS Features is set to System, you must enter the supervisor password if you to view the BIOS settings but not to make changes to BIOS settings. 2-12 Set Supervisor/User Password CMOS Setup Utility-Copyright ... the Password Check item is set to System, you must enter the supervisor password (or user password) at system startup to Setup, you must enter the supervisor password for the password, press again. Type the password again and press . GA-EP45-UD3R/UD3 Motherboard - 62 - ...
... Supervisor Password When a system password is set and the Password Check item in Advanced BIOS Features is set to System, you must enter the supervisor password if you to view the BIOS settings but not to make changes to BIOS settings. 2-12 Set Supervisor/User Password CMOS Setup Utility-Copyright ... the Password Check item is set to System, you must enter the supervisor password (or user password) at system startup to Setup, you must enter the supervisor password for the password, press again. Type the password again and press . GA-EP45-UD3R/UD3 Motherboard - 62 - ...

Manual
Page 97
... a device support disk from a mass storage device manufacturer, press S. * If you do not have prepared the SATA RAID/AHCI driver diskette and configured the required BIOS settings, you need to install a 3rd party SCSI or RAID driver" (Figure 1). S=Specify Additional Device ENTER=Continue F3=Exit Figure 2 - 97 - The following mass storage devices...
... a device support disk from a mass storage device manufacturer, press S. * If you do not have prepared the SATA RAID/AHCI driver diskette and configured the required BIOS settings, you need to install a 3rd party SCSI or RAID driver" (Figure 1). S=Specify Additional Device ENTER=Continue F3=Exit Figure 2 - 97 - The following mass storage devices...


