Manual
Page 5
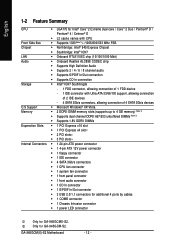
... CPU 14 1-3-2 Installation of the CPU Cooler 15 1-4 Installation of Memory 16 1-5 Installation of Expansion Cards 18 1-6 I/O Back Panel Introduction 19 1-7 Connectors Introduction 20 Chapter 2 BIOS Setup 31 The Main Menu (For example: GA-945GCMX-S2 BIOS Ver. : F5a 32 2-1 Standard CMOS Features 34 2-2 Advanced BIOS Features 36 2-3 IntegratedPeripherals 38 2-4 Power Management Setup 42...
... CPU 14 1-3-2 Installation of the CPU Cooler 15 1-4 Installation of Memory 16 1-5 Installation of Expansion Cards 18 1-6 I/O Back Panel Introduction 19 1-7 Connectors Introduction 20 Chapter 2 BIOS Setup 31 The Main Menu (For example: GA-945GCMX-S2 BIOS Ver. : F5a 32 2-1 Standard CMOS Features 34 2-2 Advanced BIOS Features 36 2-3 IntegratedPeripherals 38 2-4 Power Management Setup 42...
Manual
Page 12
...; 1 CPU fan connector Š 1 system fan connector Š 1 front panel connector Š 1 front audio connector Š 1 CD In connector Š 1 S/PDIF In/Out connector Š 2 USB 2.0/1.1 connectors for additional 4 ports by cables Š 1 COMB connector Š 1 Chassis Intrusion connector Š 1 power LED connector Only for GA-945GCM-S2. GA-945GCM(X)-S2 Motherboard - 12 - Only for GA-945GCMX-S2.
...; 1 CPU fan connector Š 1 system fan connector Š 1 front panel connector Š 1 front audio connector Š 1 CD In connector Š 1 S/PDIF In/Out connector Š 2 USB 2.0/1.1 connectors for additional 4 ports by cables Š 1 COMB connector Š 1 Chassis Intrusion connector Š 1 power LED connector Only for GA-945GCM-S2. GA-945GCM(X)-S2 Motherboard - 12 - Only for GA-945GCMX-S2.
Manual
Page 13
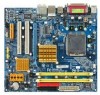
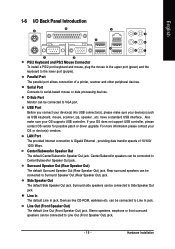
Hardware Installation You must install the FSB 1333 MHz CoreTM 2 CPU with 1333 MHz FSB through overclocking. English Rear Panel I/O Š 1 PS/2 keyboard port Š 1 PS/2 mouse port Š 1 parallel port Š 1 serial port Š 1 D-Sub port Š 4 USB 2.0/1.1 ports Š 1 RJ-45 port Š 6 ...
Hardware Installation You must install the FSB 1333 MHz CoreTM 2 CPU with 1333 MHz FSB through overclocking. English Rear Panel I/O Š 1 PS/2 keyboard port Š 1 PS/2 mouse port Š 1 parallel port Š 1 serial port Š 1 D-Sub port Š 4 USB 2.0/1.1 ports Š 1 RJ-45 port Š 6 ...
Manual
Page 19
... etc. Also make sure your OS supports USB controller. Surround side speakers can be connected to Surround Speaker Out (Rear Speaker Out) jack. English 1-6 I/O Back Panel Introduction PS/2 Keyboard and PS/2 Mouse Connector To install a PS/2 port keyboard and mouse, plug the mouse to the upper port (green) and the keyboard...
... etc. Also make sure your OS supports USB controller. Surround side speakers can be connected to Surround Speaker Out (Rear Speaker Out) jack. English 1-6 I/O Back Panel Introduction PS/2 Keyboard and PS/2 Mouse Connector To install a PS/2 port keyboard and mouse, plug the mouse to the upper port (green) and the keyboard...

Manual
Page 25
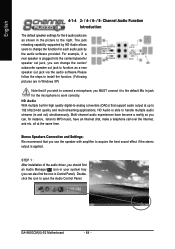
...) NC Pin 1: LED anode(+) Pin 2: LED cathode(-) Open: Normal Close: Power On/Off Pin 1: Power Pin 2- Hardware Installation English 10) F_PANEL (Front Panel Jumper) Please connect the power LED, PC speaker, reset switch and power switch etc. PW+ PWSPEAK+ SPEAK- 2 20 1 19 HD+ HD- of your ...chassis front panel to the F_PANEL connector according to the pin assignment below. Pin 3: NC Pin 4: Data(-) Pin 1: LED anode(+) Pin 2: LED cathode(-) Open: Normal ...
...) NC Pin 1: LED anode(+) Pin 2: LED cathode(-) Open: Normal Close: Power On/Off Pin 1: Power Pin 2- Hardware Installation English 10) F_PANEL (Front Panel Jumper) Please connect the power LED, PC speaker, reset switch and power switch etc. PW+ PWSPEAK+ SPEAK- 2 20 1 19 HD+ HD- of your ...chassis front panel to the F_PANEL connector according to the pin assignment below. Pin 3: NC Pin 4: Data(-) Pin 1: LED anode(+) Pin 2: LED cathode(-) Open: Normal ...
Manual
Page 26
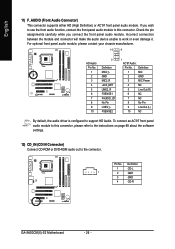
... out to this connector. Pin No. English 11) F_AUDIO (Front Audio Connector) This connector supports either HD (High Definition) or AC'97 front panel audio module. Definition 1 MIC 2 GND 3 MIC Power 4 NC 5 Line Out (R) 6 NC 7 NC 8 No Pin 9 Line Out ..., the audio driver is configured to work or even damage it. To connect an AC'97 front panel audio module to the connector. Definition 1 CD-L 1 2 GND 3 GND 4 CD-R GA-945GCM(X)-S2 Motherboard - 26 - For optional front panel audio module, please contact your chassis manufacturer. 10 9 HD Audio: Pin No. 1 2 3...
... out to this connector. Pin No. English 11) F_AUDIO (Front Audio Connector) This connector supports either HD (High Definition) or AC'97 front panel audio module. Definition 1 MIC 2 GND 3 MIC Power 4 NC 5 Line Out (R) 6 NC 7 NC 8 No Pin 9 Line Out ..., the audio driver is configured to work or even damage it. To connect an AC'97 front panel audio module to the connector. Definition 1 CD-L 1 2 GND 3 GND 4 CD-R GA-945GCM(X)-S2 Motherboard - 26 - For optional front panel audio module, please contact your chassis manufacturer. 10 9 HD Audio: Pin No. 1 2 3...
Manual
Page 57
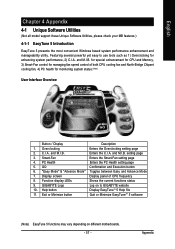
...for CPU and Memory, 3) Smart-Fan control for managing fan speed control of CPU frequency 8. GO Confirmation and Execution button 6. GIGABYTE Logo Log on different motherboards. - 57 - English Chapter 4 Appendix 4-1 Unique Software Utilities (Not all model support these Unique ... and manageability utility. and M.I .A. Display screen Display panel of both CPU cooling fan and North-Bridge Chipset cooling fan, 4) PC health for enhancing system performance, 2) C.I .A. Featuring several powerful yet easy to GIGABYTE website 10. Help button Display EasyTuneTM 5 Help file...
...for CPU and Memory, 3) Smart-Fan control for managing fan speed control of CPU frequency 8. GO Confirmation and Execution button 6. GIGABYTE Logo Log on different motherboards. - 57 - English Chapter 4 Appendix 4-1 Unique Software Utilities (Not all model support these Unique ... and manageability utility. and M.I .A. Display screen Display panel of both CPU cooling fan and North-Bridge Chipset cooling fan, 4) PC health for enhancing system performance, 2) C.I .A. Featuring several powerful yet easy to GIGABYTE website 10. Help button Display EasyTuneTM 5 Help file...
Manual
Page 64
HD Audio With multiple built-in high quality digital-to handle multiple audio streams (in the picture to work correctly. GA-945GCM(X)-S2 Motherboard - 64 - all at up to 192 kHz/24-bit quality and multi-streaming applications, HD Audio is able to -analog converters (DACs) that ... audio jack by HD Audio allows users to MP3 music, have become a reality so you use the speaker with amplifier to open the Audio Control Panel. Channel Audio Function Introduction The default speaker settings for the 6 audio jacks are as a rear speaker out jack via the audio software.Please follow...
HD Audio With multiple built-in high quality digital-to handle multiple audio streams (in the picture to work correctly. GA-945GCM(X)-S2 Motherboard - 64 - all at up to 192 kHz/24-bit quality and multi-streaming applications, HD Audio is able to -analog converters (DACs) that ... audio jack by HD Audio allows users to MP3 music, have become a reality so you use the speaker with amplifier to open the Audio Control Panel. Channel Audio Function Introduction The default speaker settings for the 6 audio jacks are as a rear speaker out jack via the audio software.Please follow...
Manual
Page 65
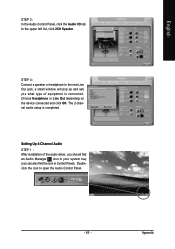
Choose Headphone or Line Out depending on the device connected and click OK. Appendix English STEP 2: In the Audio Control Panel, click the Audio I/O tab. The 2-channel audio setup is connected. Setting Up 4-Channel Audio STEP 1 : After installation of the audio driver, you should find the ... the icon to the rear Line Out jack, a small window will pop up and ask you can also find an Audio Manager icon in Control Panel). STEP 3: Connect a speaker or headphone to open the Audio Control Panel. - 65 - In the upper left list, click 2CH Speaker.
Choose Headphone or Line Out depending on the device connected and click OK. Appendix English STEP 2: In the Audio Control Panel, click the Audio I/O tab. The 2-channel audio setup is connected. Setting Up 4-Channel Audio STEP 1 : After installation of the audio driver, you should find the ... the icon to the rear Line Out jack, a small window will pop up and ask you can also find an Audio Manager icon in Control Panel). STEP 3: Connect a speaker or headphone to open the Audio Control Panel. - 65 - In the upper left list, click 2CH Speaker.
Manual
Page 66
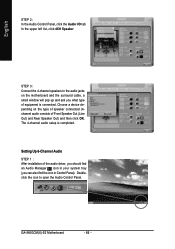
STEP 3: Connect the 4-channel speakers to open the Audio Control Panel. Doubleclick the icon to the audio jacks on the type of speaker connected (4channel audio consists of equipment is completed. GA-945GCM(X)-S2 Motherboard - 66 - Choose a device depending on the motherboard and the surround cable,... a small window will pop up and ask you can also find an Audio Manager icon in Control Panel). The 4-channel audio setup is connected...
STEP 3: Connect the 4-channel speakers to open the Audio Control Panel. Doubleclick the icon to the audio jacks on the type of speaker connected (4channel audio consists of equipment is completed. GA-945GCM(X)-S2 Motherboard - 66 - Choose a device depending on the motherboard and the surround cable,... a small window will pop up and ask you can also find an Audio Manager icon in Control Panel). The 4-channel audio setup is connected...
Manual
Page 67
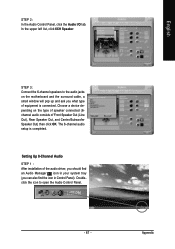
... the Audio I/O tab. Setting Up 8-Channel Audio STEP 1 : After installation of equipment is completed. Appendix STEP 3: Connect the 6-channel speakers to open the Audio Control Panel. - 67 - The 6-channel audio setup is connected. Doubleclick the icon to the audio jacks on the type of speaker connected (6channel audio consists of Front... what type of the audio driver, you should find an Audio Manager icon in your system tray (you can also find the icon in Control Panel). In the upper left list, click 6CH Speaker.
... the Audio I/O tab. Setting Up 8-Channel Audio STEP 1 : After installation of equipment is completed. Appendix STEP 3: Connect the 6-channel speakers to open the Audio Control Panel. - 67 - The 6-channel audio setup is connected. Doubleclick the icon to the audio jacks on the type of speaker connected (6channel audio consists of Front... what type of the audio driver, you should find an Audio Manager icon in your system tray (you can also find the icon in Control Panel). In the upper left list, click 6CH Speaker.
Manual
Page 68
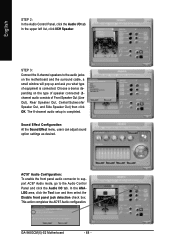
...and Side Speaker Out) then click OK. In the ANALOG area, click the Tool icon and then select the Disable front panel jack detection check box. GA-945GCM(X)-S2 Motherboard - 68 - Sound Effect Configuration: At the Sound Effect menu, users can adjust sound option settings as desired. AC'...97 Audio Configuration: To enable the front panel audio connector to support AC97 Audio mode, go to the audio jacks on the type...
...and Side Speaker Out) then click OK. In the ANALOG area, click the Tool icon and then select the Disable front panel jack detection check box. GA-945GCM(X)-S2 Motherboard - 68 - Sound Effect Configuration: At the Sound Effect menu, users can adjust sound option settings as desired. AC'...97 Audio Configuration: To enable the front panel audio connector to support AC97 Audio mode, go to the audio jacks on the type...


