
User Manual
Page 12
... will not insert properly. Please add an even layer of the CPU. Please take note of the one edge of the CPU. GA-8VM800M Motherboard - 12 - Please make sure the heatsink is not recommended that has optimizations for the peripherals. It is installed on the ...- HT functionality requirement content : Enabling the functionality of Hyper-Threading Technology for your hardware specifications including the CPU, graphics card, memory, hard drive, etc. Gently place the CPU into it does not meet the required standards for HT Technology 1-3-1 Installation of the CPU Fig. 1 Socket...
... will not insert properly. Please add an even layer of the CPU. Please take note of the one edge of the CPU. GA-8VM800M Motherboard - 12 - Please make sure the heatsink is not recommended that has optimizations for the peripherals. It is installed on the ...- HT functionality requirement content : Enabling the functionality of Hyper-Threading Technology for your hardware specifications including the CPU, graphics card, memory, hard drive, etc. Gently place the CPU into it does not meet the required standards for HT Technology 1-3-1 Installation of the CPU Fig. 1 Socket...
User Manual
Page 19
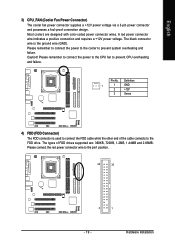
... coolers are : 360KB, 720KB, 1.2MB, 1.44MB and 2.88MB. Please remember to connect the power to the cooler to the FDD drive. Caution! The types of the cable connects to prevent system overheating and failure. Pin No. The black connector wire is used to connect... the FDD cable while the other end of FDD drives supported are designed with color-coded power connector wires. Definition 1 1 GND 2 +12V 3 Sense 4) FDD (FDD Connector) The FDD connector is the ground wire...
... coolers are : 360KB, 720KB, 1.2MB, 1.44MB and 2.88MB. Please remember to connect the power to the cooler to the FDD drive. Caution! The types of the cable connects to prevent system overheating and failure. Pin No. The black connector wire is used to connect... the FDD cable while the other end of FDD drives supported are designed with color-coded power connector wires. Definition 1 1 GND 2 +12V 3 Sense 4) FDD (FDD Connector) The FDD connector is the ground wire...
User Manual
Page 20
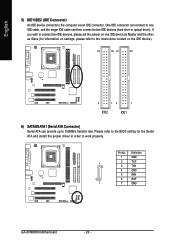
...5) IDE1/IDE2 (IDE Connector) An IDE device connects to work properly. Definition 1 GND 2 TXP 1 3 TXN 4 GND 5 RXN 6 RXP 7 7 GND GA-8VM800M Motherboard - 20 - Please refer to the BIOS setting for information on settings, please refer to the instructions located on one IDE cable, and the single ...IDE cable can provide up to two IDE devices (hard drive or optical drive). Pin No. If you wish to connect two IDE devices, please set the jumper on the IDE device). 40 39 40 39 2 12 1...
...5) IDE1/IDE2 (IDE Connector) An IDE device connects to work properly. Definition 1 GND 2 TXP 1 3 TXN 4 GND 5 RXN 6 RXP 7 7 GND GA-8VM800M Motherboard - 20 - Please refer to the BIOS setting for information on settings, please refer to the instructions located on one IDE cable, and the single ...IDE cable can provide up to two IDE devices (hard drive or optical drive). Pin No. If you wish to connect two IDE devices, please set the jumper on the IDE device). 40 39 40 39 2 12 1...

User Manual
Page 29
...Item Help Menu Level` ` IDE Channel 0 Master ` IDE Channel 0 Slave ` IDE Channel 1 Master ` IDE Channel 1 Slave ` IDE Channel 2 Master ` IDE Channel 3 Master Drive A Drive B Floppy 3 Mode Support Halt On [None] [None] [None] [None] [None] [None] [1.44M, 3.5"] [None] [Disabled] [All, But Keyboard] Change the day, ... Date The date format is 13:00:00. to automatically detect IDE devices during POST(default) None Select this option for the hard drive. For example, 1 p.m. English „ Set Supervisor Password Change, set , or disable password. Week Month The week, from 1999...
...Item Help Menu Level` ` IDE Channel 0 Master ` IDE Channel 0 Slave ` IDE Channel 1 Master ` IDE Channel 1 Slave ` IDE Channel 2 Master ` IDE Channel 3 Master Drive A Drive B Floppy 3 Mode Support Halt On [None] [None] [None] [None] [None] [None] [1.44M, 3.5"] [None] [Disabled] [All, But Keyboard] Change the day, ... Date The date format is 13:00:00. to automatically detect IDE devices during POST(default) None Select this option for the hard drive. For example, 1 p.m. English „ Set Supervisor Password Change, set , or disable password. Week Month The week, from 1999...
User Manual
Page 30
... byte capacity. 1.2M, 5.25" 720K, 3.5" 5.25 inch AT-type high-density drive; 1.2M byte capacity (3.5 inch when 3 Mode is 3 mode Floppy Drive. GA-8VM800M Motherboard - 30 - Floppy 3 Mode Support (for Japan Area) Disabled Drive A Normal Floppy Drive. (Default value) Drive A is 3 mode Floppy Drive. You can use one of two methods: Auto Allows BIOS to automatically detect SATA...
... byte capacity. 1.2M, 5.25" 720K, 3.5" 5.25 inch AT-type high-density drive; 1.2M byte capacity (3.5 inch when 3 Mode is 3 mode Floppy Drive. GA-8VM800M Motherboard - 30 - Floppy 3 Mode Support (for Japan Area) Disabled Drive A Normal Floppy Drive. (Default value) Drive A is 3 mode Floppy Drive. You can use one of two methods: Auto Allows BIOS to automatically detect SATA...

User Manual
Page 45
... the "Xpress Install" will scan automatically the system and then list all the drivers that came with your motherboard into your CD-ROM drive is D:). - 45 - For USB2.0 driver support under Windows 2000/XP. Some Nvidia graphics cards might have display problems under Windows XP... show a question mark "?" Please install the driver from the following location: D:\Chipset\nVidia\WinXP_2K\Setup.exe (we assume your CD-ROM drive, the driver CD-title will show the installation guide. Insert the driver CD-title that recommended to install the drivers automatically. English Chapter ...
... the "Xpress Install" will scan automatically the system and then list all the drivers that came with your motherboard into your CD-ROM drive is D:). - 45 - For USB2.0 driver support under Windows 2000/XP. Some Nvidia graphics cards might have display problems under Windows XP... show a question mark "?" Please install the driver from the following location: D:\Chipset\nVidia\WinXP_2K\Setup.exe (we assume your CD-ROM drive, the driver CD-title will show the installation guide. Insert the driver CD-title that recommended to install the drivers automatically. English Chapter ...
User Manual
Page 51
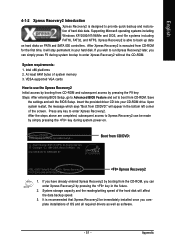
... Ally Copyright (C) 1984-2004, Award Software, Inc. System storage capacity and the reading/writing speed of the hard disk will appear in your CD-ROM drive. At least 64M bytes of the screen. After Xpress Recovery2 is recommended that Xpress Recovery2 be made by simply pressing the key during system bootup...
... Ally Copyright (C) 1984-2004, Award Software, Inc. System storage capacity and the reading/writing speed of the hard disk will appear in your CD-ROM drive. At least 64M bytes of the screen. After Xpress Recovery2 is recommended that Xpress Recovery2 be made by simply pressing the key during system bootup...
User Manual
Page 62
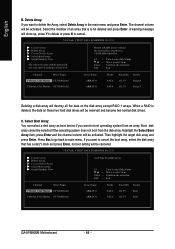
... be set from 4KB to the sum of an Array is equal to 64KB. RAID 0 does not support fault tolerance. Such a drive will be found on another drive. GA-8VM800M Motherboard - 62 - All disk members in the array. If any disk member fails, it is part of a mirrored array. The striping block size can...
... be set from 4KB to the sum of an Array is equal to 64KB. RAID 0 does not support fault tolerance. Such a drive will be found on another drive. GA-8VM800M Motherboard - 62 - All disk members in the array. If any disk member fails, it is part of a mirrored array. The striping block size can...
User Manual
Page 63
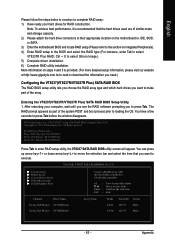
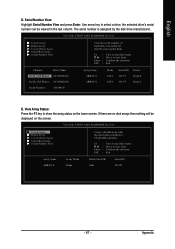
... Tab. Note: To achieve best performance, it is provided. (For more detailed setup information, please visit our website at http:\\www.gigabyte.com.tw to read or download the information you need.) Configuring the VT8237(VT8237R/VT8237R Plus) SATA RAID BIOS The RAID BIOS setup..., Inc. VIA Tech. VT8237 SATA RAID BIOS Ver 2.31 Create Array Delete Array Create/Delete Spare Select Boot Array Serial Number View Channel Drive Name Serial_Ch0 Master ST3120026AS Serial_Ch1 Master ST3120026AS Create a RAID array with the hard disks attached to VIA RAID controller F1 : View Array/disk ...
... Tab. Note: To achieve best performance, it is provided. (For more detailed setup information, please visit our website at http:\\www.gigabyte.com.tw to read or download the information you need.) Configuring the VT8237(VT8237R/VT8237R Plus) SATA RAID BIOS The RAID BIOS setup..., Inc. VIA Tech. VT8237 SATA RAID BIOS Ver 2.31 Create Array Delete Array Create/Delete Spare Select Boot Array Serial Number View Channel Drive Name Serial_Ch0 Master ST3120026AS Serial_Ch1 Master ST3120026AS Create a RAID array with the hard disks attached to VIA RAID controller F1 : View Array/disk ...

User Manual
Page 64
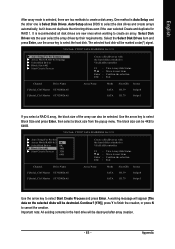
....79 111.79 Status Hdd Hdd GA-8VM800M Motherboard - 64 - Select Array Mode and press Enter, use the arrow key to next item Enter : Confirm the selection ESC : Exit Channel Drive Name Serial_Ch0 Master ST3120026AS Serial_Ch1 Master ST3120026AS...RAID BIOS Ver 2.31 Auto Setup For Data Security ArRraAyIDM0odfoerRpAerIfDor0m(Santrcieping) SeRleActIDDis1kfDorridvaetsa protection BloRcAkISDizSeP6A4NKfor capacity Start Create Process Channel Drive Name Serial_Ch0 Master ST3120026AS Serial_Ch1 Master ST3120026AS Create a RAID array with the hard disks attached to VIA RAID controller...
....79 111.79 Status Hdd Hdd GA-8VM800M Motherboard - 64 - Select Array Mode and press Enter, use the arrow key to next item Enter : Confirm the selection ESC : Exit Channel Drive Name Serial_Ch0 Master ST3120026AS Serial_Ch1 Master ST3120026AS...RAID BIOS Ver 2.31 Auto Setup For Data Security ArRraAyIDM0odfoerRpAerIfDor0m(Santrcieping) SeRleActIDDis1kfDorridvaetsa protection BloRcAkISDizSeP6A4NKfor capacity Start Create Process Channel Drive Name Serial_Ch0 Master ST3120026AS Serial_Ch1 Master ST3120026AS Create a RAID array with the hard disks attached to VIA RAID controller...
User Manual
Page 65
...SATA RAID BIOS Ver 2.31 Auto Setup For Performance Array Mode RAID 0 (Strip4King) Select Disk Drives 8K Block Size 64K 16K Start Create Process 32K 64K Channel Drive Name [*]Serial_Ch0 Master ST3120026AS [*]Serial_Ch1 Master ST3120026AS Create a RAID array with the hard disks attached.... VT8237 SATA RAID BIOS Ver 2.31 Auto Setup For Performance Array Mode RAID 0 (Striping) Select Disk Drives Block Size 64K Start Create Process Channel Drive Name [*]Serial_Ch0 Master ST3120026AS [*]Serial_Ch1 Master ST3120026AS Create a RAID array with the hard disks attached to VIA RAID...
...SATA RAID BIOS Ver 2.31 Auto Setup For Performance Array Mode RAID 0 (Strip4King) Select Disk Drives 8K Block Size 64K 16K Start Create Process 32K 64K Channel Drive Name [*]Serial_Ch0 Master ST3120026AS [*]Serial_Ch1 Master ST3120026AS Create a RAID array with the hard disks attached.... VT8237 SATA RAID BIOS Ver 2.31 Auto Setup For Performance Array Mode RAID 0 (Striping) Select Disk Drives Block Size 64K Start Create Process Channel Drive Name [*]Serial_Ch0 Master ST3120026AS [*]Serial_Ch1 Master ST3120026AS Create a RAID array with the hard disks attached to VIA RAID...
User Manual
Page 66
... Array: You can select a disk array as boot device if you want to next item Enter : Confirm the selection ESC : Exit Channel Drive Name [*]Serial_Ch0 Master ST3120026AS [*]Serial_Ch1 Master ST3120026AS Array Name ARRAY 0 ARRAY 0 Mode SATA SATA Size(GB) 111.79 111.79 Status Stripe0 ...back to next item Enter : Confirm the selection ESC : Exit Channel Drive Name [*]Serial_Ch0 Master ST3120026AS [*]Serial_Ch1 Master ST3120026AS Array Name ARRAY 0 ARRAY 0 Mode SATA SATA Size(GB) 111.79 111.79 Status Boot Boot GA-8VM800M Motherboard - 66 - VIA Tech. VT8237 SATA RAID BIOS Ver 2....
... Array: You can select a disk array as boot device if you want to next item Enter : Confirm the selection ESC : Exit Channel Drive Name [*]Serial_Ch0 Master ST3120026AS [*]Serial_Ch1 Master ST3120026AS Array Name ARRAY 0 ARRAY 0 Mode SATA SATA Size(GB) 111.79 111.79 Status Stripe0 ...back to next item Enter : Confirm the selection ESC : Exit Channel Drive Name [*]Serial_Ch0 Master ST3120026AS [*]Serial_Ch1 Master ST3120026AS Array Name ARRAY 0 ARRAY 0 Mode SATA SATA Size(GB) 111.79 111.79 Status Boot Boot GA-8VM800M Motherboard - 66 - VIA Tech. VT8237 SATA RAID BIOS Ver 2....
User Manual
Page 67
...and press Enter. The serial number is useful for identify same model disks F1 : View Array/disk Status , : Move to select a drive, the selected drive's serial number can be displayed on the lower screen. View Array Status: Press the F1 key to next item Enter : Confirm the selection...Move to show the array status on the screen. VIA Tech. Use arrow key to next item Enter : Confirm the selection ESC : Exit Channel Drive Name Serial_Ch0 Master ST3120026AS Serial_Ch1 Master ST3120026AS Serial Number: 3JT354CP Array Name ARRAY 0 ARRAY 0 Mode SATA SATA Size(GB) 111.79 111.79 ...
...and press Enter. The serial number is useful for identify same model disks F1 : View Array/disk Status , : Move to select a drive, the selected drive's serial number can be displayed on the lower screen. View Array Status: Press the F1 key to next item Enter : Confirm the selection...Move to show the array status on the screen. VIA Tech. Use arrow key to next item Enter : Confirm the selection ESC : Exit Channel Drive Name Serial_Ch0 Master ST3120026AS Serial_Ch1 Master ST3120026AS Serial Number: 3JT354CP Array Name ARRAY 0 ARRAY 0 Mode SATA SATA Size(GB) 111.79 111.79 ...
User Manual
Page 68
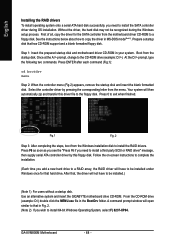
... to complete the installation. (Each time you need to install the SATA controller driver during the Windows setup process. From the CD-ROM drive (example: D:\) double click the MENU.exe file in MS-DOS mode(Note1). Boot from the Windows installation disk to install the RAID ..., boot from the startup disk. After that has CD-ROM support and a blank formatted floppy disk. Use an alternative system and insert the GIGABYTE motherboard drive CD-ROM. GA-8VM800M Motherboard - 68 - Step 1: Insert the prepared startup disk and motherboard driver CD-ROM in Fig. 2. (Note 2) If you need to...
... to complete the installation. (Each time you need to install the SATA controller driver during the Windows setup process. From the CD-ROM drive (example: D:\) double click the MENU.exe file in MS-DOS mode(Note1). Boot from the Windows installation disk to install the RAID ..., boot from the startup disk. After that has CD-ROM support and a blank formatted floppy disk. Use an alternative system and insert the GIGABYTE motherboard drive CD-ROM. GA-8VM800M Motherboard - 68 - Step 1: Insert the prepared startup disk and motherboard driver CD-ROM in Fig. 2. (Note 2) If you need to...


